MLOps Zoomcamp FAQ
Table of Contents
General Course-Related Questions
# I forgot if I registered, can I still join the zoomcamp?
You don't need to register, as registration is not mandatory. It is only used for gauging interest and collecting data for analytics. You can start learning and submitting homework without registering even while a cohort is “live”. There is no check against any registered list.
# Is it going to be live? When?
The course videos are pre-recorded, and you can start watching the course right now.
The zoomcamps are spread out throughout the year. See the article Guide to Free Online Courses at DataTalks Club.
We will also occasionally have office hours — live sessions where we will answer your questions. The office hours sessions are recorded too.
You can see the office hours (playlist with year 20xx) as well as the pre-recorded course videos in the Course Channel’s Bookmarks and/or DTC’s YouTube channel.
# Course - Can I still join the course after the start date?
Yes, even if you don't register, you're still eligible to submit the homeworks as long as the form is still open and accepting submissions.
Be aware, however, that there will be deadlines for turning in the final projects. So don't leave everything to the last minute.
# Course: How do I start?
No matter if you're with a 'live' cohort or following in self-paced mode, start by:
Reading pins and bookmarks on the course channel to see what things are where.


Reading the repository (bookmarked in channel) and watching the video lessons (playlist bookmarked in channel).
If you have questions, search the channel itself first; someone may have already asked and gotten a solution.
For the most Frequently Asked Questions, refer to this document:

If you don't want to read/skimmer/search the FAQ document, tag the
@ZoomcampQABotwhen asking questions, and it will summarize answers from its knowledge base.For generic, non-zoomcamp queries, consider using tools like ChatGPT, BingCopilot, or Google Gemini, especially for error messages.
Check if you're on track by checking the deadlines in the Course Management form for homework submissions.
The main difference if you're not in a "live" cohort is that responses to your questions might be delayed because fewer active students are online. This won't be an issue if you do your own due diligence by searching for answers first and reading the documentation of the library.
- If you need to ask questions and the resources above haven't helped, follow the guidelines in the
asking-questions.mddocument (bookmarked in channel) and also check the Pins.
# Course - Can I still graduate when I didn’t complete homework for week x?
Yes
# Certificate - Can I follow the course in a self-paced mode and get a certificate?
No, you can only get a certificate if you finish the course with a “live” cohort. We don't award certificates for the self-paced mode. The reason is you need to peer-review capstone(s) after submitting a project. You can only peer-review projects at the time the course is running.
# Cohort: What’s the difference between the 2024 and 2023 course?
The difference is the Orchestration and Monitoring modules. Those videos will be re-recorded to use Mage-AI. The rest should mostly be the same.
Additionally, all of the homeworks will be changed for the 2024 cohort.
# Cohort: Will there be a 2024 Cohort? When will the 2024 cohort start?
Yes, it will start in May 2024.
# Cohort: I missed the current cohort, when is the next cohort scheduled for? Will there be a 202x cohort?
Please see the summary of all zoomcamps and their respective schedule at this link.
Note that there's no guarantee the zoomcamps will be run indefinitely or that the same zoomcamps will be conducted every year.
# Homework: What if my answer is not exactly the same as the choices presented?
Please choose the closest one to your answer. Also, do not post your answer in the course Slack channel.
# Homework: where can I find the schedule and/or deadlines of each homework assignment?
You can find the deadlines for each homework assignment in the course schedule or timeline provided at https://courses.datatalks.club/mlops-zoomcamp-2024/. The time is your own local time, as it has been automatically converted.
# Homework: when is the homework due date?
Deadlines differ for participants in different time zones — the cutoff is midnight Berlin time on the published date, and whatever corresponds to that in your time zone. The exact deadline for each homework is shown on the homework submission page:
# Homework: Why is the experiment in question 6 taking so long to run? Should we use yellow taxi data, or green taxi data?
You might need to use the green taxi data rather than yellow taxi data. The preprocessing code provided with the homework expects green taxi data (even though the question specifies yellow taxi data). Using green taxi data seems to be the correct approach, based on similar questions. Note that there is no official confirmation of this yet (as of early morning, May 27th in Berlin).
# Homework: I am getting conflicts on server ports and cannot establish a connection to the MLflow server, why?
Your port (5000) may be in use by some other process. To resolve this:
Run the following command to find out which process is using the port:
lsof -i :5000Either kill the process using that port or route to a different port. You can explicitly change the port with the following command:
mlflow ui --backend-store-uri sqlite:///mlflow.db --port 5001
# Homework 3, 2025 Cohort - Do I have to use MAGE as the orchestrator? Can I use any orchestrator I want?
You do not have to use MAGE or any specific orchestrator; it is totally up to you.
# Homework: Just found this course, can I still submit homeworks?
To clarify on late homework submissions:
- You cannot submit after the homework is scored, as the form is closed.
- Once the form is closed (i.e., scored), no further submissions are possible.
- You can check your code against the solution by reviewing the
homework.mdfile.
If the due date has passed but the form is still "Open/Submittable":
- This is considered a "late homework submission," and the form is still editable.
- Don’t forget to click the Update button to save any changes.
Please note, it's uncertain when the form will be closed as this process is currently manual.
# Hi, is it too late to start the course, I have ML experience?
It really depends on how much time and effort you can dedicate to the project over the coming weeks. Since you're late for the homeworks and they aren't required for the certificate, it might make sense to focus on the projects. Even if the first attempt is a struggle, it will be the best preparation for a second attempt, should you need or want one.
# Project: Are we free to choose our own topics for the final project?
Please pick up a problem you want to solve yourself. Potential datasets can be found on either Kaggle, Hugging Face, Google, AWS, or the UCI Machine Learning Datasets Repository. More links are documented in datasets.md. Please also read the README.md in 07-project folder.
# Project: Is the capstone an individual or team project?
It is an individual project.
# Project: For the final project, is it required to be put on the cloud?
You can get a few cloud points by using Kubernetes even if you deploy it only locally. Alternatively, you can use LocalStack to mimic AWS. Be sure you're clear on the Evaluation Criteria.
# Homework and Leaderboard: what is the system for points in the course management platform?
After you submit your homework, it will be graded based on the number of questions in that particular homework. You can see how many points you have on the homework page at the top.
In the leaderboard, you will find the sum of all points you've earned, which include:
- Points for Homeworks
- Points for FAQs
- Points for Learning in Public
If you submit something to the FAQ, you receive one point. For each Learning in Public link, you also get one point. Hover over the "?" for some explanations.
# What exactly is a learning-in-public post?
They are content that you create about what you have learned on a specific topic. Some DOs and DON’Ts are explained by Alexey in the following video:
https://www.loom.com/share/710e3297487b409d94df0e8da1c984ce
Anyone caught abusing and gaming the system will be publicly called out and have their points stripped so they don’t appear high on the Leaderboard (as of 18 June 2024).
# Leaderboard: I am not on the leaderboard / how do I know which one I am on the leaderboard?
When you set up your account, you are automatically assigned a random name such as “Lucid Elbakyan.” Click on the "Jump to your record on the leaderboard" link to find your entry.
To see what your display name is, click on the Edit Course Profile button.

- The first field is your nickname/displayed name. Change it if you want to use your Slack username, GitHub username, or any other nickname to remain anonymous.
- Unless you want "Lucid Elbakyan" on your certificate, it is mandatory that you change the second field to your official name as per your identification documents (passport, national ID card, driver's license, etc.). This is the name that will appear on your Certificate!
# Error: creating Lambda Function (...): InvalidParameterValueException: The image manifest, config or layer media type for the source image ... is not supported.
This error occurs when the Docker image you are using is a manifest list (multi-platform). AWS Lambda does not support manifest lists—it only accepts single-platform images with a standard image manifest.
Quick fix: Build your Docker image using docker buildx and specify the platform explicitly.
docker buildx build --platform linux/amd64 -t your-ecr-image:latest -f Dockerfile .
This ensures the image is compatible with AWS Lambda. Also, make sure that you push your image using the --platform option.
# Criteria for getting a certificate?
Finish the Capstone project.
# Is completion of Homework necessary for a certificate?
No.
Can I submit the final project on the second attempt and still receive the certificate?
Yes, absolutely. It's your choice whether to submit one or two times; passing any one attempt is sufficient to earn the certificate.
# Where do I find the updated homework playlist and cohort-specific info for the MLOps course?
All cohort-specific information (homework links, video playlist, deadlines, Slack channel) lives in the cohorts/<year>/ folder of the course repo:
Replace 2025 with the current year if you're following a later cohort.
Module 1: Introduction
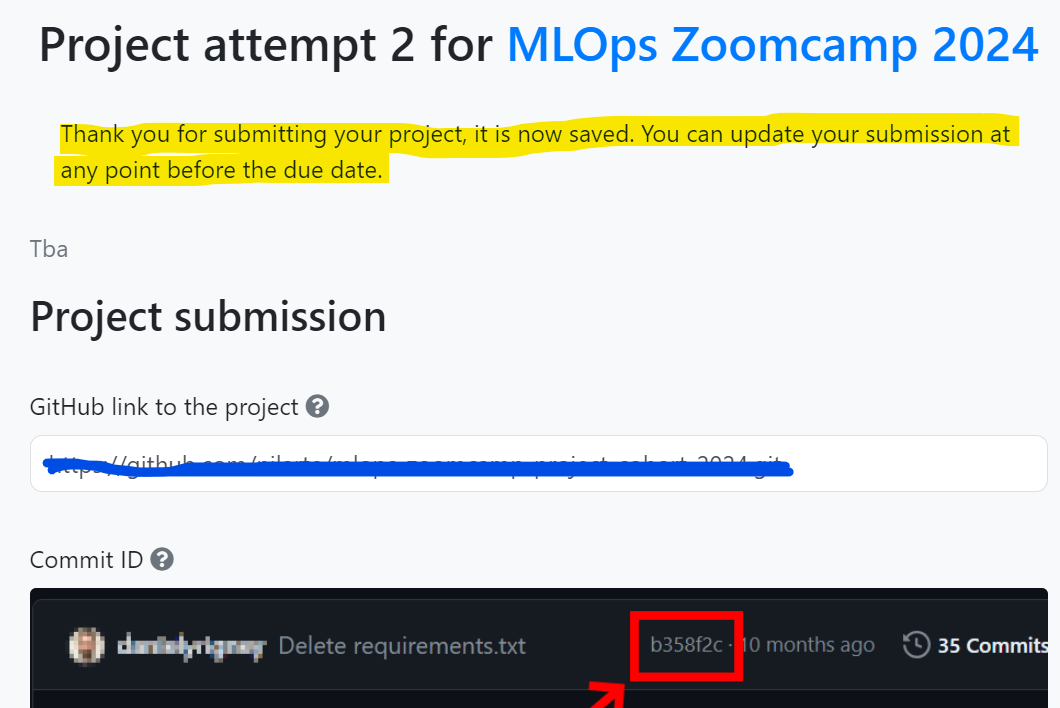
# Can I submit and update my project attempt multiple times before the final deadline?
Yes, you can submit and update your project attempts multiple times before the final deadline.
- It is advisable not to wait until the last minute. Submitting even a partially completed project early allows you to make improvements over time.
- Continue adding improvements as needed until the final date.
- Simply update the Git commit SHA to reflect changes.
# Opening Jupyter in VSCode
You can install the Jupyter extension to open notebooks in VSCode.
# Launching Jupyter notebook from codespace VM
When you are ready and have installed Anaconda, you can launch a Jupyter notebook in a new terminal with the following command:
jupyter notebook
Be careful not to make any typos. For instance, entering "jupyter-notebook" will result in an error:
Jupyter command `jupyter-notebook` not found.
# Configuring Github to work from the remote VM
In case you want to set up a GitHub repository (e.g., for homeworks) from a remote VM, you can follow these helpful tutorials:
- Setting up GitHub on AWS instance: Tutorial
- Setting up keys on AWS instance: GitHub Documentation
Once you complete these steps, you should be able to push to your repository successfully.
AWS Instance Note:
The selected AWS instance may not be covered under the free tier due to its size or other factors. Here is what the AWS free tier includes:
- Resizable compute capacity in the Cloud.
- 750 hours per month of Linux, RHEL, or SLES t2.micro or t3.micro* instance, depending on the region.
- 750 hours per month of Windows t2.micro or t3.micro* instance, depending on the region.
- 750 hours per month of public IPv4 address regardless of the instance type.
*Instances launch in Unlimited mode and may incur additional charges.
# Opening Jupyter in AWS
Faced issue while setting up Jupyter Notebook on AWS. I was unable to access it from my desktop. (I am not using Visual Studio and hence faced problem)
Run the following command:
jupyter notebook --generate-configEdit the file
/home/ubuntu/.jupyter/jupyter_notebook_config.pyto add the following line:NotebookApp.ip = '*'
# WSL: instructions
If you wish to use WSL on your Windows machine, here are the setup instructions:
Install wget:
sudo apt install wgetDownload Anaconda from the Anaconda download page using the
wgetcommand:wget <download-address>Turn on Docker Desktop WSL 2:
Clone the desired GitHub repository:
git clone <github-repository-address>Install Jupyter:
pip3 install jupyterConsider using Anaconda, which includes tools like PyCharm and Jupyter.
Alternatively, download Miniforge for a lightweight, open-source version of conda that supports mamba for improved environment solving speed. The Texas Tech University High Performance Computing Center provides a detailed guide:
For Windows, install WSL via:
wsl --installIf Python shows as version 3.10 after installing Anaconda with Python 3.9, execute:
source .bashrcIf the issue persists, add the following to your PATH:
export PATH="<anaconda-install-path>/bin:$PATH"
For using VSCode with WSL, refer to VSCode on WSL.
# Git: Created repo without .gitignore
If you created a repository without a .gitignore, follow these steps to add one:
Open Terminal.
Navigate to the location of your Git repository.
Create a .gitignore file for your repository:
touch .gitignoreLocate the .gitignore file. If you already have it, open it.
Edit the .gitignore file and add the following lines:
# Python
*.pyc
__pycache__/
*.py[cod]
*$
Save the changes to the .gitignore file.
Commit the changes.
# .gitignore: how-to
If you create a folder data and download datasets or raw files to your local repository, you might want to push all your code to a remote repository without including these files or folders. To achieve this, use a .gitignore file.
Follow these steps to create a .gitignore file:
- Create an empty
.txtfile using a text editor or command line. - Save as
.gitignore(ensure you use the dot symbol). - Add rules:
*.parquetto ignore all Parquet files.data/to ignore all files in thedatafolder.
For more patterns, read the GIT documentation.
<>{IMAGE:image_id}
# AWS: Suggestions
Ensure when stopping an EC2 instance that it fully stops. Look for the status indicator: green (running), orange (stopping), and red (stopped). Refresh the page to confirm it shows a red circle and status as stopped.
Note that stopping an EC2 instance might still incur charges, such as storage costs for uploaded data on an EBS volume.
Consider setting up billing alerts to monitor costs. However, specific instructions for setting them up are not provided here.
# IBM Cloud an alternative for AWS
You can get an invitation code from Coursera and use it in your account to verify it. IBM Cloud offers different features.
# AWS costs:
I am worried about the cost of keeping an AWS instance running during the course.
With the instance specified during working environment setup, if you remember to Stop Instance once you finish your work for the day, using that strategy, in a day with about 5 hours of work, you will pay around $0.40 USD, which will account for $12 USD per month. This seems to be an affordable amount.
You must remember that you will have a different public IP address every time you restart your instance, and you will need to edit your SSH Config file. It's worth the time though.
Additionally, AWS enables you to set up an automatic email alert if a predefined budget is exceeded.
Here is a tutorial to set this up.
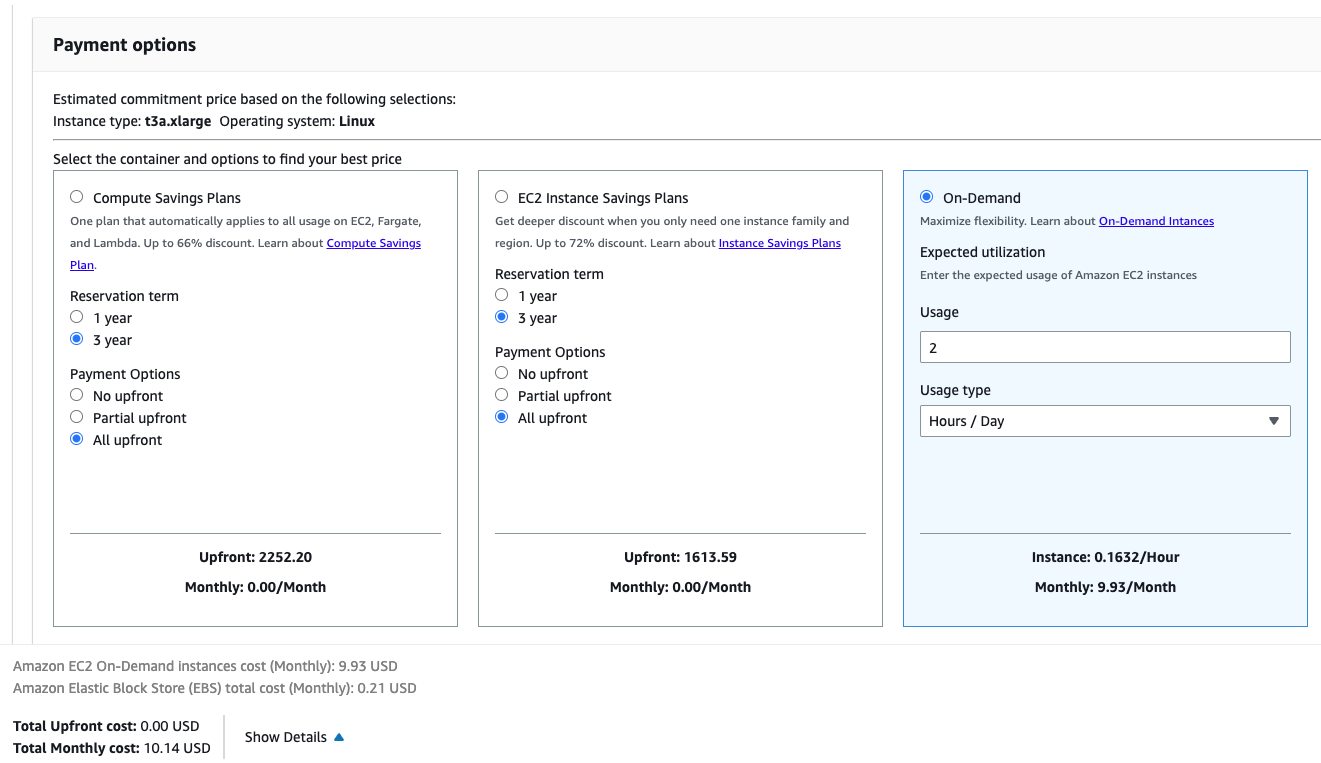
Also, you can estimate the cost yourself using the AWS pricing calculator. At the time of writing (20.05.2023), a t3a.xlarge instance with 2 hr/day usage (which translates to 10 hr/week and should be enough to complete the course) and 30GB EBS monthly cost is 10.14 USD.
Here’s a link to the estimate.
# Is the AWS free tier enough for doing this course?
For many parts - yes. Some services like Kinesis are not in the AWS free tier, but you can use them locally with LocalStack.
# AWS EC2: this site can’t be reached
When I click an open IP address in an AWS EC2 instance, I get an error: "This site can’t be reached." What should I do?
This IP address is not meant to be opened in a browser. It is used to connect to the running EC2 instance via terminal. Use the following command from your local machine or a remote server:
- Assume the IP address is
11.111.11.111 - The downloaded key name is
razer.pem(ensure the key is moved to a hidden folder.ssh) - Your username is
user_name
ssh -i /Users/user_name/.ssh/razer.pem ubuntu@11.111.11.111
# Unprotected private key file!
After running the command:
ssh -i ~/.ssh/razer.pem ubuntu@XX.XX.XX.XX
I encountered the error: "unprotected private key file". To resolve this issue, ensure the file permissions are correctly set by running the following command:
chmod 400 ~/.ssh/razer.pem
For more detailed steps, see this guide.
# AWS EC2 instance constantly drops SSH connection
My SSH connection to AWS cannot last more than a few minutes, whether via terminal or VS Code.
My config:
Host mlops-zoomcamp  # ssh connection calling name
User ubuntu  # username AWS EC2
HostName <instance-public-IPv4-addr>  # Public IP, changes when instance is turned off.
IdentityFile ~/.ssh/name-of-your-private-key-file.pem  # Private SSH key file path
LocalForward 8888 localhost:8888  # Connecting to internal service
StrictHostKeyChecking no
The disconnection occurs whether I SSH via WSL2 or via VS Code, often after running some code like import mlflow.
To reconnect, I need to stop and restart the instance, which assigns a new IPv4 address.
I've checked the steps at AWS's troubleshooting page: AWS SSH Connection Errors
Inbound rule should allow all IPs for SSH.
Expected Behavior:
SSH connection should remain active while using the instance.
Should be able to reconnect if disconnected.
Memory Issue: Disconnections may occur if the instance runs out of memory. Use EC2's screenshot feature to troubleshoot. If it's an OS out-of-memory issue, consider:
- Using a higher compute VM with more RAM.
- Adding a swap file, which uses disk as a RAM substitute to prevent OOM errors.
- Follow Ubuntu's documentation: Ubuntu Swap FAQ.
- Alternatively, follow AWS documentation: AWS Swap File.
Timeout Issue: If connections drop due to timeouts, add the following to your local
.ssh/configfile to ping every 50 seconds:ServerAliveInterval 50
# AWS EC2: How do I handle changing IP addresses on restart?
Every time I restart my EC2 instance, I receive a different IP and need to update the config file manually.
Solution:
You can create a script to automatically update the IP address of your EC2 instance. Refer to this guide for detailed steps.
# VS Code crashes when connecting to Jupyter
Make sure to use an instance with enough compute capabilities such as a t2.xlarge. You can check the monitoring tab in the EC2 dashboard to monitor your instance.
# My connection to my GCP VM instance keeps timing out when I try to connect
If you switched off the VM instance completely in GCP, the IP address may change when it switches back on. You need to update the ssh_config file with the new external IP address. This can be done in VS Code if you have the Remote-SSH extension installed.
- Open the command palette and type
Remote-SSH: Open SSH Configuration File…. - Select the appropriate
ssh_configfile. - Edit the
HostNameto the correct IP address.
# X has 526 features, but expecting 525 features
Error:
ValueError: X has 526 features, but LinearRegression is expecting 525 features as input.
Solution:
The DictVectorizer creates an initial mapping for the features (columns). When calling the DictVectorizer again for the validation dataset, transform should be used as it will ignore features that it did not see when fit_transform was last called. For example:
X_train = dv.fit_transform(train_dict)

X_test = dv.transform(test_dict)
# Missing dependencies
If some dependencies are missing:

Install the following packages:
pandasmatplotlibscikit-learnfastparquetpyarrowseaborn
pip install -r requirements.txt
I have seen this error when using pandas.read_parquet(). The solution is to install pyarrow or fastparquet by running the following command in the notebook:
!pip install pyarrow
Note: If you’re using Conda instead of pip, install fastparquet rather than pyarrow, as it is much easier to install and it’s functionally identical to pyarrow for our needs.
# squared Option Not Available in mean_squared_error
The mean_squared_error function in scikit-learn no longer includes the squared parameter. To compute the Root Mean Squared Error (RMSE), use the dedicated function root_mean_squared_error from sklearn.metrics instead.
# No RMSE value in the options
The evaluation RMSE I get doesn’t figure within the options!
If you’re evaluating the model on the entire February data, try to filter outliers using the same technique you used on the train data (0 ≤ duration ≤ 60) and you’ll get an RMSE which is (approximately) in the options. Also, don’t forget to convert the columns' data types to str before using the DictVectorizer.
Another option:
- Along with filtering outliers, additionally filter on null values by replacing them with
-1. - You will get an RMSE which is (almost) the same as in the options.
- Use the
.round(2)method to round it to 2 decimal points.
Warning Deprecation
The Python interpreter warns of modules that have been deprecated and will be removed in future releases while also suggesting how to update your code. For example:
C:\ProgramData\Anaconda3\lib\site-packages\seaborn\distributions.py:2619:
FutureWarning: `distplot` is a deprecated function and will be removed in a future version. Please adapt your code to use either `displot` (a figure-level function with similar flexibility) or `histplot` (an axes-level function for histograms).
warnings.warn(msg, FutureWarning)
To suppress the warnings, you can include this code at the beginning of your notebook:
import warnings

warnings.filterwarnings("ignore")
# How to replace distplot with histplot
To replace sns.distplot with sns.histplot, you can use the following syntax:
sns.distplot(df_train["duration"])
Can be replaced with:
sns.histplot(
    df_train["duration"], kde=True,
    stat="density", kde_kws=dict(cut=3), bins=50,
    alpha=.4, edgecolor=(1, 1, 1, 0.4),
)
This will give you an almost identical result.
# KeyError: 'PULocationID' or 'DOLocationID'
You need to replace the capital letter "L" with a small one "l".
# ImportError: Unable to find a usable engine; tried using: ‘pyarrow’, ‘fastparquet’.
To resolve this error, run the following command:
!pip install pyarrow
After successfully installing, you can delete the command.
# Reading large parquet files
When reading large parquet files, you might encounter the following error:
IndexError: index 311297 is out of bounds for axis 0 with size 131743
Here are some possible solutions:
Run as a Python Script:
- Try executing your code as a standalone Python script instead of within Jupyter Notebook.
Use PySpark Library:
- Consider using the PySpark library, which is optimized for handling large data files.
Read Parquet in Chunks:
- You can read parquet files in chunks using the pyarrow library. Reference this blog post for more details.
Using these methods may help manage and process large parquet files more efficiently.
# Kernel getting killed during assignment tasks on local
If the Jupyter notebook kernel gets killed repeatedly due to out-of-memory issues when converting a Pandas DataFrame to a dictionary or other memory-intensive steps, try using Google Colab as it offers more memory.
Here's how you can proceed:
Upload the datasets to Google Drive in the folder "Colab Notebooks."
Mount the drive on Colab:
from google.colab import drive
drive.mount('/content/drive')
Pull the data from uploaded tables in Colab:
df_jan = pq.read_table('/content/drive/My Drive/Colab Notebooks/yellow_tripdata_2023-01.parquet').to_pandas()Complete the assignment in Colab.
Download the final assignment to your local machine and copy it into the relevant repository.
# What is the difference between label and one-hot encoding?
Two main encoding approaches are generally used to handle categorical data: label encoding and one-hot encoding.
Label Encoding: Assigns each categorical value an integer based on alphabetical order. Suitable for logical categorical data, such as a rating system or classification.
One-Hot Encoding: Creates new variables using 0s and 1s to represent original categorical data. Useful when there is no inherent order or logic to the categories.
Tools and Implementation
Sci-kit Learn:
- Dictionary Vectorizer: Handles categorical data and generates arrays based on unique instances in a DataFrame or other data structures.
OneHotEncoderclass: Specifically for applying one-hot encoding.
Pandas:
pd.get_dummies(): Similar functionality for one-hot encoding.
Note: Sometimes resetting a dataset into objects is necessary to apply one-hot encoding, especially when there is logical structuring in the data that could influence label encoding, which can be limiting for some applications.
# Distplot takes too long
First, remove the outliers (trips with unusual duration) before plotting.
# RMSE on test set too high
RMSE on the test set was too high when hot encoding the validation set using a previously fitted OneHotEncoder(handle_unknown='ignore') on the training set. In contrast, DictVectorizer yielded the correct RMSE.
In principle, both transformers should behave identically when treating categorical features, especially in scenarios where there are no sequences of strings in each row (as in this week’s homework):
- Features are put into binary columns encoding their presence (1) or absence (0).
- Unknown categories are imputed as zeros in the hot-encoded matrix.
This discrepancy indicates that there might be a difference in how OneHotEncoder and DictVectorizer handle the data after fitting on the training set and applying to the validation set.
# ictVectorizerA: Alexey’s answer
In summary:
pd.get_dummiesor One-Hot Encoding (OHE) can produce results in different orders and handle missing data differently, potentially causing train and validation sets to have different columns.DictVectorizerwill ignore missing values (during training) and new values (during validation) in datasets.
Other sources:
<{IMAGE:image_id}>
# Why did we not use OneHotEncoder(sklearn) instead of DictVectorizer?
There are several reasons for choosing DictVectorizer over OneHotEncoder:
- Simple One-Step Process: DictVectorizer provides a straightforward method to encode both categorical and numerical features from dictionaries, outputting directly to a sparse matrix.
- Ideal for ML Pipelines: The direct output in sparse matrix format makes DictVectorizer a good fit for machine learning pipelines without needing additional preprocessing.
- Use Cases:
- Use OneHotEncoder if you need full control, are working with sklearn pipelines, or need to handle unknown categories safely.
- Use DictVectorizer when your data is in dictionary format (e.g., JSON or from APIs) and you aim for quick integration into the pipeline.
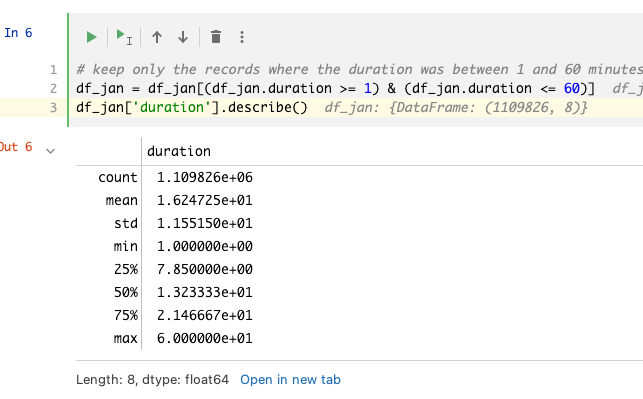
# Clipping outliers
How to check that we removed the outliers?
Use the pandas function describe() which can provide a report of the data distribution along with the statistics to describe the data. For example, after clipping the outliers using a boolean expression, the min and max can be verified using:
df['duration'].describe()
# Replacing NaNs for pickup location and drop off location with -1 for One-Hot Encoding
pd.get_dummies and DictVectorizer both create a one-hot encoding on string values. Therefore, you need to convert the values in PUlocationID and DOlocationID to string.
If you convert the values in PUlocationID and DOlocationID from numeric to string, the NaN values get converted to the string "nan". With DictVectorizer, the RMSE is the same whether you use "nan" or "-1" as the string representation for the NaN values. Therefore, the representation doesn't have to be "-1" specifically; it could also be some other string.
# Slightly different RMSE
Problem: My LinearRegression RMSE is very close to the answer but not exactly the same. Is this normal?
Answer: No, LinearRegression is a deterministic model; it should always output the same results when given the same inputs.
Check the Following:
- Ensure outliers are properly treated in both the train and validation sets.
- Verify that one-hot encoding is correctly applied by inspecting the shape of the one-hot encoded feature matrix. If it shows 2 features, there may be an issue.
- Hint: Convert drop-off and pick-up codes to the proper data format before fitting with
DictVectorizer.
- Hint: Convert drop-off and pick-up codes to the proper data format before fitting with
# Extremely low RMSE
Problem: I’m facing an extremely low RMSE score (e.g., 4.3451e-6) - what should I do?
Answer:
- Recheck your code to see if your model is inadvertently learning the target before making predictions.
- Ensure that the target variable is not included as a parameter while fitting the model. Including it can result in misleadingly low scores.
- Verify that
X_traindoes not contain any part of youry_train. This applies to the validation set as well. - Adjust your data handling to avoid data leakage between your features and the target.
# Enabling Auto-completion in Jupyter Notebook
Problem: How to enable auto-completion in Jupyter Notebook? Tab doesn’t work.
Solution:
You can enable auto-completion by running the following command:
!pip install --upgrade jedi==0.17.2
# Downloading the data from the NY Taxis datasets gives error: 403 Forbidden
Problem: While following the steps in the videos, you may encounter a 403 Forbidden error when trying to download files using wget.
Solution:
The issue occurs because the links point to files on cloudfront.net. An example of such a link is:
https://d37ci6vzurychx.cloudfront.net/trip+data/green_tripdata_2021-01.parquetInstead of downloading the dataset directly from the link, use the dataset URL in your file.
Update (27-May-2023):
- You can now download the data from the official NYC trip record page: TLC Trip Record Data.
- Go to the page, right-click, and use "copy link" to get the URL since the URL provided might change if NYC updates their system.
Example command:
wget https://d37ci6vzurychx.cloudfront.net/trip-data/green_tripdata_2021-01.parquet
# Using PyCharm & Conda env in remote development
Problem: PyCharm (remote) doesn’t see the conda execution path, preventing the use of a conda environment located on a remote server.
Solution:
On the remote server's command line, run:
conda activate envnameThen, execute:
which pythonThis will provide the Python execution path.
Use this path to add a new interpreter in PyCharm:
- Add local interpreter.
- Select system interpreter.
- Enter the path obtained from the previous step.
# Running out of memory
Problem: The output of DictVectorizer was consuming too much memory, causing an inability to fit the linear regression model before running out of memory on a 16 GB machine.
Solution:
- In the example for DictVectorizer on the scikit-learn website, the parameter
sparseis set asFalse. While this helps with viewing results, it greatly increases memory usage. - To address this, either set
sparse=True, or leave it at the default setting, which is alsoTrue.
By using sparse=True, memory usage will be reduced, allowing for more efficient model fitting.
# Activating Anaconda env in .bashrc
Problem: Installing Anaconda didn’t modify the .bashrc profile. This means the Anaconda environment was not activated after exiting and relaunching the Unix shell.
Solution:
For Bash:
- Initiate conda again, which will add entries for Anaconda in the
.bashrcfile.
cd YOUR_PATH_ANACONDA/bin ./conda init bash- This will automatically edit your
.bashrc.
- Initiate conda again, which will add entries for Anaconda in the
Reload:
source ~/.bashrc
# The feature size is different for training set and validation set
While working through HW1, you may notice that the feature sizes for the training and validation datasets are different. This issue often arises when using the incorrect method with a dictionary vectorizer.
Ensure you use the transform method on the premade dictionary vectorizer instead of fit_transform. Since you already have the dictionary vectorizer created, there's no need to execute the fit pipeline on the model.
# Permission denied (publickey) Error (when you remove your public key on the AWS machine)
If you encounter a "Permission denied (publickey)" error after removing your public key from an AWS machine, follow these steps:
Access your machine via Session Manager to recreate your public key. Refer to the guide for more details: Fix Permission Denied Errors.
To retrieve your old public key, use this command:
ssh-keygen -y -f /path_to_key_pair/my-key-pair.pemReplace
/path_to_key_pair/my-key-pair.pemwith the actual path to your key pair.For additional instructions on retrieving the public key, consult the AWS documentation: Retrieving the Public Key.
# Overfitting: Absurdly high RMSE on the validation dataset
Problem: The February dataset has been used as a validation/test dataset and stripped of the outliers in a similar manner to the train dataset (taking only the rows for the duration between 1 and 60, inclusive). The RMSE obtained afterward is in the thousands.
Solution:
- Ensure that the sparse matrix result from
DictVectorizeris not turned into anndarray. After removing that part of the code, a correct result was achieved.
<{IMAGE:image_id}>
If there are further issues, carefully review each preprocessing step to ensure consistency between training and validation datasets.
# Can’t import sklearn
If you encounter an error when trying to import sklearn, specifically:
from sklearn.feature_extraction import DictVectorizer
You can resolve it by installing scikit-learn with the following command:
!pip install scikit-learn
# Install docker in WSL2 without installing Docker Desktop
If you want to install Docker in WSL2 on Windows without Docker Desktop, follow these steps:
Install Docker
You can ignore the warnings during installation.
curl -fsSL https://get.docker.com -o get-docker.sh
sudo sh get-docker.sh
Add Your User to the Docker Group
sudo usermod -aG docker $USEREnable the Docker Service
sudo systemctl enable docker.serviceTest the Installation
Verify that both Docker and Docker Compose are installed successfully.
docker --version
docker compose version
docker run hello-world
Ensure Docker Starts Automatically
If the service does not start automatically after restarting WSL, update your
.profileor.zprofilefile with:if grep -q "microsoft" /proc/version > /dev/null 2>&1; then if service docker status 2>&1 | grep -q "is not running"; then wsl.exe --distribution "${WSL_DISTRO_NAME}" --user root \ --exec /usr/sbin/service docker start > /dev/null 2>&1 fi fi
# Zero elements in sparse matrix (AKA when dictionary vectorizer / categorical X transformation fails)
Seeing a message like:
<2855951x515 sparse matrix of type '<class 'numpy.float64'>' with 0 stored elements in Compressed Sparse Row format>
This issue might occur because your variables, intended for vectorization, were imported as floating point numbers rather than integers. This can lead to nonsensical models. To resolve this, convert your data with the following code (assuming dg is your dataframe and categorical stores the names of your variables to be vectorized):
dg[categorical] = dg[categorical].round(0).astype(int).astype(str)
# Using a docker image as development environment (Linux)
If you don’t want to install Anaconda locally and prefer not to use Codespace or a VPS, you can create and run a Docker image locally.
For this, use the following Dockerfile:
FROM docker.io/bitnami/minideb:bookworm

RUN install_packages wget ca-certificates vim less silversearcher-ag

# Uncomment the `COPY` and comment the `RUN` line if you have downloaded anaconda manually
# I did this to save bandwidth when experimenting with the image creation

RUN wget https://repo.anaconda.com/archive/Anaconda3-2022.05-Linux-x86_64.sh && bash Anaconda3-2022.05-Linux-x86_64.sh -b -p /opt/anaconda3

#COPY Anaconda3-2022.05-Linux-x86_64.sh /tmp/Anaconda3-2022.05-Linux-x86_64.sh

RUN bash /tmp/Anaconda3-2022.05-Linux-x86_64.sh -b -p /opt/anaconda3 && \
    rm /tmp/Anaconda3-2022.05-Linux-x86_64.sh

ENV PATH="/opt/anaconda3/bin:$PATH" \
    HOME="/app"

EXPOSE 8888

WORKDIR /app

USER 1001

ENTRYPOINT [ "jupyter", "notebook", "--ip", "0.0.0.0" ]
Build the image using:
docker build -f Dockerfile -t mlops:v0 .
Then you can run it with:
mkdir app
chmod -R 777 app
docker run --name jupyter -p 8888:8888 -v ./app:/app mlops:v0
In the logs, you will see the Jupyter URL needed to access the environment. The files you create will be stored in the app directory.
# Use uv as a package manager
There is an option to run the project without Anaconda while easily managing multiple Python versions on your machine. The new package manager, uv, is a fast and efficient one written in Rust. It's recommended for use in Python projects overall. Install guide
uv venv --python 3.9.7 # install python 3.9.7 used in the course

source .venv/bin/activate # activate the environment

python -V # should be 3.9.7

uv pip install pandas scikit-learn notebook seaborn pyarrow # install required packages

jupyter notebook # run jupyter notebook
Cleanup is straightforward. Deactivate the environment and delete the folder:
deactivate

rm -rf .venv
# I get `TypeError: got an unexpected keyword argument 'squared'` when using `mean_squared_error(..., squared=False)`. Why?
The squared parameter was added in scikit-learn 0.22. In earlier versions, it is not recognized, which causes the TypeError.
To compute RMSE in older versions:
- Use
np.sqrt(mean_squared_error(...)).
In scikit-learn 1.0 and later, you can use:
from sklearn.metrics import root_mean_squared_error as rmse

rmse_value = root_mean_squared_error(y_train, y_pred)

print('RMSE:', rmse_value)
This approach is more explicit and convenient.
# Visualizing outliers in large datasets with Seaborn: Boxplot vs Histplot
seaborn.boxplot is generally faster because it uses a smaller set of summary statistics (min, Q1, median, Q3, max) to represent the data, which requires less computational effort, especially for large datasets.
seaborn.histplot can be slower, particularly with large datasets, because it needs to bin the data and compute frequency counts for each bin, which involves more processing.
So, if speed is a concern, especially with large datasets, boxplots are typically faster than histograms.
# Reading parquet files with Pandas (pyarrow dependency)
A module that was compiled using NumPy 1.x cannot be run in NumPy 2.2.4 as it may crash.
AttributeError: module 'pyarrow' has no attribute '__version__'
Downgrade the version of your numpy:
pip uninstall numpy -y

conda remove numpy --force

conda clean --all -y

conda install numpy=1.26 -y
Module 2: Experiment Tracking
# Kernel died during Model Training on Github Codespaces
While training the model in Jupyter Notebook on GitHub Codespaces, the Jupyter kernel may die. To resolve this, upgrade the machine type in Codespaces from 8 cores to 14 cores. It is free to upgrade, but be aware that you will use more hours.
# Do we absolutely need to save data to disk? Can we use it directly from download?
Yes, you can use data directly from a URL without saving it to disk. For example, you can use Pandas to read data from a URL:
# Access Denied at Localhost:5000 - Authorization Issue
Localhost:5000 Unavailable // Access to Localhost Denied // You don’t have authorization to view this page (127.0.0.1:5000)
If you are using Chrome, follow these steps:
- Navigate to
chrome://net-internals/#sockets. - Press "Flush Socket Pools".

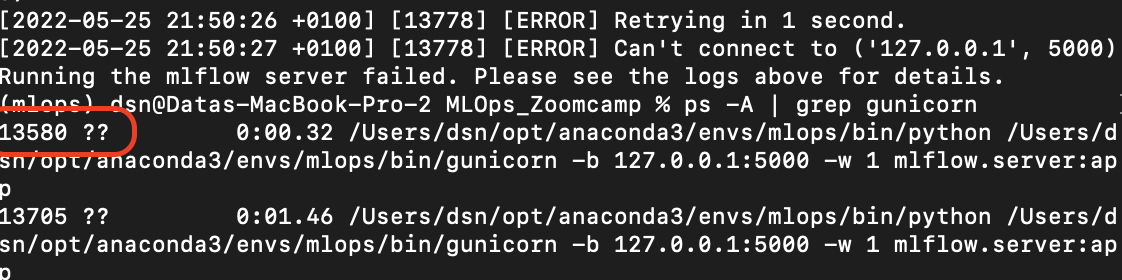
# Connection in use: ('127.0.0.1', 5000)
You have something running on the 5000 port. You need to stop it. Here are some ways to resolve the issue:
Using Terminal on Mac:
Run the command:
ps -A | grep gunicornIdentify the process ID (the first number after running the command).
Kill the process using the ID:
kill 13580where
13580represents the process number.
To Kill All Processes Using Port 5000:
sudo fuser -k 5000/tcpAlternative Command to Kill the Running Port:
kill -9 $(ps -A | grep python | awk '{print $1}')Change to a Different Port:
mlflow ui --backend-store-uri sqlite:///mlflow.db --port 5001
For more information, refer to the source.
# Could not convert string to float - ValueError
Running python register_model.py results in the following error:
ValueError: could not convert string to float: '0 int\n1 float\n2 hyperopt_param\n3 Literal{n_estimators}\n4 quniform\n5 Literal{10}\n6 Literal{50}\n7 Literal{1}'
Full Traceback:
Traceback (most recent call last):

File "/Users/name/Desktop/Programming/DataTalksClub/MLOps-Zoomcamp/2. Experiment tracking and model management/homework/scripts/register_model.py", line 101, in <module>

run(args.data_path, args.top_n)

File "/Users/name/Desktop/Programming/DataTalksClub/MLOps-Zoomcamp/2. Experiment tracking and model management/homework/scripts/register_model.py", line 67, in run

train_and_log_model(data_path=data_path, params=run.data.params)

File "/Users/name/Desktop/Programming/DataTalksClub/MLOps-Zoomcamp/2. Experiment tracking and model management/xfsub/scripts/register_model.py", line 41, in train_and_log_model

params = space_eval(SPACE, params)

File "/Users/name/miniconda3/envs/mlops-zoomcamp/lib/python3.9/site-packages/hyperopt/fmin.py", line 618, in space_eval

rval = pyll.rec_eval(space, memo=memo)

File "/Users/name/miniconda3/envs/mlops-zoomcamp/lib/python3.9/site-packages/hyperopt/pyll/base.py", line 902, in rec_eval

rval = scope._impls[node.name](*args, **kwargs)

ValueError: could not convert string to float: '0 int\n1   float\n2     hyperopt_param\n3       Literal{n_estimators}\n4       quniform\n5         Literal{10}\n6         Literal{50}\n7         Literal{1}'
Solution:
There are two plausible errors related to the hpo.py file where hyper-parameter tuning is run. The objective function should be structured as follows:
Ensure the
withstatement and thelog_paramsfunction are correctly applied to log all runs and parameters:def objective(params): with mlflow.start_run(): mlflow.log_params(params) rf = RandomForestRegressor(**params) rf.fit(X_train, y_train) y_pred = rf.predict(X_valid) rmse = mean_squared_error(y_valid, y_pred, squared=False) mlflow.log_metric('rmse', rmse)Add the
withstatement immediately before the function, just after:X_valid, y_valid = load_pickle(os.path.join(data_path, "valid.pkl"))Log parameters just after defining the
search_spacedictionary:search_space = {....} mlflow.log_params(search_space)
Logging parameters in groups can lead to issues because register_model.py expects to receive parameters individually. Ensure the objective function matches the example above.
# Experiment not visible in MLflow UI


Make sure you launch the MLflow UI from the same directory as the code that is running the experiments (the same directory that contains the mlruns directory and the database that stores the experiments).
Or, navigate to the correct directory when specifying the tracking_uri.
For example:
If the
mlflow.dbis in a subdirectory calleddatabase, the tracking URI would be:sqlite:///database/mlflow.dbIf the
mlflow.dbis a directory above your current directory, the tracking URI would be:sqlite:///../mlflow.db
Another alternative is to use an absolute path to mlflow.db rather than a relative path.
You can also launch the UI from the same notebook by executing the following code cell:
import subprocess

MLFLOW_TRACKING_URI = "sqlite:///data/mlflow.db"

subprocess.Popen(["mlflow", "ui", "--backend-store-uri", MLFLOW_TRACKING_URI])
Then, use the same MLFLOW_TRACKING_URI when initializing MLflow or the client:
from mlflow.tracking import MlflowClient

client = MlflowClient(tracking_uri=MLFLOW_TRACKING_URI)

mlflow.set_tracking_uri(MLFLOW_TRACKING_URI)
# Metrics not visible in mlflow UI
I encountered the following issue: I was able to run experiments and the different model parameters were visible. However, the metrics, including the “handmade” metric rmse in the training script, were not visible (empty field).
I solved my problem by making sure to specify the “key” and “value” explicitly when using mlflow.log_metric:
mlflow.log_metric(key="rmse", value=rmse)
# Unable to create new Experiment
Following the instructions in the video did not work, even though the Jupyter notebook indicates it was successfully created.
It is recommended to set the URI to the listener directly. This discrepancy might be due to differences in the "mlflow" package versions between the video and the latest version we are using. The documentation for the latest "mlflow" package suggests setting the URI as follows:
mlflow.set_tracking_uri(uri="http://127.0.0.1:5000")
# Hash Mismatch Error with Package Installation
When attempting to install MLFlow using pip install mlflow, an error occurs related to a hash mismatch for the Numpy package:
ERROR: THESE PACKAGES DO NOT MATCH THE HASHES FROM THE REQUIREMENTS FILE.
During the installation on 27th May 2022, the following occurred while Numpy was being installed:
Collecting numpy
  Downloading numpy-1.22.4-cp310-cp310-win_amd64.whl (14.7 MB)
  |██████████████              | 6.3 MB 107 kB/s eta 0:01:19
ERROR: THESE PACKAGES DO NOT MATCH THE HASHES FROM THE REQUIREMENTS FILE.
If you have updated the package versions, please update the hashes. Otherwise, examine the package contents carefully; someone may have tampered with them.
- Expected SHA256:
3e1ffa4748168e1cc8d3cde93f006fe92b5421396221a02f2274aab6ac83b077 - Got:
15e691797dba353af05cf51233aefc4c654ea7ff194b3e7435e6eec321807e90
Install Numpy Separately:
Try installing Numpy separately using:
pip install numpy
Install MLFlow:
After successfully installing Numpy, proceed with reinstalling MLFlow:
pip install mlflow
This approach resolved the issue in this instance, although the problem may not be consistently reproducible. Be aware that similar hash mismatch errors might occur during package installations.
# How to Delete an Experiment Permanently from MLFlow UI
After deleting an experiment from the UI, it may still persist in the database. To delete this experiment permanently, follow these steps:
Install
ipython-sqlpip install ipython-sqlLoad SQL Magic Scripts in Jupyter Notebook
%load_ext sqlLoad the Database
Replace
nameofdatabase.dbwith your actual database name:%sql sqlite:///nameofdatabase.dbRun SQL Script
Use SQL commands to delete the experiment permanently. Refer to this link for a detailed guide.
# How to Update Git Public Repo Without Overwriting Changes
Problem: I cloned the public repo, made edits, committed, and pushed them to my own repo. Now I want to get the recent commits from the public repo without overwriting my own changes to my own repo. Which command(s) should I use?
Below is the Git configuration:
[core]
  repositoryformatversion = 0
  filemode = true
  bare = false
  logallrefupdates = true
  ignorecase = true
  precomposeunicode = true

[remote "origin"]
  url = git@github.com:my_username/mlops-zoomcamp.git
  fetch = +refs/heads/*:refs/remotes/origin/*

[branch "main"]
  remote = origin
  merge = refs/heads/main
Solution:
- Fork the original repository from DataClubsTak instead of cloning it directly.
- On GitHub, navigate to your forked repository.
- Click “Fetch and Merge” under the “Fetch upstream” menu on the main page of your own repository.
# Image size of 460x93139 pixels is too large. It must be less than 2^16 in each direction.
This issue is caused by mlflow.xgboost.autolog() in version 1.6.1 of XGBoost. To resolve this:
- Downgrade XGBoost to version 1.6.0 using the following command:
pip install xgboost==1.6.0
- Alternatively, update your requirements file to specify
xgboost==1.6.0.
# MlflowClient object has no attribute 'list_experiments'
Since version 1.29, the list_experiments method was deprecated and then removed in later versions.
You should use the following code instead:
# Register the best model
model_uri = f"runs:/{best_run.info.run_id}/model"
mlflow.register_model(model_uri=model_uri, name="RandomForestBestModel")
For more details, refer to the Mlflow documentation.
# MLflow Autolog not working
Make sure mlflow.autolog() (or framework-specific autolog) is written before with mlflow.start_run(), not after.
Also, ensure that all dependencies for the autologger are installed, including matplotlib. A warning about uninstalled dependencies will be raised.
# MLflow URL ([127.0.0.1:5000](http://127.0.0.1:5000)) doesn't open.
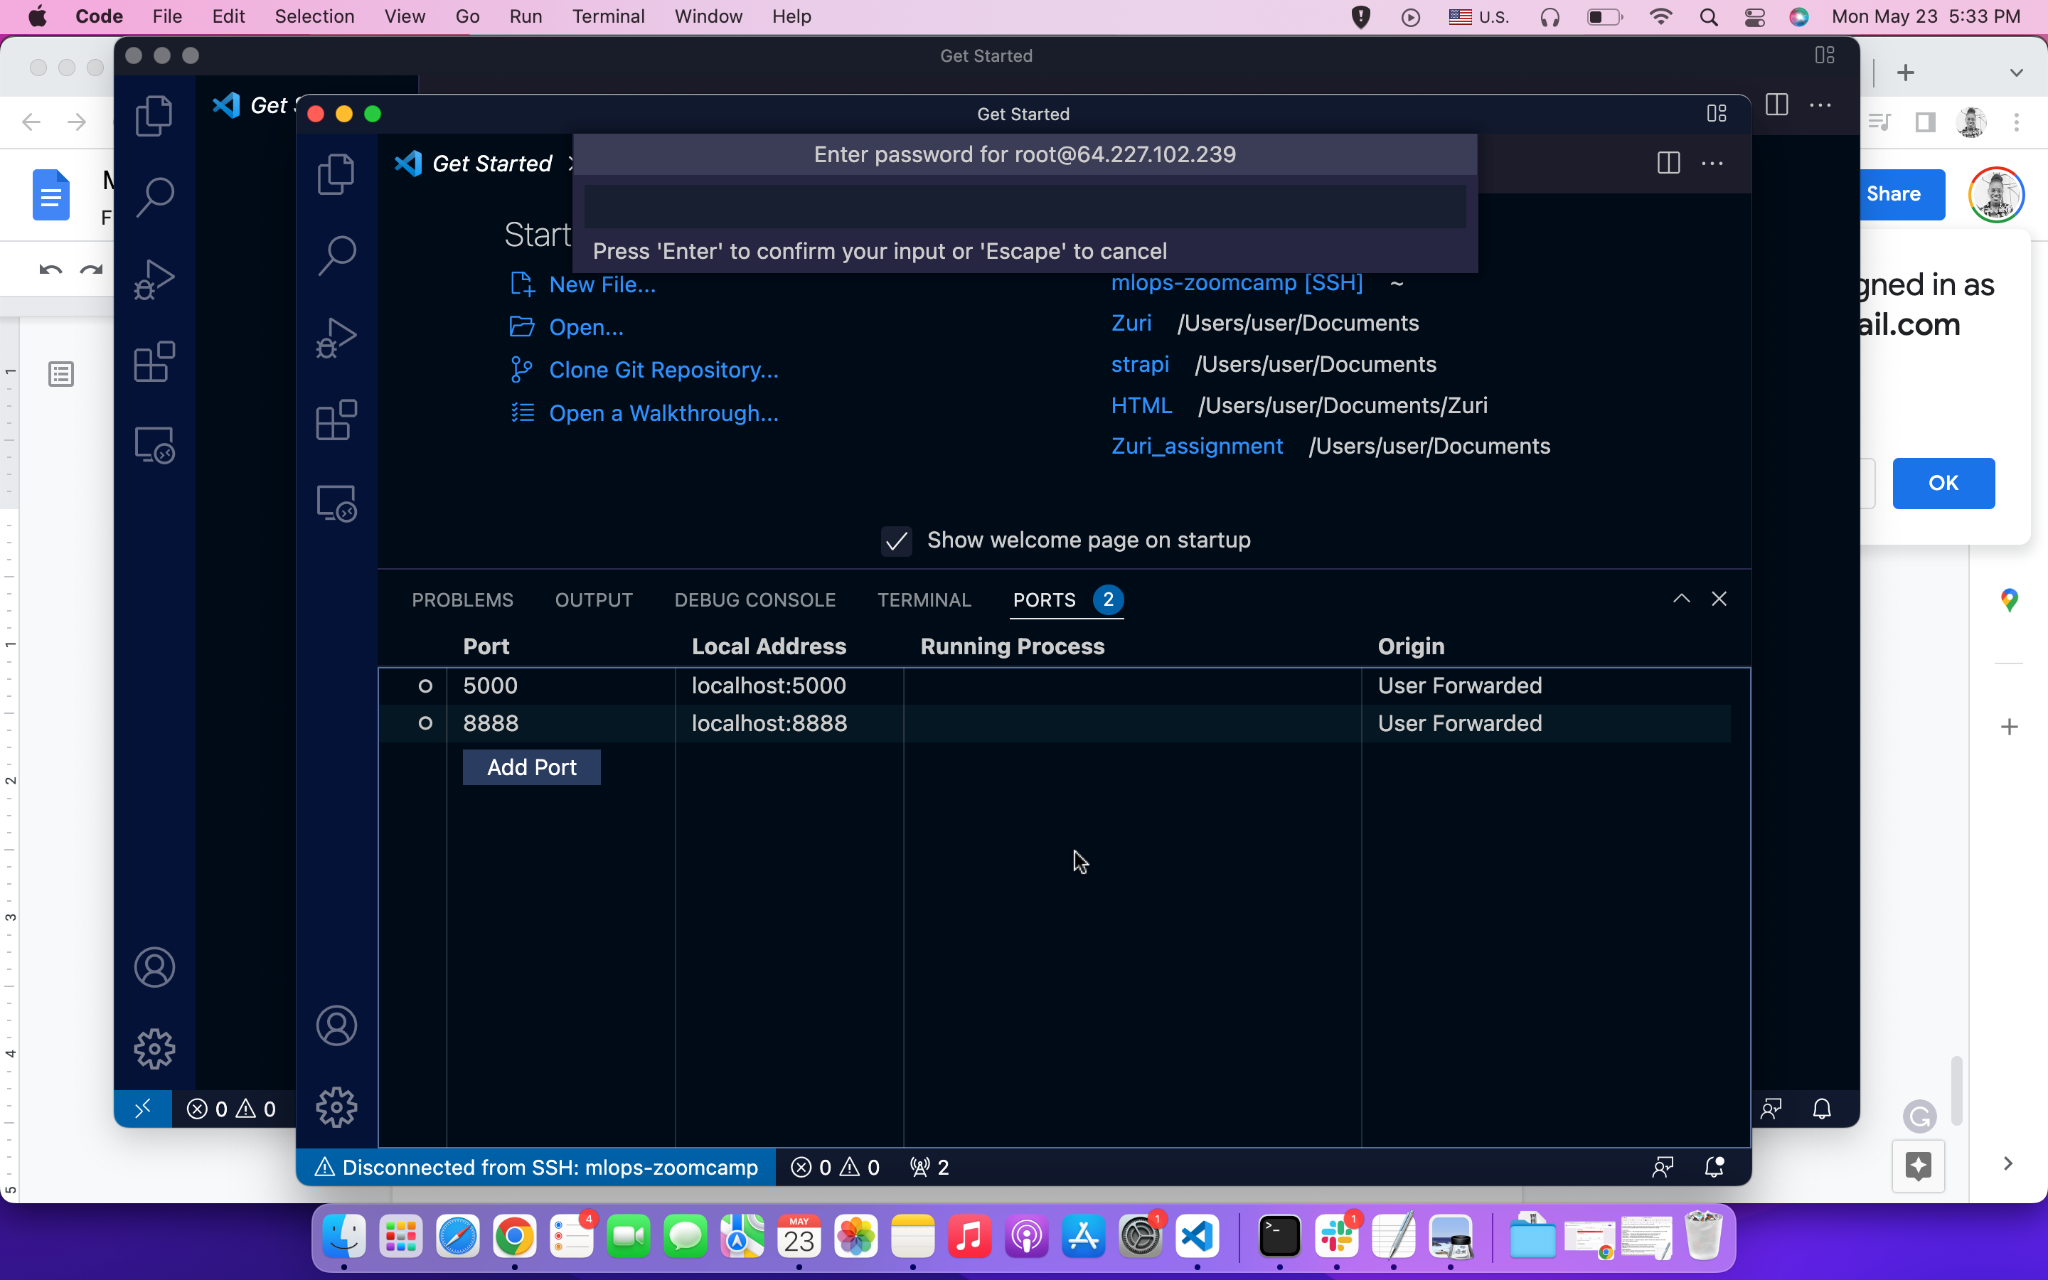
If you’re running MLflow on a remote VM, you need to forward the port too, like we did in Module 1 for the Jupyter notebook port 8888. Simply connect your server to VS Code, as we did, and add 5000 to the PORT.
If you are running MLflow locally and 127.0.0.1:5000 shows a blank page, navigate to localhost:5000 instead.
# MLflow.xgboost Autolog Model Signature Failure
Got the same warning message as Warrie Warrie when using mlflow.xgboost.autolog():

It turned out that this was just a warning message, and upon checking MLflow UI (making sure that no "tag" filters were included), the model was actually automatically tracked in MLflow.
# MlflowException: Unable to Set a Deleted Experiment
raise MlflowException(

mlflow.exceptions.MlflowException: Cannot set a deleted experiment 'random-forest-hyperopt' as the active experiment. You can restore the experiment, or permanently delete the experiment to create a new one.
To resolve this issue, consider the following options:
Restore or Permanently Delete the Experiment: Refer to guidance on Stack Overflow for methods to permanently delete an experiment in MLflow.
Command Line Resolution: If you have deleted the experiment from the MLflow UI, run the following command in the CLI. Make sure to use the correct database filename.
mlflow gc --backend-store-uri sqlite:///backend.dbEnsure .trash is Empty: If the above command does not work and your .trash folder is already empty, confirm this by executing:
rm -rf mlruns/.trash/*Note: Ensure no files remain in
.trash/that could be interfering with the experiment reset.
# No Space Left on Device - OSError[Errno 28]
You do not have enough disk space to install the requirements. Here are some solutions:
Increase EBS Volume on AWS: Follow this guide to increase the base EBS volume.
Add an External Disk on AWS: Add and configure an external disk to your instance, then configure conda installation to happen on this external disk.
Add Persistent Disk on GCP:
- Add another disk to your VM and follow this guide to mount the disk.
- Confirm the mount by running the following command in the bash shell:
df -H- Delete Anaconda and use Miniconda instead. Download Miniconda on the additional disk that you mounted.
- During the Miniconda installation, enter the path to the extra disk instead of the default disk, so that conda is installed on the extra disk.
</ANSWER>
# How can I run MLflow on a remote server and access it from a different domain without encountering the 'Invalid Host header' error during development or testing?
mlflow server --backend-store-uri sqlite:///example.db --host 0.0.0.0 --port 5000 --cors-allowed-origins '*' --x-frame-options NONE --disable-security-middleware
# Homework: Parameters Mismatch in Homework Q3
I was using an old version of sklearn, which caused a mismatch in the number of parameters. In the latest version, min_impurity_split for RandomForestRegressor was deprecated. Upgrading to the latest version resolved the issue.
# Protobuf error when installing MLflow
I installed all the libraries from the requirements.txt document in a new environment with the following command:
pip install -r requirements.txt
Then, when I run mlflow from my terminal like this:
mlflow
I get this error:
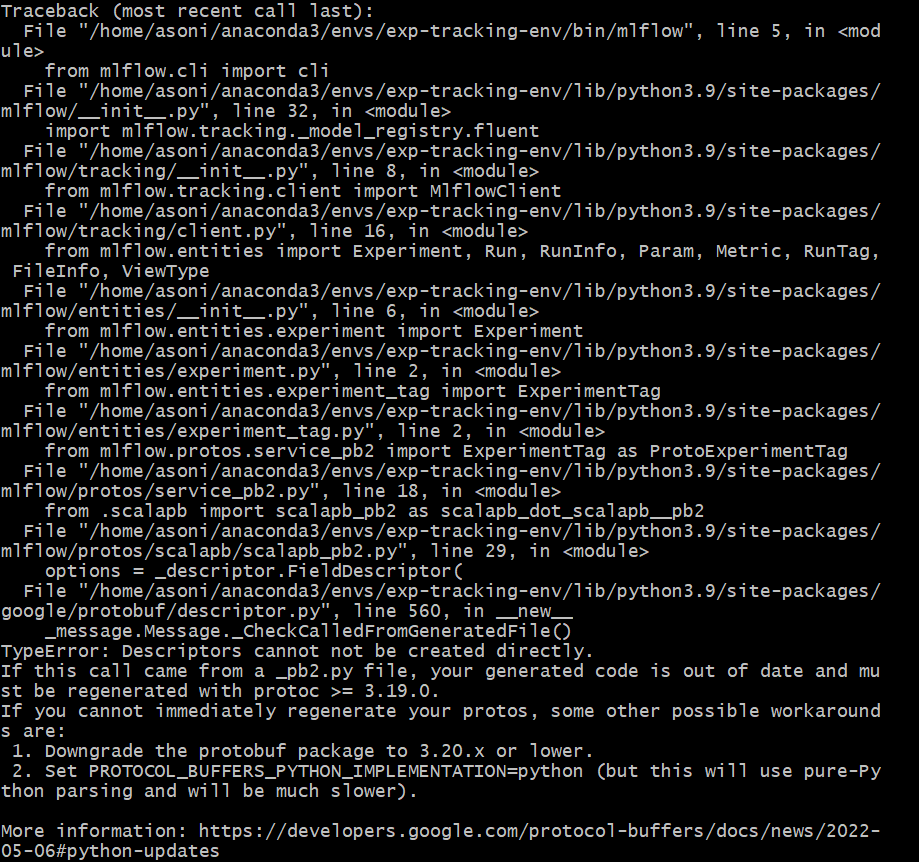
You need to downgrade the version of the protobuf module to 3.20.x or lower. Initially, it was version 4.21. Use the following command to install the compatible version:
pip install protobuf==3.20
After doing this, I was able to run mlflow from my terminal.
# SSH: Connection to AWS EC2 instance from local machine WSL getting terminated frequently within a minute of inactivity.
If the SSH connection from your local machine’s WSL to an AWS EC2 instance is frequently getting terminated after a short period of inactivity, you might see the following message displayed:

To fix this issue, add the following lines to your config file in the .ssh directory of your WSL environment:
ServerAliveInterval 60
ServerAliveCountMax 3
For example, after adding these lines, your SSH configuration should look somewhat like this:
Host mlops-zoomcamp
  HostName 45.80.32.7
  User ubuntu
  IdentityFile ~/.ssh/siddMLOps.pem
  StrictHostKeyChecking no
  ServerAliveInterval 60
  ServerAliveCountMax 3
# Setting up Artifacts folders
Please check your current directory while running the mlflow ui command. You need to run mlflow ui or mlflow server command in the right directory.
# Setting up MLflow experiment tracker on GCP
If you have problems setting up MLflow for experiment tracking on GCP, you can check these two links:
# Setuptools Replacing Distutils - MLflow Autolog Warning
Downgrade setuptools:
- Change from version 62.3.2 to 49.1.0
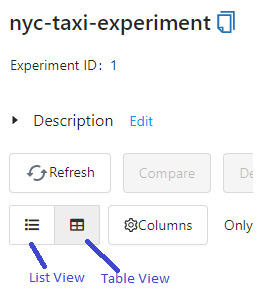
# Sorting runs in MLflow UI
I can’t sort runs in MLflow
Make sure you are in table view (not list view) in the MLflow UI.
# TypeError: send_file() unexpected keyword 'max_age' during MLflow UI Launch
Problem: When running $ mlflow ui on a remote server and attempting to open it in a local browser, the following exception occurs, and the MLflow UI page does not load.
Solution:
Uninstall Flask on your remote server by using:
pip uninstall flaskReinstall Flask with:
pip install FlaskThis issue arises because the base conda environment includes a version of Flask that's less than 1.2. Cloning this environment retains the older version, causing the error. Installing a newer version of Flask resolves the issue.
# mlflow ui on Windows FileNotFoundError: [WinError 2] The system cannot find the file specified
Problem: After successfully installing mlflow using pip install mlflow on a Windows system, running the mlflow ui command results in the error:
FileNotFoundError: [WinError 2] The system cannot find the file specified
Solution:
Add C:\Users\{User_Name}\AppData\Roaming\Python\Python39\Scripts to the PATH.
# Unsupported Operand Type Error in hpo.py
Running the command:
python hpo.py --data_path=./your-path --max_evals=50
leads to the following error:
TypeError: unsupported operand type(s) for -: 'str' and 'int'
Full Traceback:
File "~/repos/mlops/02-experiment-tracking/homework/hpo.py", line 73, in <module>
  run(args.data_path, args.max_evals)

File "~/repos/mlops/02-experiment-tracking/homework/hpo.py", line 47, in run
  fmin(

File "~/Library/Caches/pypoetry/virtualenvs/mlflow-intro-SyTqwt0D-py3.9/lib/python3.9/site-packages/hyperopt/fmin.py", line 540, in fmin
  return trials.fmin(

File "~/Library/Caches/pypoetry/virtualenvs/mlflow-intro-SyTqwt0D-py3.9/lib/python3.9/site-packages/hyperopt/base.py", line 671, in fmin
  return fmin(

File "~/Library/Caches/pypoetry/virtualenvs/mlflow-intro-SyTqwt0D-py3.9/lib/python3.9/site-packages/hyperopt/fmin.py", line 586, in fmin
  rval.exhaust()

File "~/Library/Caches/pypoetry/virtualenvs/mlflow-intro-SyTqwt0D-py3.9/lib/python3.9/site-packages/hyperopt/fmin.py", line 364, in exhaust
  self.run(self.max_evals - n_done, block_until_done=self.asynchronous)
Solution:
The --max_evals argument in hpo.py is not defined with a datatype, leading to it being interpreted as a string. It should be an integer to ensure the script functions correctly. Modify the argument definition as follows:
parser.add_argument(
    "--max_evals",
    type=int,
    default=50,
    help="the number of parameter evaluations for the optimizer to explore."
)
# Unsupported Scikit-Learn version
Getting the following warning when running mlflow.sklearn:
2022/05/28 04:36:36 WARNING mlflow.utils.autologging_utils: You are using an unsupported version of sklearn. If you encounter errors during autologging, try upgrading / downgrading sklearn to a supported version, or try upgrading MLflow.
Solution:
- Use scikit-learn version between 0.24.1 and 1.4.2.
Reference: MLflow Documentation
# Mlflow CLI does not return experiments
CLI commands (mlflow experiments list) do not return experiments.
You need to set the environment variable for the Tracking URI:
export MLFLOW_TRACKING_URI=http://127.0.0.1:5000
# Viewing MLflow Experiments using MLflow CLI
Problem:
After starting the tracking server, when trying to use the MLflow CLI commands as listed here, most commands can't find the experiments that have been run with the tracking server.
Solution:
Set the environment variable
MLFLOW_TRACKING_URIto the URI of the SQLite database:export MLFLOW_TRACKING_URI=sqlite:///{path to sqlite database}After setting the environment variable, you can view the experiments from the command line using commands like:
mlflow experiments searchNote: Commands like
mlflow gcmay still not get the tracking URI and need to be passed explicitly as an argument every time the command is run.
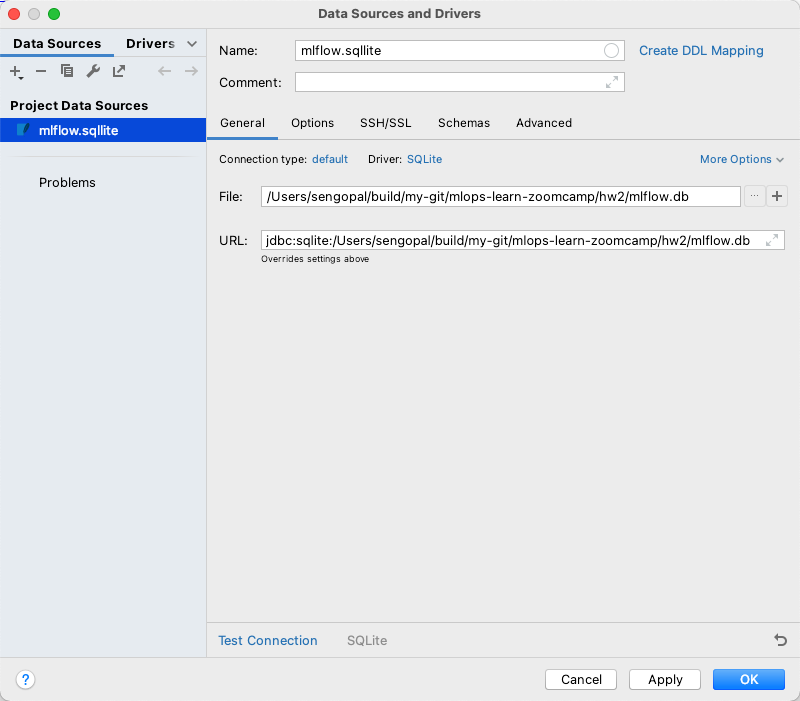
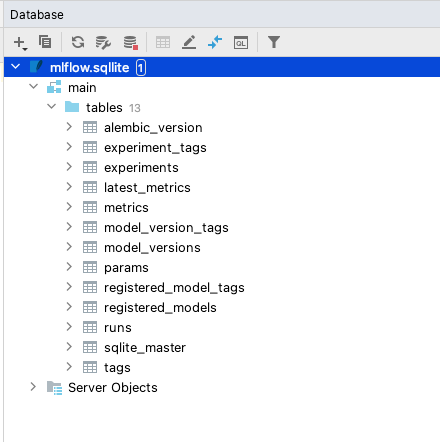
# Viewing SQLite Data Raw & Deleting Experiments Manually
All the experiment and other tracking information in MLflow are stored in an SQLite database provided while initiating the mlflow ui command. This database can be inspected using PyCharm’s Database tab by selecting the SQLite database type.
Once the connection is created, the tables can be queried and inspected using standard SQL. The same applies to any SQL-backed database such as PostgreSQL.
This approach is useful to understand the entity structure of the data being stored within MLflow and is beneficial for systematic archiving of model tracking for extended periods.
# What does launching the tracking server locally mean?
Launching the tracking server locally means starting an MLflow server on your machine for remote hosting. This setup is useful when multiple colleagues are collaborating and need to connect to the same MLflow server instead of running it individually on their laptops.
# Parameter adding in case of max_depth not recognized
Problem: Parameter was not recognized during the model registry.
Solution: Parameters should be added prior to the model registry. Use the following method to add parameters:
mlflow.log_params(params)
This way, the dictionary can be directly appended to data.run.params.
# Max_depth is not recognize even when I add the mlflow.log_params
Max_depth is not recognized even when I add the mlflow.log_params.
The mlflow.log_params(params) should be added to the hpo.py script. If you run it, it will append the new model to the previous run that doesn’t contain the parameters. You should either:
- Remove the previous experiment
- Change it
# AttributeError: 'tuple' object has no attribute 'tb_frame'
Problem: About week_2 homework: The register_model.py script, when copied into a Jupyter notebook, fails and produces the following error:
AttributeError: 'tuple' object has no attribute 'tb_frame'
Solution: Remove click decorators.
# WandB API error
Problem: When running the preprocess_data.py file, you encounter the following error:
wandb: ERROR api_key not configured (no-tty). call wandb.login(key=[your_api_key])
Solution:
Go to your WandB profile and navigate to user settings.
Scroll down to the “Danger Zone” and copy your API key.
Before running
preprocess_data.py, add and run the following cell in your notebook:%%bash wandb login <YOUR_API_KEY_HERE>
# WARNING mlflow.xgboost: Failed to infer model signature: could not sample data to infer model signature: please ensure that autologging is enabled before constructing the dataset.
Please make sure you follow the order below, enabling autologging before constructing the dataset. If you still have this issue, check that your data is in a format compatible with XGBoost.
Enable MLflow autologging for XGBoost
mlflow.xgboost.autolog()Construct your dataset
X_train, y_train = ...Train your XGBoost model
import xgboost as xgb
model = xgb.XGBRegressor(...)

model.fit(X_train, y_train)
# Old version of glibc when running XGBoost
Starting from version 2.1.0, XGBoost distributes its Python package in two variants:
- manylinux_2_28: For recent Linux distributions with glibc 2.28 or newer. This variant includes all features, such as GPU algorithms and federated learning.
- manylinux2014: For older Linux distributions with glibc versions older than 2.28. This variant lacks support for GPU algorithms and federated learning.
If you're installing XGBoost via pip, the package manager automatically selects the appropriate variant based on your system's glibc version. Starting May 31, 2025, the manylinux2014 variant will no longer be distributed.
This means that systems with glibc versions older than 2.28 will not be able to install future versions of XGBoost via pip unless they upgrade their glibc version or build XGBoost from source.
# wget not working
Problem
Using the wget command to download either data or Python scripts on Windows, I am using the notebook provided by Visual Studio and despite having a Python virtual environment, it did not recognize the pip command.
Solution
- Use
python -m pip, this applies to any other command as well, e.g.,python -m wget.
# Open/run github notebook(.ipynb) directly in Google Colab
Problem: Open/run GitHub notebook (.ipynb) directly in Google Colab
Solution:
- Change the domain from
github.comtogithubtocolab.com. The notebook will open in Google Colab. - Note: This only works with public repositories.
Navigating in Wandb UI became difficult to me, I had to intuit some options until I found the correct one.
Solution: Refer to the official documentation.
# Why do we use Jan/Feb/March for Train/Test/Validation Purposes?
We use this type of split approach instead of a random split to address specific needs in model evaluation, primarily focusing on seasonality and preventing data leakage.
"Out of Time" Validations:
- Check for Seasonality:
- By using specific periods like Jan/Feb/March, we can assess if there are seasonal effects in the data.
- Example: If the RMSE for the test period is 5, but the RMSE for validation is 20, this indicates significant seasonality. This might suggest switching to Time Series approaches.
- Check for Seasonality:
Prevent Data Leakage:
- When predicting future outcomes, a "random sample" train/test split can introduce data leakage, resulting in overfitting and poor model performance in production.
- It's crucial not to use future information when predicting the present in a model context.
- Train: January
- Test: February
- Validate: March
The validation process is essential for reporting model metrics to leadership, regulators, auditors, and for analyzing target drift in the models.
<Problem and approach discussed were provided by an internal source.>
# WARNING: mlflow.sklearn: Failed to log training dataset information to MLflow Tracking.
When using MLflow's autolog function, you may encounter the following warning:
WARNING mlflow.sklearn: Failed to log training dataset information to MLflow Tracking. Reason: 'numpy.ndarray' object has no attribute 'toarray'
This occurs because the autolog function is attempting to log your dataset. MLflow expects the dataset to be in a pd.DataFrame format. If you're following course code that provides a numpy.ndarray, MLflow fails as the numpy.ndarray is already an array.
Since we are not processing datasets in this zoomcamp, use the following parameter in the autolog function to prevent logging datasets:
log_datasets = False
# ImportError: urllib3 v2.0 only supports OpenSSL 1.1.1+
If you're encountering this error while running mlflow server against S3 or Postgres (e.g. on an Amazon Linux 2 instance with OpenSSL 1.0.2):
ImportError: urllib3 v2.0 only supports OpenSSL 1.1.1+, currently the 'ssl' module is compiled with 'OpenSSL 1.0.2k-fips 26 Jan 2017'.
Pin urllib3 to a compatible version:
pip3 install "urllib3<1.27"
Alternatively, upgrading mlflow itself often downgrades urllib3 as a side effect, fixing the import:
pip3 install --upgrade mlflow
# AttributeError: 'MlflowClient' object has no attribute 'list_run_infos'
Problem: In the scenario 2 notebook, the error
AttributeError: 'MlflowClient' object has no attribute 'list_run_infos'
is thrown when running:
run_id = client.list_run_infos(experiment_id='1')[0].run_id
Solution: Use the following code instead:
run_id = client.search_runs(experiment_ids='1')[0].info.run_id
Scenario: This solution works for MLflow version 2.12.2 and might work for other recent versions as of May, 2024.
# When using Autologging, do I need to set a training parameter to track it on Mlflow UI?
No, in the official documentation it’s mentioned that autologging keeps track of the parameters even when you do not explicitly set them when calling .fit.
You can run the training, only setting the parameters you want, but you can check all the parameters in the MLflow UI.
# Hyperopt is not installable with Conda
Description
When setting up your virtual environment with
conda install --file requirements.txt
you may encounter the following error:
PackagesNotFoundError: The following packages are not available from current channels:

- hyperopt
Solution
Your conda installation might be out of date. You can update Conda with:
conda update -n base -c defaults condaIf updating does not solve the issue, consider installing the package via the Intel channel, as advised on the conda page:
conda install intel::hyperopt
# Error importing xgboost in python with OS mac: library not loaded: @rpath/libomp.dylib
To fix this error, run the following command:
brew install libomp
# Size limit when uploading to GitHub
To manage size limits effectively when uploading to GitHub, add the mlruns and artifacts directories to your .gitignore, like this:
02-experiment-tracking/mlruns
02-experiment-tracking/runnin-mflow-examples/mlruns
02-experiment-tracking/homework/mlruns
02-experiment-tracking/homework/artifacts
Module 3: Orchestration
# Why does MlflowClient no longer support list_experiments?
Older versions of MLflow used client.list_experiments(), but in recent versions, this method was replaced.
Use client.search_experiments() instead.
# Mage shortcut key to open Text Editor is not working on Windows
On Windows, use the shortcut key CTRL+WIN+..
For MacOS, the shortcut is CMD+..
# Mage: Pipeline breaks with `[Errno 2] No such file or directory: '/home/src/mage_data/{…} /.variables/{...}/output_1/object.joblib'`
- Export the pipeline as a zip file.
- Create a new Mage project.
- Import the pipeline zip to the new project.
Additionally, check the following:
- Review the logs of the upstream block that was expected to generate
object.joblib. Ensure it completed successfully. - Verify that the expected output (often named
output_1) was created and saved. - Check in the Mage UI or directly in the file system (if accessible) to confirm whether the file exists in the
.variablesdirectory for that upstream block.
# Docker: Update docker-compose to initiate Mage
When running ./scripts/start.sh, the following error occurs:
ERROR: The Compose file './docker-compose.yml' is invalid because:

Unsupported config option for networks: 'app-network'

Unsupported config option for services: 'magic-platform'
Solution:
Download the latest version of Docker Compose
sudo curl -L "https://github.com/docker/compose/releases/latest/download/docker-compose-$(uname -s)-$(uname -m)" -o /usr/local/bin/docker-composeApply executable permissions to the binary
sudo chmod +x /usr/local/bin/docker-compose
# Mage in Codespaces in a subfolder under mlops-zoomcamp repository
Issue 1: Errors such as:
[+] Running 1/1

✘ magic-database Error too many requests: You have reached your pull rate limit. You may increase the limit by authenticating and upgra...

Error response from daemon: too many requests: You have reached your pull rate limit. You may increase the limit by authenticating and upgrading: [docker.com](https://www.docker.com/increase-rate-limit)
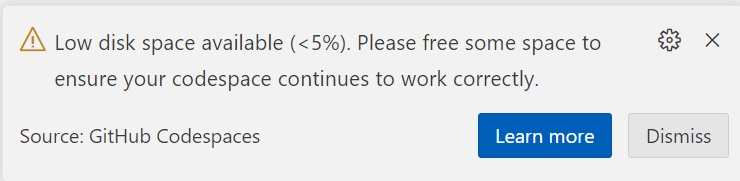
Issue 2: Popups with different percentage values indicating space is in single digits.
Solution: It is not recommended to set up Mage as a subfolder of mlops-zoomcamp. See findings in this thread for more information.
# Mage in Codespaces
The below errors seem to occur only when using Mage in Codespaces.
Errors
Error (1)
Cannot connect to the Docker daemon at unix:///var/run/docker.sock. Is the docker daemon running?Error (2)
Error response from daemon: invalid volume specification: '/workspaces/mage-mlops:/:rw': invalid mount config for type "bind": invalid specification: destination can't be '/'Solution for (1) & (2):
- Stay tuned…still testing.
- Running
docker infoanddocker –versionworks fine. - Executing
docker compose down, stopping Codespaces, and reconnecting resolved the errors, though it might not be reproducible for everyone.
Error (3)
warning: unable to access '/home/codespace/.gitconfig': Is a directorySolution (3):
This is targeted for 3.5.x Deploying with Mage. If not deploying:
Comment line #20 in
docker-compose.yml.Place a dummy empty file named
.gitconfigin your repo’s root folder.Copy it in the Dockerfile with this line, place it below line #9:
COPY .gitconfig /root/.gitconfig
The reason this happens is that when the file is missing, Docker auto-creates it as a directory instead of a file. Creating a dummy file prevents this.
# Mage updated in UI
When you see the mage version change in the UI after you’ve started the container, and you want to update, follow these steps. Read the release notes first to see if there’s a fix that affected your work and would benefit from an update.
If you want to remain in the previous version, it's also fine unless the fixes were specifically for our zoomcamp coursework (check the repository for any new instructions or PRs added).
Close the browser page.
In the terminal console, bring down the container:
docker compose downRebuild the container with the new mage image:
docker compose build --no-cacheVerify that you see:
[magic-platform 1/4] FROM docker.io/mageai/mageai:alphaThis means that the container is being rebuilt with a new version.
If the image is not updated, press
ctrl+cto cancel the process and pull the image manually:docker pull mageai/mageai:alphaThen rebuild.
Restart the docker container as before:
./scripts/start.sh
Note: This is the same sequence of steps if you want to switch to the latest tagged image instead of using the alpha image.
What does alpha and latest mean?
Latest is the fully released version ready for production use, and it has gone through verification, testing, QA, and whatever else the release cycle entails.
Alpha is the potentially buggy version with fresh new fixes and newly added features; but not yet put through the full beta test (if there’s one), integration testing, and other QA steps. Expect issues to occur.
# Mage Time Series Bar Chart Not Showing
import requests
from io import BytesIO
from typing import List
import numpy as np
import pandas as pd

if 'data_loader' not in globals():
    from mage_ai.data_preparation.decorators import data_loader

@data_loader
def ingest_files(**kwargs) -> pd.DataFrame:
    dfs: List[pd.DataFrame] = []
    for year, months in [(2024, (1, 3))]:
        for i in range(*months):
            response = requests.get(
                f'https://github.com/mage-ai/datasets/raw/master/taxi/green/{year}/{i:02d}.parquet'
            )
            if response.status_code != 200:
                raise Exception(response.text)
            df = pd.read_parquet(BytesIO(response.content))
            # if time series chart on mage error, add code below
            df['lpep_pickup_datetime_cleaned'] = df['lpep_pickup_datetime'].astype(np.int64) // 10**9
            dfs.append(df)
    return pd.concat(dfs)
# Mage: data_exporter block not taking all outputs from previous transformer block
I encountered this issue while trying to run the data_export block that saves the dict vectorizer and the logs of the linear regression model into MLflow. My two distinct outputs were clearly created by the previous transformer block where the linear regression model is trained and the dict vectorizer is fitted to the training dataset.
I received this error while trying to run my export code:
Exception: Block mlflow_model_registry may be missing upstream dependencies. It expected to have 2 arguments, but only received 1. Confirm that the @data_exporter method declaration has the correct number of arguments.
The outputs are stored in a list, and this list is the input with the two outputs as the two elements. I had to modify my code in the data_exporter function to take only one argument and to define the two variables after that:
Dv = output[0]

Lr = output[1]
This adjustment resolved the issue.
# Mage Dashboard on unit_3 is not showing charts
Error: Cannot cast DatetimeArray to dtype float64
Have the runs completed successfully? We need to have successfully running Pipelines in order to populate the mage and mlflow databases.
If all pipelines are successfully completed and you are still getting this error, please provide further information.
# Creating Helper functions in Mage
There’s no need to add the utility functions in each sub-project when you watch the videos as there only needs to be one set. Just verify the code is still the same as in Mage’s mlops repository.
As for the import statements:
from mlops.utils.[...] import [...]
All refer to the same path in the main mlops "parent" project:
/[mage-mlops-repository-name]/mlops/utils/...
# Mage GDP block hangs or fails with `AttributeError: 'NoneType' object has no attribute 'to_dict'`
If the Global Data Products block in Video 3.2.1 takes forever and eventually fails with:
Pipeline run xx for global data product training_set: failed
AttributeError: 'NoneType' object has no attribute 'to_dict'
Try these in order:
Check that the project and repo_path in the block config match your setup:
"project": "unit_2_training",
"repo_path": "/home/src/mlops/unit_2_training",
Restart the kernel from the Run menu, then bring Docker down and back up via the script.
If it still fails, rebuild the block: remove the connections from the
hyperparameter_tuning/sklearnblock to its upstream blocks (click each connector → Remove Connection), delete the Global Data Product block from the Tree panel (right click → Delete Block, ignore dependencies), then drag a fresh Global Data Products block to be the first in the pipeline, rename it to match the video, and re-run it.
You can repeat the same recovery steps for the corresponding file in unit_3_observability.
Reference docs:
# How do you remove a global data product?
There is no way to remove this through the UI. You need to manually edit the global_data_products.yaml, which is stored in your project’s utils function. You can do this through the Text Editor.
# Mage error: TypeError: string indices must be integers
If you've removed and re-added blocks (especially while debugging Global Data Products), the upstream connections may be stale.
- Remove the connections from the
hyperparameter_tuning/sklearnblock in the Tree panel to its upstream blocks. - Re-add these connections.
- Save the pipeline with
Ctrl+S.
# MLflow container error: Can't locate revision identified by …
This means your MLflow container tries to access a db file which was a backend for a different MLflow version than the one you have in the container. Most likely, the MLflow version in the container does not match the MLflow version of the MLflow server you ran in module 2.
The easiest solution is to check which version you worked with before, and change the docker image accordingly.
Open a terminal on your host and activate the conda environment you worked in:
conda activate <your-env-name>Run the following command to check your MLflow version:
mlflow --versionEdit the
mlflow.dockerfileline to your version:RUN pip install mlflow==2.??.??Save the file and rebuild the docker service by running:
docker-compose buildNow you can start up the containers again, and your MLflow container should be able to successfully read your mounted DB file.
# Permission denied in GitHub Codespace
When you encounter a permission denied error while setting up the server in GitHub Codespaces, refer to this guide:
https://askubuntu.com/questions/409025/permission-denied-when-running-sh-scripts
# (root) Additional property mlflow is not allowed
This error means you are not writing below server on the Docker Compose file. To solve the issue:
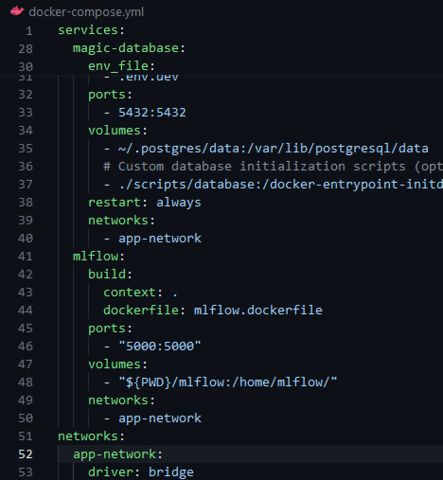
# Q6: Logged model artifacts lost when mlflow container is down or removed
By default, the logged model and artifacts are stored in a local folder in the mlflow container but not in /home/src/mlflow. Therefore, when the container is restarted (after a compose down or container removal), the artifacts are deleted and you cannot see them in the mlflow UI.
To prevent this issue, you can include a new volume in the Docker Compose service for mlflow to map a folder on the local machine to the folder /mlartifacts in the mlflow container:
"${PWD}/mlartifacts:/mlartifacts/"
This way, every data logged to the experiment will be available even when the mlflow container is recreated.
# Q6: mlflow not showing artifacts
When using localstore, try to start mlflow where mlflow.db is present. For example, if mlflow.db is in mlops/mlflow, navigate to that folder and run ../scripts/start.sh. This assumes you followed the instructions in the homework.md file of week 3 and set up the mlops folder.
# Q6: Correct mlflow tracking uri
For the correct mlflow tracking URI, use:
mlflow.set_tracking_uri(uri="http://mlflow:5000")
This assumes you used the suggested Docker file snippet in Homework Question 6.
# I get the following error: invalid mount config for type "bind": invalid specification: destination can't be '/' when running docker compose up when running mage
You should not run docker compose up for the mage repo directly. Instead, use:
bash ./scripts/start.sh
Additional Information
- The
start.shscript handles necessary environment variable settings before executingdocker compose up. - Key environment variables such as
PROJECT_NAMEandMAGE_CODE_PATHshould be set, potentially in your.envfile. - Note that if you are starting a new mage project, like in a capstone project, you may not have a
start.shscript or ascriptsdirectory, so ensure the environment variables are set correctly.
Update by another student from the MLOps Zoomcamp.
# AttributeError: module 'mlflow' has no attribute 'set_tracking_url'
In a mage block, the Python statement mlflow.set_tracking_uri() was returning an attribute error. This issue was observed when running Mage in one container and MLflow in another. If you encounter this, there may be something else in your project with the name "mlflow."
Debugging the Import Issue:
Insert a print statement before the Python statement that produces the attribute error:
print(mlflow.__file__)This will show what the
mlflowmodule points to. It should return a site-packages location, something like:'/usr/local/lib/python3.10/site-packages/mlflow/__init__.py'If not, you may have another file or folder called "mlflow" that is confusing the Python import statement.
Checking Backend Store Location:
Look at the folder name where the
mlflow.dbis being created via this command (either in command line or in the Dockerfile for the MLflow service):mlflow server --backend-store-uri sqlite:///home/mlflow/mlflow.db --host 0.0.0.0 --port 5000If the folder name for the backend store is "mlflow," Python may be trying to import that instead of the MLflow package you installed. Change the backend store folder name to something else, like
mlflow_data.Rename the folder in your local drive (since it gets mounted in
docker-compose.yml).Update the folder name in the Dockerfile for the MLflow service:
- Specify the backend-store-uri in the MLflow server command with the new folder name.
Update the folder name in
docker-compose.yml(when mounting the folder for the MLflow service), e.g.,volumes: - "${PWD}/mlflow_data:/home/mlflow_data/"
If
import mlflowGives a Module Not Found Error:Check the
PYTHONPATHvariable in the container:docker ps # Copy the Mage container ID docker exec -it <container-ID> /bin/bash echo $PYTHONPATHIf you do not see the path to the site-packages directory for your Python version, add it to the
PYTHONPATHenvironment variable.To find out what path to use, execute this from the running container:
import sys
print(sys.path)
Add this to the
PYTHONPATHin the Dockerfile for the Mage service:ENV PYTHONPATH="${PYTHONPATH}:/usr/local/lib/python3.10/site-packages"
# prefect project init Error: No such command 'project'.
The newest version of Prefect does not have the module project. To initiate a project, use the command:
project init
# Video 3.3.4: Training Metrics RMSE chart does not show due to the error: KeyError: ‘rmse_LinearRegression’
Solution: Check the difference between xgboost and sklearn pipelines. In the xgboost pipeline, there is a track_experiment callback, which is missing in the sklearn pipeline.
Please add these lines:
You can refer to them in the similar commit linked here:
# How can I enable communication between Docker containers when invoked from a Kestra task?
 )
)
Use the docker.Run plugin in your Kestra task to run containers. This plugin supports advanced Docker options like custom networks.
For local development, you can use networkMode: host to allow containers to access services on your host (e.g., MLflow running on localhost).
Example:
networkMode: host
Note:
hostmode is only supported on Linux.- For Docker Desktop on Windows/macOS, use
host.docker.internalor create a shared Docker network.
Best Practice:
In production setups, tools like MLflow should run outside Kestra and be accessed over a stable URI (e.g., a cloud endpoint or a container with a known hostname in a shared network).
# How can I integrate my Dockerized ML model into a Mage pipeline?
The most effective approach is to have your Docker container serve the model via an HTTP API (FastAPI or Flask), then call that API from a custom Python block in Mage.
In your Docker container:
- Wrap your model's prediction logic in an API. With FastAPI, create a
/predictendpoint that accepts input data and returns the model's output. - Build and run the container. For local development, run both your model's container and the Mage container with
docker-composeon the same Docker network so they can reach each other by service name.
In your Mage pipeline:
- Add a custom Python block (a transformer or data loader).
- Inside the block, use
requeststo send your input data to the model's/predictendpoint. - Process the returned predictions and pass them downstream — to a database, another transformer, or an exporter.
# Mage: cannot create a Global Data Product across projects
If you try to build a Global Data Product that points at a pipeline in a different Mage project, it fails with:
AttributeError: 'NoneType' object has no attribute 'to_dict'
Mage's Global Data Products are not cross-project. Create the data preparation pipeline inside the same project that consumes it (e.g. unit_2_training) and configure it to build there.
# Video 3.2.8: ValueError: not enough values to unpack (expected 3, got 1)
Ensure the upstream connections for the xgboost training are in the right order:
data→training_setdata_2→hyperparameter_tuning/xgboost
If your tree doesn't look like this:
- Remove the connections for the
xgboostblock. - Reconnect starting with the training set, then
hyperparameter_tuning/xgboost.
Module 4: Deployment
# Fix Out of Memory error while orchestrating the workflow on a ML Pipeline for a high volume dataset.
We come across situations in data transformation & pre-processing as well as model training in a ML pipeline where we need to handle datasets of high dimensionality or high cardinality (usually millions). We often end up with Out of Memory (OOM) errors like below when the flow is running:

If you do not have the option of increasing your RAM, the following approaches can be effective in mitigating this error:
Read Only Required Features/Columns:
- During the data loading step, read only the necessary features/columns from the dataset.
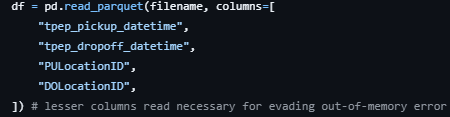
Remove Unused Dataframes:
- Before encoding/vectorizing, remove the dataframe when you have obtained
X_train&y_train.

- Before encoding/vectorizing, remove the dataframe when you have obtained
Create or Resize Swap File:
- If you do not have a swap file or have a small one, create a swap file (size as per memory requirement) or replace the existing one with a properly sized one.
To remove an existing swapfile, use:
sudo swapoff /swapfile
sudo rm /swapfile
To create a new properly sized swapfile (e.g., 16 GB), use:
sudo fallocate -l 16G /swapfile
sudo chmod 600 /swapfile
sudo mkswap /swapfile
sudo swapon /swapfile
To check the swap file created:
free -h
# Docker: aws.exe: error: argument operation: Invalid choice — Docker can not login to ECR.
When using AWS CLI on Windows, you might encounter the following error:
aws.exe: error: argument operation: Invalid choice
Check your AWS CLI version. For example:
aws-cli/2.4.24 Python/3.8.8 Windows/10 exe/AMD64 prompt/offInstead of using the outdated command, use the updated command provided by AWS:
aws ecr get-login-password \
--region <region> \
| docker login \
--username AWS \
--password-stdin <aws_account_id>.dkr.ecr.<region>.amazonaws.com
Refer to the official AWS documentation for additional details: AWS CLI ECR Login Password
Ensure that you replace <region> and <aws_account_id> with your specific values.
# Multiline commands in Windows Powershell
To use multiline commands in Windows PowerShell, place a backtick (`) at the end of each line except the last. Note that multiline strings do not require a backtick.
- Escape double quotes (
") to"\ - Use
$env:to create environment variables (non-persistent). For example:
$env:KINESIS_STREAM_INPUT="ride_events"

aws kinesis put-record --cli-binary-format raw-in-base64-out `

--stream-name $env:KINESIS_STREAM_INPUT `

--partition-key 1 `

--data '{

\"ride\": {

\"PULocationID\": 130,

\"DOLocationID\": 205,

\"trip_distance\": 3.66

},

\"ride_id\": 156

}'
# Pipenv installation not working (AttributeError: module 'collections' has no attribute 'MutableMapping')
If you encounter pipenv failures with the command pipenv install and see the following error:
AttributeError: module 'collections' has no attribute 'MutableMapping'
The issue occurs because you are using the system Python (3.10) for pipenv.
To resolve this issue:
If pipenv was previously installed via
apt-get, remove it using:sudo apt remove pipenvEnsure a non-system Python is installed in your environment. An easy way to achieve this is by installing Anaconda or Miniconda.
Install pipenv using your non-system Python:
pip install pipenvRe-run
pipenv install <dependencies>with the relevant dependencies. It should work without issues.
This solution was tested and worked on an AWS instance similar to the configuration presented in class.
# module is not available (Can't connect to HTTPS URL)
First, check if the SSL module is configured with the following command:
python -m ssl
If the output is empty, there is no problem with the SSL configuration. Then you should upgrade your pipenv package in your current environment to resolve the problem.
# No module named 'pip._vendor.six'
During scikit-learn installation via the command:
pipenv install scikit-learn==1.0.2
The following error is raised:
ModuleNotFoundError: No module named 'pip._vendor.six'
To resolve this issue, follow these steps:
Install the
python-sixpackage:sudo apt install python-sixRemove the existing Pipenv environment:
pipenv --rmReinstall
scikit-learn:pipenv install scikit-learn==1.0.2
# Pipenv with Jupyter
Problem Description: How can we use Jupyter notebooks with the Pipenv environment?
Solution:
Install Jupyter and
ipykernelusing Pipenv.Register the kernel within the Pipenv shell using the following command:
python -m ipykernel install --user --name=my-virtualenv-nameIf you are using Jupyter notebooks in VS Code, this will also add the virtual environment to the list of kernels.
For more details, refer to this Stack Overflow question.
# Pipenv: Jupyter no output
Problem: I tried to run a starter notebook in a Pipenv environment but had issues with no output on prints. I used scikit-learn==1.2.2 and python==3.10. Tornado version was 6.3.2.
Solution: The error you're encountering seems to be a bug related to Tornado, which is a Python web server and networking library. It's used by Jupyter under the hood to handle networking tasks.
- Downgrading to
tornado==6.1fixed the issue.
More information can be found on this Stack Overflow post.
# AWS CLI: 'Invalid base64' error after running `aws kinesis put-record`
Problem Description:
You might encounter an 'Invalid base64' error after executing the aws kinesis put-record command on your local machine. This issue can occur if you are using AWS CLI version 2. In a referenced video (4.4, around 57:42), a warning is visible as the instructor is using version 1 of the CLI.
Solution:
To resolve this issue, use the argument --cli-binary-format raw-in-base64-out when executing the command. This option will encode your data string into base64 before transmitting it to Kinesis.
aws kinesis put-record --cli-binary-format raw-in-base64-out --other-parameters
# Error index 311297 is out of bounds for axis 0 with size 131483 when loading parquet file.
Problem description: Running starter.ipynb in homework’s Q1 will show this error.
Solution:
- Update pandas along with related dependencies to the latest versions.
# Pipenv: Pipfile.lock was not created along with Pipfile
Use the following command to force the creation of Pipfile.lock:
pipenv lock
# Permission Denied using Pipenv
This issue is usually due to the pythonfinder module in pipenv.
The solution involves manually changing the scripts as described here: python_finder_fix
# Going further with Google Cloud Platform: Load and save data to GCS
There is a possibility to load and store data in a Google Cloud Storage bucket. To do that, authenticate through the IDE you are using and allow read and write access to a GCS bucket:
Authenticate gsutil with your GCP account:
gsutil configUpload the data to your GCS bucket:
gsutil cp path/to/local/data gs://your-bucket-nameCreate a service account and manage permissions:
- In the GCP Console, go to "IAM & Admin," then "Service accounts."
- Create a new service account, grant it permissions (e.g., "Storage Object Admin" for GCS access), and generate a JSON key file.
Install the Google Cloud SDK: Google Cloud SDK Installation Guide
Authenticate the SDK with your GCP account:
gcloud auth loginSet your GCP project:
gcloud config set project YOUR_GCP_PROJECT_IDInstall the Google Cloud Storage library:
!pip install google-cloud-storage
Example Script
Here's how to load a CSV file from Google Cloud Storage into a pandas DataFrame:
from google.cloud import storage
import pandas as pd

# Set up the storage client with the service account key
storage_client = storage.Client.from_service_account_json('path/to/service-account-key.json')

# Get the GCS bucket
bucket = storage_client.get_bucket('your-bucket-name')

# List the contents of the bucket
blobs = bucket.list_blobs()
for blob in blobs:
    print(blob.name)

# Load a CSV file from the bucket into a pandas DataFrame
csv_blob = bucket.blob('path/to/csv/in/bucket.csv')
df = pd.read_csv(csv_blob.download_as_string())
You can directly save output data by setting the output file name to your desired GCS URI.
# Error: Error while parsing arguments via CLI [ValueError: Unknown format code 'd' for object of type 'str']
When passing arguments to a script via command line and converting it to a 4-digit number using f’{year:04d}’, this error can occur.
This happens because command line inputs are read as strings. They need to be converted to integers before formatting with an f-string:
year = int(sys.argv[1])
f'{year:04d}'
If you use the click library, update your decorator accordingly:
import click

@click.command()
@click.option("--year", help="Year for evaluation", type=int)
def your_function(year):
    # Your code
# Docker: Dockerizing tips
Ensure the correct image is being used to derive from.
- Copy the data from local to the Docker image using the
COPYcommand to a relative path. Using absolute paths within the image might be troublesome. - Use paths starting from
/appand don’t forget to doWORKDIR /appbefore actually performing the code execution.
Most Common Commands
Build container:
docker build -t mlops-learn .Execute the script:
docker run -it --rm mlops-learn
<mlops-learn> is just a name used for the image and does not have any significance.
# Running multiple services in a Docker container
If you are trying to run Flask with Gunicorn and an MLFlow server from the same container, defining both services in the Dockerfile with CMD will only run MLFlow and not Flask.
Create separate shell scripts with server run commands:
For Flask with Gunicorn:
Save as
script1.sh:#!/bin/bash
gunicorn --bind=0.0.0.0:9696 predict:app ```
For MLFlow server:
Save as
script2.sh:#!/bin/bash
mlflow server -h 0.0.0.0 -p 5000 --backend-store-uri=sqlite:///mlflow.db --default-artifact-root=g3://zc-bucket/mlruns/ ```
Create a wrapper script to run the above two scripts:
Save as
wrapper_script.sh:#!/bin/bash # Start the first process ./script1.sh & # Start the second process ./script2.sh & # Wait for any process to exit wait -n # Exit with status of process that exited first exit $?Give executable permissions to all scripts:
chmod +x *.shDefine the last line of your Dockerfile as:
CMD ./wrapper_script.shDon't forget to expose all ports defined by the services.
# Cannot generate pipfile.lock raise InstallationError( pip9.exceptions.InstallationError)
Problem description: Cannot generate pipfile.lock. Raises InstallationError( pip9.exceptions.InstallationError: Command "python setup.py egg_info" failed with error code 1.
Solution:
You need to force an upgrade of
wheelandpipenv.Run the following command:
pip install --user --upgrade --upgrade-strategy eager pipenv wheel
# Connecting s3 bucket to MLFLOW
How can we connect an S3 bucket to MLflow?
To connect an S3 bucket to MLflow, use boto3 and AWS CLI to store access keys. These access keys allow boto3 (AWS' Python API tool) to authenticate and connect with AWS servers. Without access keys, access to the bucket cannot be verified, which could prevent connection attempts by unauthorized individuals.
Steps:
Ensure Access Keys are Available:
- Access keys are essential for
boto3to communicate with AWS servers securely. - They ensure that only authorized users with the correct permissions can access the bucket.
- Access keys are essential for
Set Bucket as Public (Optional):
- Alternatively, you can set the bucket to public access.
- In this case, access keys are not needed as anyone can access the bucket without authentication.
For more detailed information on credentials management, refer to the official documentation: https://boto3.amazonaws.com/v1/documentation/api/latest/guide/credentials.html
# Uploading to s3 fails with "An error occurred (InvalidAccessKeyId) when calling the PutObject operation: The AWS Access Key Id you provided does not exist in our records."
Even though the upload works using AWS CLI and boto3 in Jupyter notebook.
Solution:
Set the AWS_PROFILE environment variable (the default profile is called default).
# Docker: Dockerizing LightGBM
Problem Description:
lib_lightgbm.so Reason: image not found
Solution:
Add the following command to your Dockerfile:
RUN apt-get install libgomp1Modify the installer command based on your OS if needed.
# Error raised when executing mlflow’s pyfunc.load_model in lambda function.
When the request is processed in a lambda function, the mlflow library raises the following warning:
2022/09/19 21:18:47 WARNING mlflow.pyfunc: Encountered an unexpected error (AttributeError("module 'dataclasses' has no attribute '__version__'")) while detecting model dependency mismatches. Set logging level to DEBUG to see the full traceback.
Solution:
- Increase the memory of the lambda function.
# 4.3 FYI Notebook is end state of Video -
Just a note if you are following the video but also using the repo’s notebook. The notebook is the end state of the video which eventually uses MLflow pipelines.
Just watch the video and be patient. Everything will work :)
# Solution: The notebook in the repo is missing some code, include the code to log the dict_vectorizer. If the error is after using pipelines, update the predict function as seen in the video.
Ensure that the code to log the dict_vectorizer is included in your notebook. If you're using pipelines and encountering an error, update the predict function according to the video instructions to resolve the issue.
# Docker: Passing envs to my docker image
Problem Description:
I was having issues because my Python script was not reading AWS credentials from environment variables. After building the image, I was running it like this:
docker run -it homework-04 -e AWS_ACCESS_KEY_ID=xxxxxxxx -e AWS_SECRET_ACCESS_KEY=xxxxxx
**Environment Variables Order: **
You can set environment variables like
AWS_ACCESS_KEY_ID,AWS_SECRET_ACCESS_KEY, andAWS_SESSION_TOKEN(if using AWS STS). Ensure these variables are passed before the image name:docker run -e AWS_ACCESS_KEY_ID=xxxxxxxx -e AWS_SECRET_ACCESS_KEY=xxxxxx -it homework-04Using an Env File:
You can pass an env file by using the following command, assuming your env file is named
.env:docker run -it homework-04 --env-file .envAWS Configuration Files:
If AWS credentials are not found, the AWS SDKs and CLI will check the
~/.aws/credentialsand~/.aws/configfiles for credentials. You can map these files into your Docker container using volumes:docker run -it --rm -v ~/.aws:/root/.aws homework:v1
# Docker: How to see the model in the docker container in app/?
If you need to view the model inside the Docker container for the image svizor/zoomcamp-model:mlops-3.10.0-slim, follow these steps:
Create a Dockerfile:
FROM svizor/zoomcamp-model:mlops-3.10.0-slimBuild the Docker Image:
docker build -t zoomcamp_test .Run the Container and List the Contents of
/app:docker run -it zoomcamp_test ls /appThe output should include
model.bin, confirming the model is present.
Additional Instructions
You can copy files into the Docker image by adding lines like
COPY myfile .to the Dockerfile, and then run a script with arguments:docker run -it myimage myscript arg1 arg2Remember, a new build is required whenever the Dockerfile is modified.
Alternative Method
To list the contents of /app when the container runs, modify the Dockerfile:
FROM svizor/zoomcamp-model:mlops-3.10.0-slim

WORKDIR /app

CMD ls
- Note:
- Use
CMDto specify commands for container runtime. - Use
RUNfor building the image andCMDduring container execution.
- Use
# WARNING: The requested image's platform (linux/amd64) does not match the detected host platform (linux/arm64/v8) and no specific platform was requested
To resolve this issue, make sure to build the Docker image with the platform tag. Use the following command:
docker build -t homework:v1 --platform=linux/arm64 .
# HTTPError: HTTP Error 403: Forbidden when call apply_model() in score.ipynb
Solution:
Instead of using the following input file:
input_file = f'https://s3.amazonaws.com/nyc-tlc/trip+data/{taxi_type}_tripdata_{year:04d}-{month:02d}.parquet'
Use:
input_file = f'https://d37ci6vzurychx.cloudfront.net/trip-data/{taxi_type}_tripdata_{year:04d}-{month:02d}.parquet'
# ModuleNotFoundError: No module named 'pipenv.patched.pip._vendor.urllib3.response'
If you're encountering the error:
ModuleNotFoundError: No module named 'pipenv.patched.pip._vendor.urllib3.response'
Follow these steps to resolve it:
Reinstall
pipenvwith the following command:pip install pipenv --force-reinstallIf you see an error referring to
site-packages\pipenv\patched\pip\_vendor\urllib3\connectionpool.py, then:Upgrade
pipand installrequests:pip install -U pip pip install requests
# Error: pipenv command not found after pipenv installation
When installing pipenv using the --user option, you need to update the PATH environment variable to run pipenv commands. It's recommended to update your .bashrc or .profile (depending on your OS) to persist the change. Edit your .bashrc file to include or update a line like this:
PATH="<path_to_your_pipenv_install_dir>:$PATH"
Alternatively, you can reinstall pipenv as root for all users:
sudo -H pip install -U pipenv
# Homework/Question 2: Namerror: name ‘year’ is not defined
For question 2, which requires you to prepare the dataframe with the output, you need to first define the year and month as integers.
# Mage error: Error loading custom object at…
When returning an object from a block, you may encounter an error like this:
Error loading custom_object at /home/src/mage_data/*************/pipelines/taxi_duration_pipe/.variables/make_predictions/output_0: [Errno 2] No such file or directory: '/home/src/mage_data/*************/pipelines/taxi_duration_pipe/.variables/make_predictions/output_0/object.joblib'

Error loading custom_object at /home/src/mage_data/*************/pipelines/taxi_duration_pipe/.variables/make_predictions/output_0: [Errno 2] No such file or directory: '/home/src/mage_data/*************/pipelines/taxi_duration_pipe/.variables/make_predictions/output_0/object.joblib'
This occurred when returning a numpy.ndarray, specifically the y_pred variable containing the predictions for the taxi dataset. It seems Mage struggles with some types of objects and expects data structures like DataFrames instead of numpy.ndarrays. To resolve this, you can return a DataFrame that includes both the y_pred and the ride IDs.
# Docker: The arm64 chip doesn’t match with Alexey’s docker image
You may get a warning similar to the one below when trying to run the docker:
WARNING: The requested image's platform (linux/amd64) does not match the detected host platform (linux/arm64/v8) and no specific platform was requested

Python 3.10.13 (main, Mar 12 2024, 12:22:40) [GCC 12.2.0] on linux
Add the tag --platform linux/amd64 when running, and it should work. For example:
docker run -it --platform linux/amd64 --rm -p 9696:9696 homework:v2
# Pipenv installation
Make sure you have Python and pip installed by checking their versions:
python --version
pip --version
To install Pipenv, use the following command:
pip install pipenv --user
# Jupyter: nbconvert error
If you encounter an error when converting your notebook.ipynb into a Python script using the command:
jupyter nbconvert --to script your_notebook.ipynb
and you see the error message:
Jupyter command `jupyter-nbconvert` not found.
follow these steps:
Verify the Directory
Ensure that you're in the directory containing your Jupyter notebook.
Install the Necessary Package
If the issue persists, you may need to install the
nbconvertpackage. Run the following command:pip install nbconvertConvert the Notebook
After installing
nbconvert, use the following command to convert your notebook to a Python script:jupyter nbconvert your_notebook.ipynb --to pythonNote: The correct command is slightly different (
--to pythoninstead of--to script).
# Homework/Question 6: Do not forget to specify that the folder output/yellow should be created in the working directory of your docker file
For question 6, which requires you to include your script in a Dockerfile, specify the creation of the folder output/yellow in the working directory of your Docker container by adding the following line in your Dockerfile:
RUN mkdir -p output/yellow
# Homework/Question 6: Entry point for running scoring script in Docker container
For question 6, if you are using the script as instructed in the homework and not Flask, your entry point should be bash. This can be set by specifying:
ENTRYPOINT = ["bash"]
# Error: Unable to locate credentials
This error appeared when I was running the Jupyter notebooks inside Visual Studio Code in Codespaces. I fixed it by running the Jupyter notebooks outside of Codespaces.
Module 5: Monitoring
# How do I log in to AWS ECR from the terminal using Docker?
The older aws ecr get-login --no-include-email command is deprecated. Use:
aws ecr get-login-password --region us-west-1 | docker login --username AWS --password-stdin <ACCOUNTID>.dkr.ecr.<REGION>.amazonaws.com
Make sure you specify the correct AWS region where your ECR repository is located (e.g., us-west-1). If the region is incorrect or not set properly, the login will fail with a 400 Bad Request error — which doesn't clearly indicate the region is the issue.
# ImportError when using ColumnQuantileMetric with Evidently
While working on the monitoring module homework, the instructions mention using ColumnQuantileMetric. However, attempting to import it results in an error:
ImportError: cannot import name 'ColumnQuantileMetric' from 'evidently.metrics'
The ColumnQuantileMetric class does not exist in current versions of Evidently (e.g., 0.7.8+). The correct class to use is QuantileValue, which serves the same purpose.
Additionally, the expected argument is not column_name, but column. This differs from other metrics like MissingValueCount that use column_name.
If you see a ValidationError: column field required, you are likely using the wrong parameter name.
You can use it as follows:
from evidently.metrics import QuantileValue

QuantileValue(column="fare_amount", quantile=0.5)
This mismatch likely results from outdated references or changes in the library’s API.
# Login window in Grafana
Problem description: When running docker-compose up as shown in video 5.2, if you go to http://localhost:3000/, you are asked for a username and a password.
Solution:
- The default credentials are:
- Username:
admin - Password:
admin
- Username:
- After logging in, you can set a new password.
For more details, see Grafana documentation.
# Error in starting monitoring services in Linux
Problem Description:
In Linux, when starting services using docker compose up --build as shown in video 5.2, the services won’t start and instead we get the message:
unknown flag: --build
Solution:
Since we install docker-compose separately in Linux, use the following command:
docker-compose up --build
# KeyError ‘content-length’ when running prepare.py
Problem: When running prepare.py, encountering KeyError: 'content-length'.
Solution:
From Emeli Dral: It seems the link used in prepare.py to download taxi data is no longer functional. Replace the URL in the script as follows:
url = f"https://nyc-tlc.s3.amazonaws.com/trip+data/{file}"
with:
url = f"https://d37ci6vzurychx.cloudfront.net/trip-data/{file}"
By making this substitution in prepare.py, the problem should be resolved, allowing access to the necessary data.
# Evidently service exit with code 2
When running the command docker-compose up –build and sending data to the real-time prediction service, the service returns "Max retries exceeded with url: /api". This issue occurs because the evidently service exits with code 2 due to "app.py" in the evidently service being unable to import from pyarrow import parquet as pq.
Install the pyarrow module:
pip install pyarrowRestart your machine.
If the first and second solutions don’t work:
- Comment out the
pyarrowmodule in "app.py" of the evidently service, as it may not be used, which resolved the issue in some cases.
- Comment out the
# ValueError: Incorrect item instead of a metric or metric preset was passed to Report
When using Evidently, if you encounter this error, you likely forgot to add parentheses. Simply include opening and closing parentheses to resolve the issue.
# For the report RegressionQualityMetric()
You will get an error if you didn’t add a target='duration_min'.
If you want to use RegressionQualityMetric(), you need a target='duration_min' and you need this added to your current_data['duration_min'].
# Found array with 0 sample(s)
ValueError: Found array with 0 sample(s) (shape=(0, 6)) while a minimum of 1 is required by LinearRegression.
This error occurs because the generated data is based on an early date, resulting in an empty training dataset.
Adjust the following:
begin = datetime.datetime(202X, X, X, 0, 0)
# Adding additional metric
Getting “target columns” “prediction columns” not present errors after adding a metric.
Make sure to read through the documentation on what is required or optional when adding the metric. For example, DatasetCorrelationsMetric doesn’t require any parameters because the metric evaluates for correlations among the features.
# Grafana: Standard login does not work
When trying to log in to Grafana with the standard credentials (admin/admin), an error occurs.
To reset the admin password, use the following command inside the Grafana container:
grafana cli admin reset-admin-password adminNote: The
grafana-clicommand is deprecated. Usegrafana cliinstead.Enter the Docker container with Grafana:
Find the Container ID by running:
docker psUse the Container ID to reset the password. Replace
<container_ID>with the actual Container ID:lpep_pickup_datetime<container_ID> grafana cli admin reset-admin-password admin
This should resolve the login issue.
# The chart in Grafana doesn’t get updates
Problem Description: While my metric generation script was still running, I noticed that the charts in Grafana don’t get updated.
Solution:
- Refresh Interval: Set it to a small value, such as 5, 10, or 30 seconds.
- Timezone Setting: Ensure you use your local timezone in a call to
pytz.timezone. For example, change the setting from "Europe/London" to your local timezone to get updates.
# Prefect: Prefect server was not running locally
Prefect server was not running locally. The command prefect server start was executed but it stopped immediately.
- Used Prefect Cloud to run the script.
- Created an issue on the Prefect GitHub repository.
# Docker: no disk space left error when doing docker compose up
To resolve the "no disk space left" error when running docker compose up, follow these steps:
Run the following command to remove unused objects (build cache, containers, images, etc.):
docker system pruneIf you want to see what is taking up space before pruning, use:
docker system df
# Failed to listen on :::8080 (reason: php_network_getaddresses: getaddrinfo failed: Address family for hostname not supported)
Problem: When running docker-compose up --build, you may encounter this error.
To solve this issue, add the following command in the adminer block in your docker-compose.yml file:
a dminer:
  command: php -S 0.0.0.0:8080 -t /var/www/html
  image: adminer...
This configuration specifies the command to be executed when the container starts, setting up PHP to listen on 0.0.0.0:8080. This addresses the network error by changing the bind address.
# Generate Evidently Chart in Grafana
Problem: Can we generate charts like Evidently inside Grafana?
Solution:
- In Grafana, you can use a stat panel (just a number) and a scatter plot panel, which may require a plug-in.
- Unfortunately, there's no native method to directly recreate the Evidently dashboard.
- Ensure that all relevant information is logged to your Grafana data source, then design your custom plots.
External Recreation:
- Export the Evidently output in JSON with
include_render=Truefor external visualization:- See more details here.
- For non-aggregated visuals, use the option "`raw_data": True".
- More details here.
This specific plot with under- and over-performance segments is particularly useful during debugging and might be easier to view ad hoc using Evidently.
# Error when importing evidently package because of numpy version upgraded
A new version of Numpy has just been released v 2.0.0 (on Jun 16, 2024), which causes an import error of the package.
"`np.chararray` is deprecated and will be removed from "

419     "the main namespace in the future. Use an array with a string "

420     "or bytes dtype instead.", DeprecationWarning, stacklevel=2): `np.float_` was removed in the NumPy 2.0 release. Use `np.float64` instead.
Or
AttributeError: `np.float_` was removed in the NumPy 2.0 release. Use `np.float64` instead.
You can solve it by reinstalling numpy to a previous version 1.26.4. Just run:
python -m pip install numpy==1.26.4
Or modify the requirements.txt to freeze the version:
numpy==1.26.4
# Bind for 0.0.0.0:5432 failed: port is already allocated
Problem: When trying to start the postgres services through docker-compose up, this error occurs:
Bind for 0.0.0.0:5432 failed: port is already allocated
Note: This issue occurs because port 5432 is already used by another service.
Solution: Update the port mapping for the Postgres service to 5433:5432 in the Docker Compose YAML file.
# Table/database not showing on Grafana dashboard
Problem:
For version 5.4, when trying to create a new dashboard, Grafana does not list the dummy_metrics table in the query tab.
Note: Change the datasource name from the default "PostgreSQL."
Solution 1:
Update the config/grafana_datasources.yaml with the following:
# List of datasources to insert/update
# Available in the database
datasources:

- name: NewPostgreSQL
  type: postgres
  url: db:5432
  user: postgres
  secureJsonData:
    password: 'example'
  jsonData:
    sslmode: 'disable'
    database: test
Solution 2:
- Use the "Code" option rather than the "Builder" option.
- Load the data using your own SQL queries. See the screenshot below (box highlighted in red).
- Tip: If you write your
FROMstatement first, theSELECToptions can be done through auto-complete.
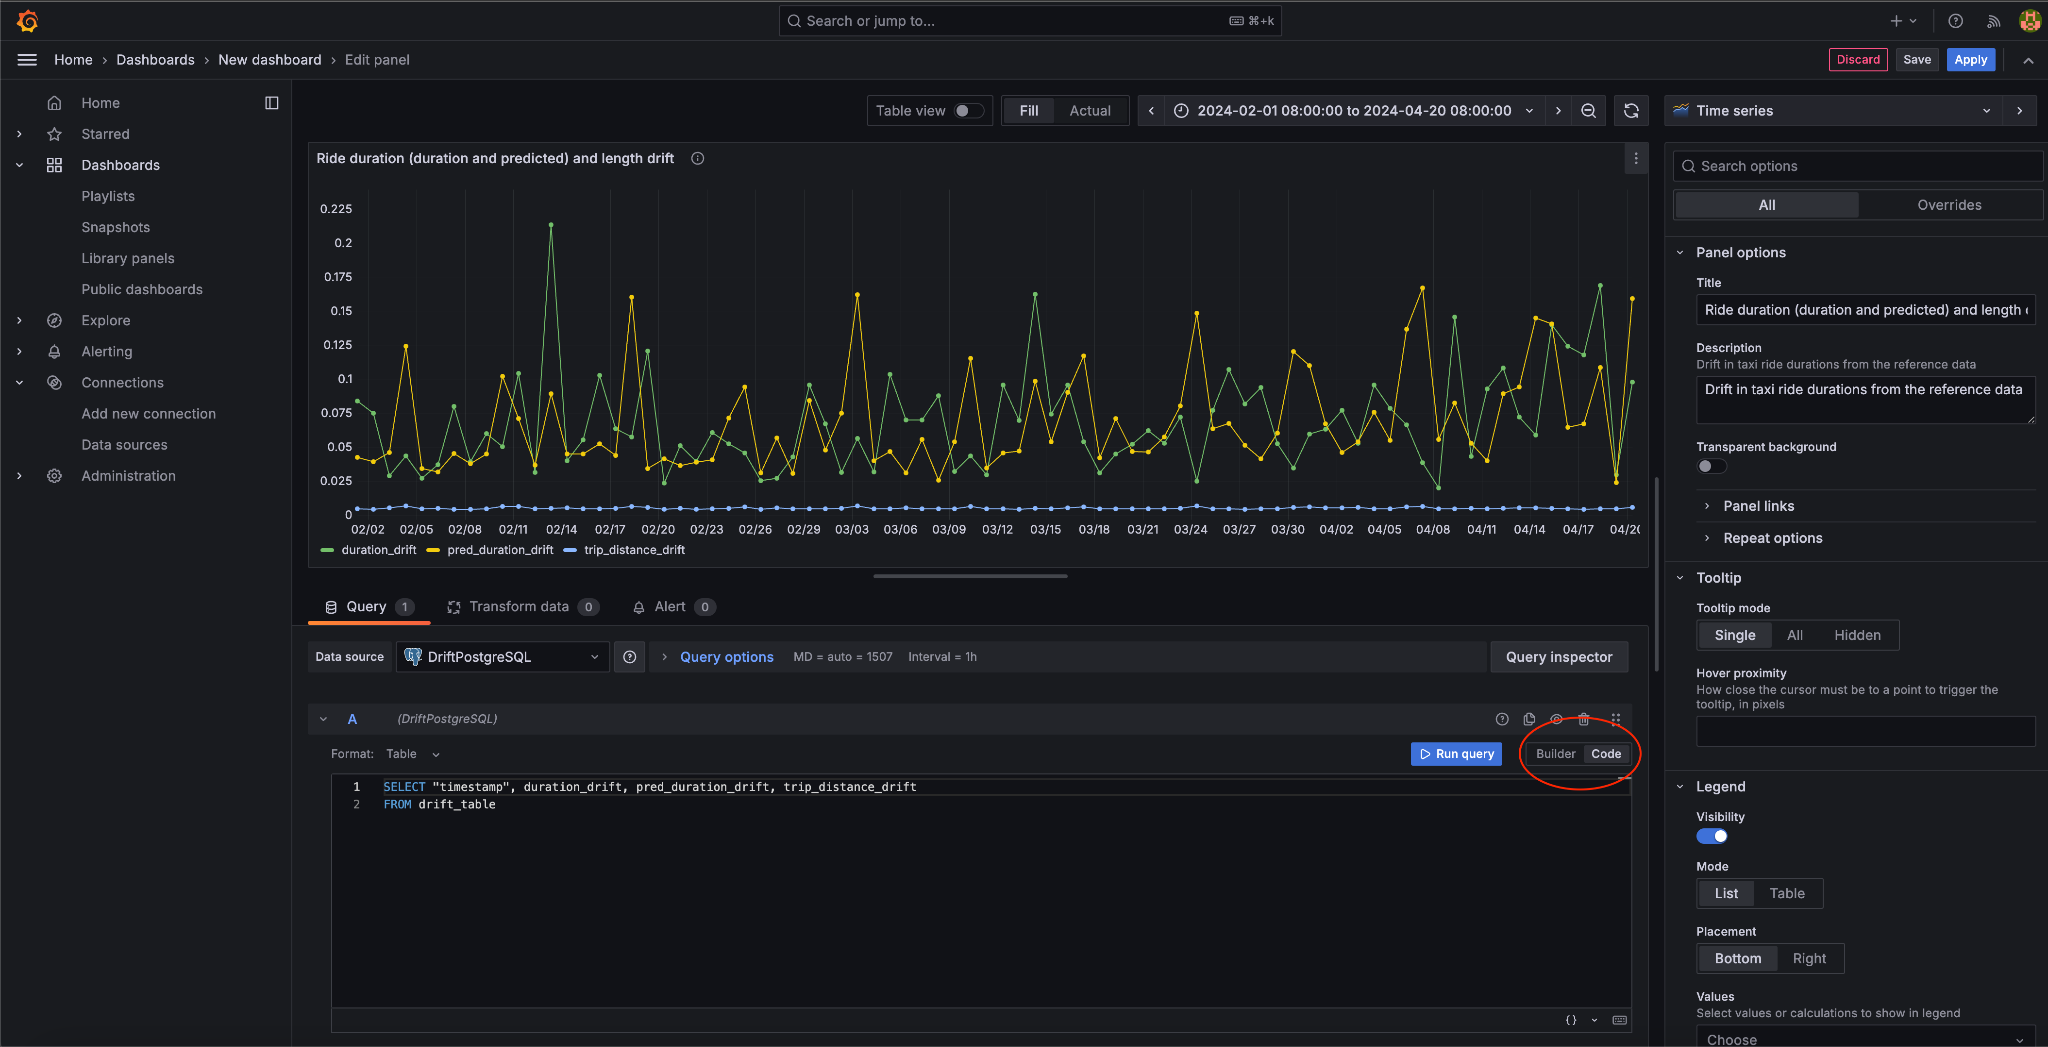
# Adminer Not Loaded
Problem: After running Docker Compose, Adminer cannot be accessed on http://127.0.0.1:8080/
Solution: Add index.php after the URL, so the URL will be http://127.0.0.1:8080/index.php
# Grafana: UI Changes
Problem: When selecting a column from the table, the error message is displayed:
no time column: no time column found
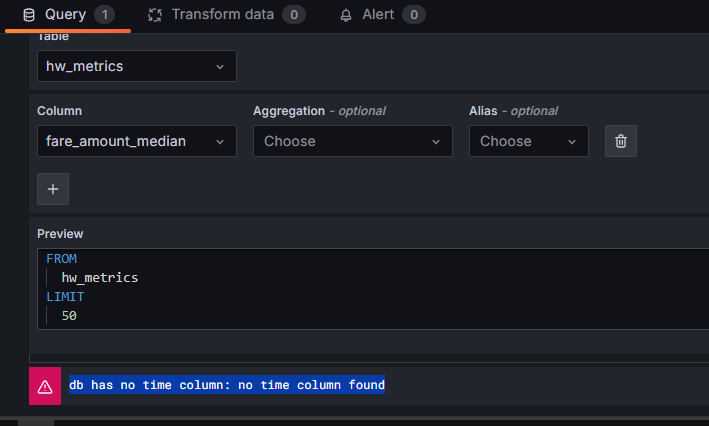
Solution: Add a timestamp column in the query builder.
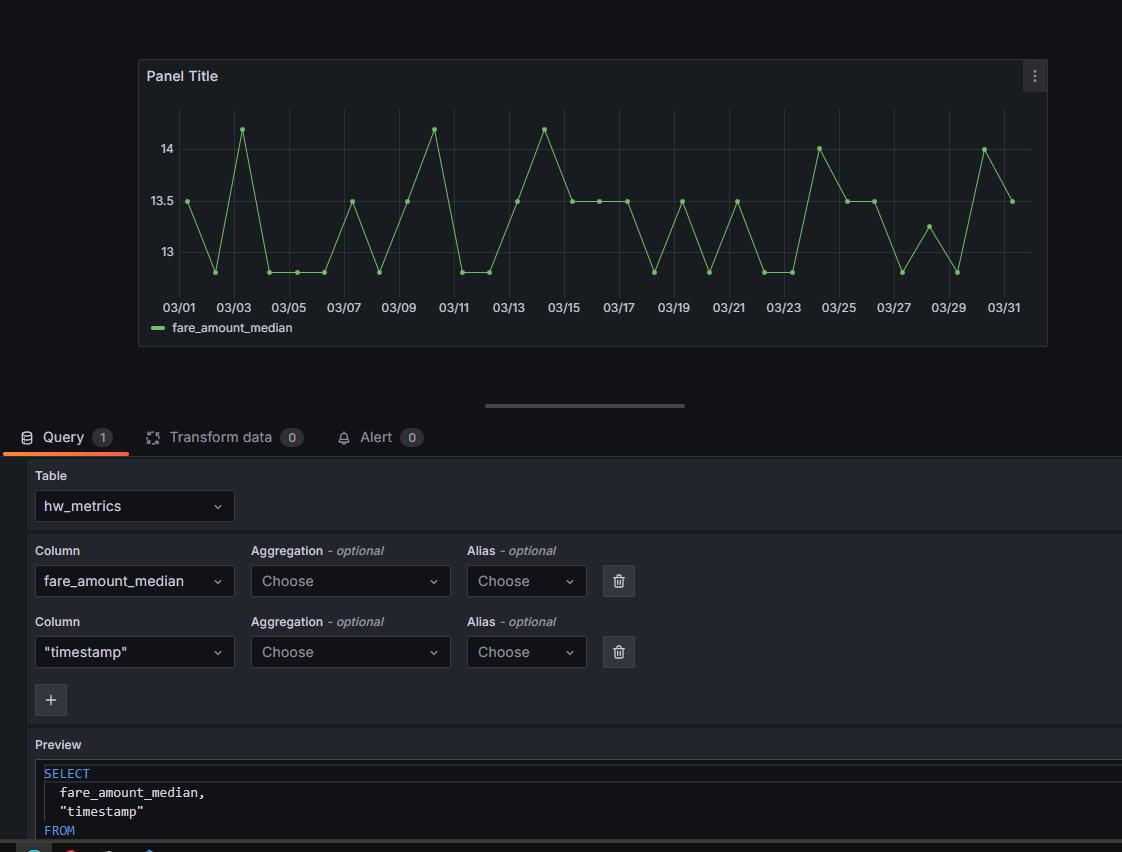
# Runtime Error: Failed to Reach API on Prefect
Problem: When running evidently_metrics_calculation.py, the following error is shown:
RuntimeError: Cannot create flow run. Failed to reach API at https://api.prefect.cloud/api/accounts/ee976605-4ca7-4a27-b5e3-0a37da3c7678/workspaces/78b23cf5-38bb-4d8b-9888-5bf8070d6d62/
Solution:
- Register or sign up at https://app.prefect.cloud/account/

# Grafana dashboard error after reset: db query error: pq: database “test” does not exist
Problem: You’ve already loaded your data, created a dashboard, and saved it. However, upon running docker-compose up after saving the dashboard, you encounter this error:
db query error: pq: database “test” does not exist
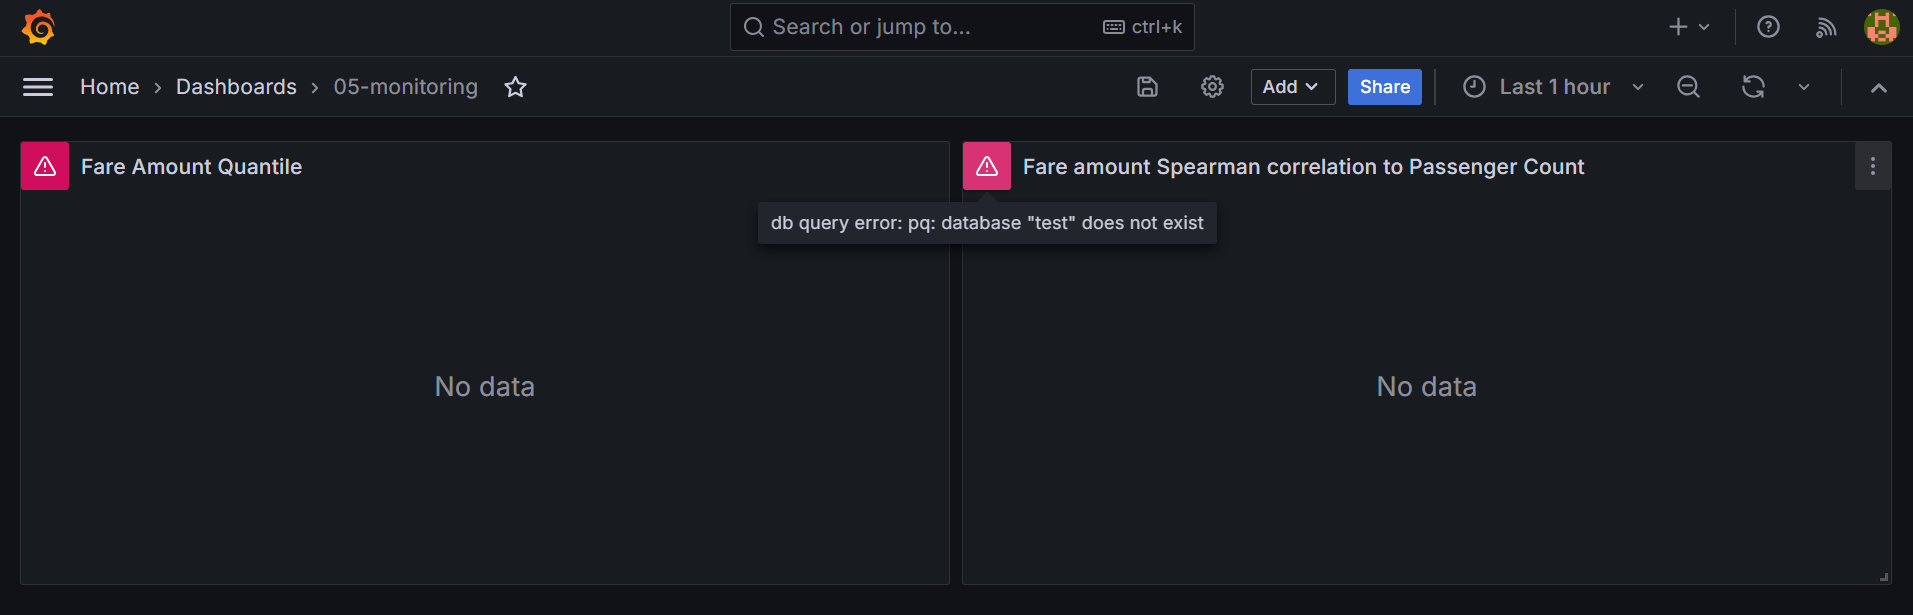
Solution:
This error indicates you haven’t run the DB initialization code. If you did run it before and even saw results, the issue likely arises because you restarted the docker-compose services.
The default docker-compose.yml file doesn’t have a volume for the Postgres DB. This means every restart will delete the DB data.
To resolve this:
If not planning to restart the services again: Simply rerun the DB initialization and filling code of your exercise.
If you plan to restart services frequently:
Add a volume to your PostgreSQL service in the
docker-compose.ymlfile:volumes: - ./data/postgres:/var/lib/postgresql/dataNote: Ensure you create a
./datadirectory in your project.
To attach the volume, run the following:
docker-compose down
docker-compose up --build
# Are there any alternative to Evidently on cloud platforms?
There are several alternatives to Evidently for monitoring machine learning models in the cloud. Here are a few options on popular cloud platforms:
Google Cloud Platform (GCP): AI Platform Predictions with Cloud Monitoring & Logging
Microsoft Azure: Azure Machine Learning
Amazon Web Services (AWS): Amazon SageMaker Model Monitor
These services provide model monitoring capabilities, allowing you to track the performance and data quality of your machine learning models within the cloud environment.
# docker.errors.DockerException: Error while fetching server API version: HTTPConnection.request() got an unexpected keyword argument 'chunked'
Instead of using:
docker-compose up --buildUse:
docker compose up --build
# Docker: Docker-Compose deprecated
Docker Compose v1 is deprecated from April 2023 onwards. More information on why v2 is better can be found in this blog post:
# psycopg.OperationalError: connection failed: connection to server at "127.0.0.1", port 5432 failed: FATAL: password authentication failed for user "postgres"
It could be that there is already another Docker container running (for example, from a previous session).
To resolve this issue:
- Check for running containers:
docker ps - Stop the running container:
docker stop <container_name_or_ID>
# Login to DB not working in Adminer UI even after right DB, user and password.
Problem: Adminer UI is not responding or showing database details, even with the correct database, user, and password.
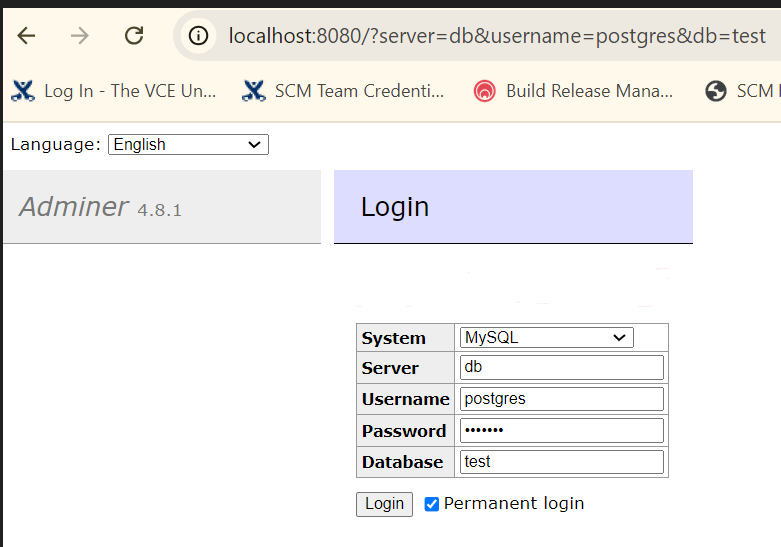
Solution: Try accessing the database from the command line using psql.
You can quickly install psql via package managers such as sudo apt.
Here is an example:
(base) cpl@inpne-ed-lab003:~$ psql -h localhost -p 5432 -U postgres

Password for user postgres:

psql (14.12 (Ubuntu 14.12-0ubuntu0.22.04.1), server 16.4 (Debian 16.4-1.pgdg120+1))

WARNING: psql major version 14, server major version 16.
Some psql features might not work.

Type "help" for help.

postgres=# \l

List of databases

 Name    |  Owner   | Encoding |  Collate   |   Ctype    |   Access privileges
-----------+----------+----------+------------+------------+-----------------------
postgres  | postgres | UTF8     | en_US.utf8 | en_US.utf8 |
template0 | postgres | UTF8     | en_US.utf8 | en_US.utf8 | =c/postgres          +
          |          |          |            |            | postgres=CTc/postgres
template1 | postgres | UTF8     | en_US.utf8 | en_US.utf8 | =c/postgres          +
          |          |          |            |            | postgres=CTc/postgres
test      | postgres | UTF8     | en_US.utf8 | en_US.utf8 |
(4 rows)
# Is it mandatory to use a reference dataset when generating a report with Evidently?
No. While Evidently is designed to compare a reference dataset with a current one, it can also be used without a reference dataset.
In such cases, you can pass reference_data=None when creating the report. This is useful for generating descriptive statistics or univariate analyses on a single dataset (e.g., using ColumnSummaryMetric, DatasetMissingValuesMetric, etc.).
# What version of Evidently AI is used in the course?
In the video (current cohort: 2025), the Evidently version used is 0.4.17. However, any version up to 0.6.7 will work with the code provided in the video and the repository.
Note that newer versions have changed the APIs, so the code in the video may not run with versions beyond 0.6.7.
# Grafana fails with 'Failed to create provisioner' when running `docker-compose up --build`
If you see this error from Grafana on startup:
✗ Failed to create provisioner: Failed to read dashboards config: could not parse provisioning config file: dashboards.yaml error: read /etc/grafana/provisioning/dashboards/dashboards.yaml: is a directory
The Grafana volumes in your docker-compose.yml are mounting a YAML file path, but Grafana sees a directory at that path. Change file references to directory references in the Grafana volumes section.
Instead of:
/etc/grafana/provisioning/dashboards/dashboards.yaml
use:
/etc/grafana/provisioning/dashboards/dashboards
Apply the same change to all file paths in the Grafana volumes block.
Module 6: Best Practices
# Evidently: Import Error
When running the command:
from evidently import ColumnMapping
The following import error occurs:
ImportError: cannot import name 'ColumnMapping' from 'evidently'
Uninstall the latest version of
evidently:pip uninstall evidently -yInstall an older compatible version:
pip install evidently==0.4.18Restart the kernel to reload the environment.
# Error following video 6.2: mlflow=1.27.0
When following the video instructions and running the Dockerfile, I encountered an error that the Dockerfile build failed on line 8 due to no matching distribution for mlflow==1.27.0. Below is the code output:
4.900 ERROR: No matching distribution found for mlflow==1.27.0

4.901 ERROR: Couldn't install package: {}

4.901  Package installation failed...

------

Dockerfile:8

--------------------

6 |     COPY [ "Pipfile", "Pipfile.lock", "./" ]

7 |

8 | >>> RUN pipenv install --system --deploy

9 |

10 |     COPY [ "lambda_function.py", "model.py", "./" ]

--------------------

ERROR: failed to solve: process "/bin/sh -c pipenv install --system --deploy" did not complete successfully: exit code: 1
# Get an error ‘Unable to locate credentials’ after running localstack with kinesis
You may encounter the error {'errorMessage': 'Unable to locate credentials', … from the print statement in test_docker.py after running localstack with Kinesis.
To resolve this issue:
In the
docker-compose.yamlfile, add the following environment variables:AWS_ACCESS_KEY_IDAWS_SECRET_ACCESS_KEY
You can assign any value to these variables (e.g.,
abc).Alternatively, you can run the following command:
aws --endpoint-url http://localhost:4566 configureProvide random values for the following prompts:
- AWS Access Key ID
- AWS Secret Access Key
- Default region name
- Default output format
<END>
# Get an error ‘unspecified location constraint is incompatible’
You may get an error while creating a bucket with LocalStack and the Boto3 client:
botocore.exceptions.ClientError: An error occurred (IllegalLocationConstraintException) when calling the CreateBucket operation: The unspecified location constraint is incompatible for the region specific endpoint this request was sent to.
To fix this, instead of creating a bucket via:
s3_client.create_bucket(Bucket='nyc-duration')
Create it with:
s3_client.create_bucket(Bucket='nyc-duration', CreateBucketConfiguration={'LocationConstraint': AWS_DEFAULT_REGION})
# Get an error "<botocore.awsrequest.AWSRequest object at 0x7fbaf2666280>" after running an AWS CLI command
When executing an AWS CLI command (e.g., aws s3 ls), you may encounter the error:
<botocore.awsrequest.AWSRequest object at 0x7fbaf2666280>
To fix this, set the AWS CLI environment variables:
export AWS_DEFAULT_REGION=eu-west-1
export AWS_ACCESS_KEY_ID=foobar
export AWS_SECRET_ACCESS_KEY=foobar
Their values are not important; any values will suffice.
# Pre-commit: Triggers an error at every commit: “mapping values are not allowed in this context”
At every commit, the above error is thrown and no pre-commit hooks are run.
Ensure the indentation in .pre-commit-config.yaml is correct, particularly the 4 spaces ahead of every repo statement.
# Could not reconfigure pytest from zero after getting done with previous folder
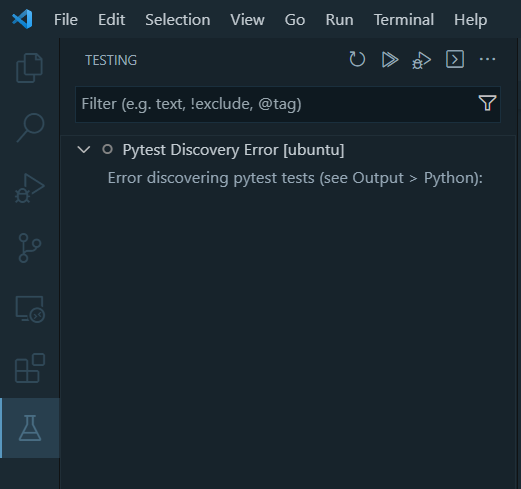
No option to remove pytest test
- Remove the
.vscodefolder located in the folder you previously used for testing. For example, if you chose to test in the "week6-best-practices" folder, remove the.vscodedirectory inside that folder.
# Empty Records in Kinesis Get Records with LocalStack
Problem Description
Following video 6.3, at minute 11:23, the get records command returns empty records.
Solution
Add --no-sign-request to the Kinesis get records call:
aws --endpoint-url=http://localhost:4566 kinesis get-records --shard-iterator [...] --no-sign-request
# In Powershell, Git commit raises utf-8 encoding error after creating pre-commit yaml file
When executing the following command in PowerShell, an error occurs:
git commit -m 'Updated xxxxxx'
The error message is:
An error has occurred: InvalidConfigError:

==> File .pre-commit-config.yaml

=====> 'utf-8' codec can't decode byte 0xff in position 0: invalid start byte
Set UTF-8 encoding when creating the pre-commit YAML file:
pre-commit sample-config | out-file .pre-commit-config.yaml -encoding utf8
# Git: Commit with pre-commit hook raises error ‘'PythonInfo' object has no attribute 'version_nodot'
When attempting to commit in Git, the following error occurs:
git commit -m 'Updated xxxxxx'

[INFO] Initializing environment for GitHub.
[INFO] Installing environment for GitHub.
[INFO] Once installed this environment will be reused.

An unexpected error has occurred: CalledProcessError: command:
…
return code: 1
expected return code: 0
stdout:
AttributeError: 'PythonInfo' object has no attribute 'version_nodot'
To resolve this issue, clear the app-data of the virtual environment using the following command:
python -m virtualenv api -vvv --reset-app-data
# Pytest error 'module not found' when using custom packages in the source code
Project structure:
/sources/production/model_service.py
/sources/tests/unit_tests/test_model_service.py
The test file contains:
from production.model_service import ModelService
Running
python test_model_service.pyfrom thesourcesdirectory works.Running
pytest ./test/unit_testsfails with:No module named 'production'.Use the following command:
python -m pytest ./test/unit_testspytestdoes not automatically add to thesys.paththe path where it is run.Alternatives include:
Running
python -m pytestExporting the
PYTHONPATHbefore executingpytest:export PYTHONPATH=.
# Pytest error ‘module not found’ when using pre-commit hooks if using custom packages in the source code
Project structure:
/sources/production/model_service.py
/sources/tests/unit_tests/test_model_service.py
In test_model_service.py:
from production.model_service import ModelService
A git commit -t ‘test’ raises No module named ‘production’ when calling the pytest hook:
- repo: local

  hooks:
    - id: pytest-check
      name: pytest-check
      entry: pytest
      language: system
      pass_filenames: false
      always_run: true
      args: [
        "tests/"
      ]
Use this hook instead:
- repo: local

  hooks:
    - id: pytest-check
      name: pytest-check
      entry: "./sources/tests/unit_tests/run.sh"
      language: system
      types: [python]
      pass_filenames: false
      always_run: true
Ensure that run.sh sets the correct directory and runs pytest:
cd "$(dirname "$0")"

cd ../..

export PYTHONPATH=.

pipenv run pytest ./tests/unit_tests
# Github actions: Permission denied error when executing script file
This issue occurs when running the following step in the CI YAML file definition:
yml
- name: Run Unit Tests
  working-directory: "sources"
  run: ./tests/unit_tests/run.sh
When executing the GitHub CI action, the following error occurs:
…/tests/unit_test/run.sh Permission error

Error: Process completed with error code 126
To resolve this issue, add execution permission to the script and commit the changes:
git update-index --chmod=+x ./sources/tests/unit_tests/run.sh
# Managing Multiple Docker Containers with docker-compose profile
When a Docker Compose file contains many containers, running them all may consume too many resources. There is often a need to easily select only a group of containers while ignoring irrelevant ones during testing.
Add
profiles: ["profile_name"]in the service definition within yourdocker-compose.ymlfile.Start the service with the specific profile using the command:
docker-compose --profile profile_name up
# AWS CLI: Why do AWS CLI commands throw <botocore.awsrequest.AWSRequest object at 0x74c89c3562d0> type messages when listing or creating AWS S3 buckets with LocalStack?
If you encounter such messages when trying to list your AWS S3 buckets (e.g., aws --endpoint-url=http://localhost:4566 s3 ls), you can try configuring AWS with the same region, access key, and secret key as those in your docker-compose file.
To configure AWS CLI, follow these steps:
After installing the AWS CLI, run the following command in your terminal:
aws configureInput the required information when prompted:
- AWS Access Key ID: [Example:
abc] - AWS Secret Access Key: [Example:
xyz] - Default region name: [Example:
eu-west-1]
- AWS Access Key ID: [Example:
# AWS: Regions need to match in docker-compose
Problem Description
If you are experiencing issues with integration tests and Kinesis, ensure that your AWS regions are consistent between docker-compose and your local configuration. Otherwise, you may create a stream in an incorrect region.
Solution Description
Set the region in your AWS config file:
~/.aws/configExample:
region = us-east-1Ensure that the region in your
docker-compose.yamlis also set:environment: - AWS_DEFAULT_REGION=us-east-1
# Isort Pre-commit
Pre-commit command was failing with isort repo.
- Set version to
5.12.0
# How to destroy infrastructure created via GitHub Actions
Infrastructure created in AWS with CD-Deploy Action needs to be destroyed.
To destroy the infrastructure from local:
terraform init -backend-config="key=mlops-zoomcamp-prod.tfstate" --reconfigure
terraform destroy --var-file vars/prod.tfvars
# Error "[Errno 13] Permission denied: '/home/ubuntu/.aws/credentials'" when running any aws command
After installing AWS CLI v2 on Linux, you may encounter a permission error when trying to run AWS commands that require access to your credentials. For example, when running aws configure, you might insert the key and secret but receive a permission error.
The issue arises because the ubuntu user does not have permission to read or write files in the .aws folder, and the credentials and config files do not exist. To resolve this:
Navigate to the
.awsfolder, typically located at/home/ubuntu/.aws.Create empty
credentialsandconfigfiles:touch credentials touch configModify the file permissions:
sudo chmod -R 777 credentials
sudo chmod -R 777 config
Run
aws configure, modify the keys and secret, and save them to thecredentialsfile. You can then execute AWS commands from your Python scripts or the command line.
# Why do I get a `ValueError: Invalid endpoint` error when using Boto3 with Docker Compose services?
Boto3 does not support underscores (_) in service URLs. Naming your Docker Compose services with underscores will cause Boto3 to throw an error when connecting to the endpoint. (Source: GitHub Issue)
Incorrect Docker Compose configuration with underscores:
version: '3.8'

services:
  backend_service:
    image: my_backend_image
    ...
  s3_service:
    image: localstack/localstack
    ...
Rename your services to avoid using underscores. For example, change s3_service to s3service. Then:
client = boto3.client('s3', endpoint_url="http://s3service:4566")
will work.
# Why do I get a “ValueError: The truth value of a DataFrame is ambiguous. Use a.empty, a.bool(), a.item(), a.any() or a.all()” error when doing unit test that involves comparing two data frames?
When you compare two Pandas DataFrames, the result is also a DataFrame. The same is true for Pandas Series. To properly compare them, you should not compare data frames directly.
Instead, convert the actual and expected DataFrames into a list of dictionaries, then use assert to compare the resulting lists.
Example:
actual_df_list_dicts = actual_df.to_dict('records')

expected_df_list_dicts = expected_df.to_dict('records')

assert actual_df_list_dicts == expected_df_list_dicts
# Pre-commit fails with 'RuntimeError: The Poetry configuration is invalid'
If pre-commit fails with something like:
RuntimeError: The Poetry configuration is invalid:
  - data.extras.pipfile_deprecated_finder[2] must match pattern ^[a-zA-Z-_.0-9]+$
This is caused by a version mismatch between the version of the tool pinned in pre-commit-config.yaml and the version installed via Pipfile.lock. Check the versions in Pipfile.lock and update pre-commit-config.yaml to match (or vice versa).
Capstone Project
# pytest doesn't recognize my installed libraries, but the script works in the terminal. Why?
This usually happens because VS Code is using a different Python interpreter than the one in your terminal. As a result, pytest can't see the packages installed in your virtual environment.
How to fix:
In your terminal, run:
which pythonIn VS Code, open the command palette (Ctrl+Shift+P) and select:
Python: Select InterpreterChoose the same interpreter shown in step 1.
# Is it a group project?
No, the capstone is a solo project.
# Do we submit 2 projects, what does attempt 1 and 2 mean?
You only need to submit one project. If the submission at the first attempt fails, you can improve it and re-submit during the attempt 2 submission window.
- If you want to submit two projects for the experience and exposure, you must use different datasets and problem statements.
- If you can’t make it to the attempt 1 submission window, you still have time to catch up to meet the attempt 2 submission window.
Remember that the submission does not count towards the certification if you do not participate in the peer review of three peers in your cohort.
# How is my capstone project going to be evaluated?
Each submitted project will be evaluated by three randomly assigned students who have also submitted the project.
You will also be responsible for grading the projects of three fellow students yourself. Please be aware that not complying with this rule will result in failing to achieve the Certificate at the end of the course.
The final grade you receive will be the median score of the grades from the peer reviewers.
The peer review criteria for evaluation must follow the guidelines defined here (TBA for link).
# Homework: What is the criteria of scoring home work?
Each homework assignment has a scoring system based on the following criteria:
- Answering 6 questions correctly: 6 points
- Adding 7 public learning items: 7 points
- Adding 1 valid question to the FAQ: 1 point
In total, you can earn up to 14 points per homework, which will contribute to the leaderboard ranking.