ML Zoomcamp FAQ
Table of Contents
- General Course-Related Questions
- Module 1. Introduction to Machine Learning
- Module 1 Homework
- Module 2. Machine Learning for Regression
- Module 2 Homework
- Module 3. Machine Learning for Classification
- Module 3 Homework
- Module 4. Evaluation Metrics for Classification
- Module 4 Homework
- Module 5. Deploying Machine Learning Models
- Module 5 Homework
- Module 6. Decision Trees, Ensembles & Gradient Boosting
- Module 6 Homework
- Projects (Midterm and Capstone)
- Module 8. Neural Networks and Deep Learning
- Module 9. Serverless Deep Learning
- Module 10. Kubernetes and TensorFlow Serving
- Miscellaneous
General Course-Related Questions
# How do I submit homework?
- Do the tasks locally
- Publish your code (e.g., in your own GitHub repo)
- Submit your answers via the homework form and include the URL to your code
- You will see the answers only after the deadline
- Homeworks are in the cohorts folder, e.g. for 2025 it's
cohorts/2025 - The forms for submitting the homework are in the course management platform
# What’s new in the 2025 edition?
- Deployment module updated to FastAPI (replacing Flask) and new tools.
- Neural networks taught with PyTorch (theory videos in Keras are kept; an additional PyTorch implementation video is provided).
- Deep learning deployment uses ONNX Runtime on AWS Lambda (replacing TensorFlow Lite).
# Are Jupyter Notebooks used?
Yes. You’ll work extensively with notebooks alongside standard Python files and CLI tools.
# Do I need prior machine learning experience?
No. The course starts from first principles. We do an introduction to ML, a gentle math refresher (only what you need), and the basics of linear algebra taught via code. You can begin with zero ML background and ramp up through hands-on exercises.
# Will the repo already have all FastAPI/uv/PyTorch updates?
The repository does not lock in every update at once. Some updates for FastAPI/uv and PyTorch are released as the cohort progresses. For theory, older videos remain; for implementation, updated workshops and videos are linked (for example, the FastAPI+uv workshop and the PyTorch add-on). To find the latest materials, check the module pages for updated workshop links. If a critical update is pushed, instructors will annotate or replace the relevant material accordingly.
# How do I sign up?
In the course GitHub repository, there’s a link to sign up. Here it is: airtable.com
# When is the next cohort?
The course is available in a self-paced mode, allowing you to go through the materials anytime. If you prefer to join a cohort with other students, live cohorts start every September.
Zoomcamps are scheduled throughout the year. For more information, refer to A Guide to Free Online Courses at DataTalks.Club.
Course videos are pre-recorded and available to watch immediately. We also occasionally host office hours for live Q&A, which are recorded and made available later. You can find these recordings and pre-recorded course videos on the Course Channel’s Bookmarks or DTC’s YouTube channel.
# Should I star the GitHub repo?
Yes, please star the repository: https://github.com/DataTalksClub/machine-learning-zoomcamp/. Starring helps it trend so others can discover the course, and the instructor explicitly asks attendees to star it to boost visibility.
# How do I join Slack if the invite email didn’t arrive?
Go to DataTalks.Club, request a Slack invite, or use the manual request form (processed daily). After joining, browse channels and join #course-ml-zoomcamp.
# How do I get help if I’m stuck?
- Slack: paste your code and errors, and use threads to keep discussions organized.
- this FAQ and past office hours: check these resources for guidance before asking.
- AI assistants like ChatGPT: use them for quick guidance or brainstorming.
- Peers and instructors: they may chime in when available.
# Do I need to enroll in the course before submitting homework?
No enrollment is required to submit homework. Just log into the homework form when it opens. The Airtable registration you may see is only for announcements; actual submissions are made on the course platform forms and via your GitHub as specified in the homework guidelines.
# What if I miss a session?
Everything is recorded, so you won’t miss office hours or any content. You can ask your questions in advance, and they will be covered during the live stream. Additionally, you can ask questions in Slack.
# What other prerequisites should I have?
- Be ready to use the terminal. You’ll use Git, the command line, Docker, and basic OS tasks. These are demonstrated in the course, but you should be comfortable running commands and reading errors.
- If you’re new to any of these tools, consider a quick hands-on practice session before the course starts.
- You don’t need to master everything before day one, but a basic comfort level with the command line will help you keep up as you learn.
# How do donations/sponsorships work?
- The course is free.
- Sponsors may be added.
- Voluntary donations help too. You can donate here: https://github.com/sponsors/alexeygrigorev.
- If you have a company training budget, you can request an invoice to support the course.
# How much theory will you cover?
The bare minimum. The focus is more on practice, and we'll cover the theory only on the intuitive level.
For example, we won't derive the gradient update rule for logistic regression (there are other great courses for that), but we'll cover how to use logistic regression and make sense of the results.
# Do I need to know Python already?
Not strictly required, but you must be comfortable programming. If you know another major language (Java, JavaScript, Rust, etc.), you’ll pick up the small subset of Python we use. Expect a lot of coding and 'code-along' sessions.
# I don't know math. Can I take the course?
Math is not strictly a prerequisite to start learning machine learning (ML), but having a strong foundation in certain mathematical concepts can significantly improve your understanding and ability to work with ML models.
Yes! We'll cover some linear algebra in the course, but in general, there will be very few formulas, mostly code.
Here are some interesting videos covering linear algebra that you can already watch:
- ML Zoomcamp 1.8 - Linear Algebra Refresher from Alexey Grigorev
- The excellent playlist from 3Blue1Brown: Vectors | Chapter 1, Essence of linear algebra
Never hesitate to ask the community for help if you have any questions.
# What’s the recent pass/completion rate?
In the most recent cohort's dashboard snapshot, roughly 85% of project attempts passed.
# Will we cover Spark or big-data tooling?
No Spark in this course. The focus is on core ML engineering and deployment patterns. We do cover deployment tooling relevant to ML (e.g., Kubernetes, TensorFlow Serving, KServe) as part of the deployment modules; see Modules 5–11 for details.
# I filled the form, but haven't received a confirmation email. Is it normal?
Normally, you'd receive the email shortly after you signed up.
- Check your promotions tab in Gmail as well as spam, as the email might have been filtered there.
- If you unsubscribed from our newsletter, you won't receive course-related updates.
Don't worry, it’s not a problem. To make sure you don’t miss anything, join the #course-ml-zoomcamp channel in Slack and our telegram channel with announcements. This is sufficient to follow the course.
# How long is the course?
Approximately 4 months, but it may take longer if you want to engage in extra activities such as an additional project or writing an article.
# How much time do I need for this course?
Around ~10 hours per week.
You can see how much time people spend on the 2024 edition here.
# Will I get a certificate?
Yes, if you finish at least 2 out of 3 projects and review 3 peers’ projects by the deadline, you will get a certificate. This is what it looks like: this.
# How can I get answers to common questions?
Start with the FAQ document (general + per-module Q&A). There’s also a Zoomcamp Q&A bot in Slack—use it thoughtfully; often the FAQ or recent messages already contain your answer.
# Can this program help data engineers move into DS/ML engineering?
Yes. The program’s project-first flow, deployment modules (FastAPI/Lambda/Kubernetes), and evaluation practices map well to ML engineer roles. Practically, you’ll gain experience with end-to-end ML workflows—from data engineering pipelines and model deployment to evaluation and monitoring—using tools commonly used in DS/ML roles.
# Will I get a certificate if I missed the midterm project?
Yes, it's possible. See the previous answer.
# How much Python should I know?
Check this article. If you know everything in this article, you know enough. If not, read the article and consider joining the course Introduction to Python – Machine Learning Bootcamp.
You can also follow the free English course "Learn Python Basics for Data Analysis" on the OpenClassrooms e-learning platform: Learn Python Basics for Data Analysis - OpenClassrooms.
It's important to know some basics such as:
- How to run a Jupyter notebook
- How to import libraries (and understand what libraries are)
- How to declare a variable (and understand what variables are)
- Some important operations regarding data analysis
# Do I need any special hardware?
For the classical Machine Learning part, all you need is a working laptop with an internet connection. The Deep Learning part is more resource intensive — for that, use any cloud GPU service (Google Colab, AWS, GCP, etc.).
# I’m new to Slack and can’t find the course channel. Where is it?
Here’s how you join in Slack: https://slack.com/help/articles/205239967-Join-a-channel
- Click “All channels” at the top of your left sidebar. If you don't see this option, click “More” to find it.
- Browse the list of public channels in your workspace, or use the search bar to search by channel name or description.
- Select a channel from the list to view it.
- Click Join Channel.
Do we need to provide the GitHub link to only our code corresponding to the homework questions?
Yes. You are required to provide the URL to your repo in order to receive a grade.
# The course has already started. Can I still join it?
Yes, you can. Even though you missed the start date, you can register for the course. You won’t be able to submit some of the homeworks, but you can still take part in the course.
In order to get a certificate, you need to submit 2 out of 3 course projects and review 3 peers by the deadline. It means that if you join the course at the end of November and manage to work on two projects, you will still be eligible for a certificate.
# How do announcements work?
Announcements are posted in the Telegram channel and mirrored into Slack. It’s best to join Telegram for clean, broadcast-only updates; otherwise you’ll still see mirrored posts in Slack.
# Are homeworks required to get the certificate?
Homeworks are optional for certification, but strongly recommended to check understanding. Certification is based on projects, not homework scores.
# Can I submit the homework after the due date?
No, it’s not possible. The form is closed after the due date. But don’t worry, homework is not mandatory for finishing the course.
# Where can I find all course materials and how can I keep track of lessons and modules?
All course materials and links live in the main ML Zoomcamp GitHub repository:
- Repository: https://github.com/DataTalksClub/machine-learning-zoomcamp/
- Modules: folders for each unit, with a README/markdown per unit, plus videos and notes.
- Cohort-specific items (homework and dates) are under cohorts/2025.
- YouTube playlist: https://www.youtube.com/playlist?list=PL3MmuxUbc_hIhxl5Ji8t4O6lPAOpHaCLR contains all lessons.
- Year-specific playlists (2021–2025) contain cohort-specific streams and extras.
- Quick access tips: browse the repo, check the modules folders, and look in cohorts/2025 for cohort-specific items. The syllabus is also available in the course repo mlzoomcamp.com/#syllabus.
# What are the deadlines in this course?
For the 2025 cohort, you can find the deadlines here (it’s taken from the 2025 cohort page) or in Google Calendar.
# Submitting learning in public links
When you post about what you learned from the course on your social media pages, use the tag #mlzoomcamp. When you submit your homework, there’s a section in the form for putting the links there. Separate multiple links by any whitespace character (linebreak, space, tab, etc).
- For posting the learning in public links, you get extra scores.
- The number of scores is limited to 7 points: if you put more than 7 links in your homework form, you’ll get only 7 points.
- The same content can be posted to 7 different social sites and still earn you 7 points if you add 7 URLs per week.
For midterms/capstones, the awarded points are doubled as the duration is longer. So for projects, the points are capped at 14 for 14 URLs.
# Can I share my answers of the Homework with the community to compare before I submit them?
We kindly ask you not to share your answers.
# Can I finish early and get the certificate in under four months?
No. Project timelines structure the cohort. The earliest certificates typically land around January (after Capstone 1/2 windows and reviews).
# Can I skip topics I already know?
Yes. All lesson content is optional; only the projects are mandatory. Move ahead at your own pace (you don’t need to wait for a “module start” date).
# Are lessons live or recorded?
Core lessons are pre-recorded and already available. Occasional live streams (like the launch/Q&A) happen, but there are no weekly office hours at this time. For help, please use the recorded office hours from prior years and check the FAQ for related guidance.
# What are the Slack “house rules”?
Slack house rules:
- Ask course questions in
#course-ml-zoomcamp(not#general). - Use threads to reply.
- Paste text/code instead of screenshots or phone photos.
- Don’t tag instructors; many peers can help and instructors see messages anyway.
- Keep the channel tidy and on-topic.
# Which tool should I use for Python environments?
We recommend uv for both installing Python and managing project virtual environments. It's fast, has no licensing concerns, and produces clean reproducible builds.
# Install uv (one-line installer; see https://docs.astral.sh/uv/ for your OS):
curl -LsSf https://astral.sh/uv/install.sh | sh

# Install a Python version:
uv python install 3.11

# Create and activate a project venv:
uv venv --python 3.11
source .venv/bin/activate    # Linux / macOS
.venv\Scripts\activate       # Windows

# Add packages:
uv add pandas scikit-learn jupyter
Module 5 includes a uv + FastAPI workshop that walks through this setup end-to-end.
# Which cloud provider is used?
Examples use AWS (you should have or create an AWS account). Concepts transfer to other clouds (GCP/Azure) with minor adjustments.
# Is system design included?
There is no dedicated system-design module. The course emphasizes end-to-end ML projects and deployments (web services, Lambda, Kubernetes). You will learn by building and deploying models rather than focusing on standalone system-design concepts.
# Is there any advantage to high homework/leaderboard scores?
Indirectly. The leaderboard highlights active learners (correct answers + learning-in-public links). That visibility helps with networking and recruiter attention, even though the certificate itself is pass/fail.
# How can I show business impact from ML projects? Does the course teach this?
The course focuses on building and deploying real ML services, which gives you practical, portfolio-worthy projects. Business impact depends on the domain context and is best learned on the job. By the end, you’ll have a visible, high-quality portfolio you can discuss with employers. For each project, consider the problem, approach, measurable outcomes, and a clear narrative to make the impact easy to communicate in interviews.
# What strategy do you recommend for an unemployed SWE pivoting to ML/AI soon?
- Ship projects and learn in public daily (posts, blogs, code).
- Publish everything on GitHub, write about your approach/results, engage on Slack/LinkedIn, and build a network.
- Use the course projects and optional activities (Kaggle, articles) as portfolio centerpieces.
# Why learn traditional ML if LLMs can do it for me?
Assistants are great accelerators, but you still need conceptual understanding to debug, adapt, and own your systems when AI tools make mistakes or hit limits.
The course teaches you to build, reason about, and deploy ML systems you control.
# ValueError: not enough values to unpack when parsing XGBoost output in parse_xg_output; how to fix and switch to evals_result?
Check the following outputs:
print(repr(output.stdout))
and
print(repr(output.stderr))
If they are empty, this means XGBoost does not print training logs to stdout. One solution is to use the training results returned by the Python API:
evals_result = {}
model = xgb.train(
params=xgb_params,
dtrain=dtrain,
num_boost_round=200,
evals=[(dtrain, 'train'), (dval, 'val')],
evals_result=evals_result,
verbose_eval=True
)
# Convert results to a DataFrame directly
df_results = pd.DataFrame({
'num_iter': range(len(evals_result['train']['auc'])),
'train_auc': evals_result['train']['auc'],
'val_auc': evals_result['val']['auc']
})
df_results.head()
This will replace relevant code in parse_xg_output(). Also, the function now does not take any parameters.
# MacOS: SSL certificate verification failed when reading a CSV from a URL in Python
On MacOS, Python may fail to verify SSL certificates when fetching a URL due to missing CA certificates in the Python SSL store. The fix is to run the certificates installer that ships with the Python installation:
/Applications/Python\ 3*/Install\ Certificates.command
After this completes, try running your Python script again to read the CSV from the URL.
# Login to courses.datatalks.club via GitHub gives a 'Server Error 500'
There's a known bug with GitHub login on the course management platform. Use Google login instead — it works for everyone.
If you previously signed up with GitHub and lost access, email Alexey at alexey@datatalks.club with both the old (GitHub-linked) email and the new email so your progress can be transferred.
# Why is there no Week 7 in the videos and lecture notes?
Week 7 is the midterm project. There are no lectures for it, so there is no 07-* folder in the course repo and no Week 7 in the video playlist. The repo goes straight from 06-trees to 08-deep-learning.
You spend that week building and submitting the midterm project instead. See the project guidelines for requirements and the deadline.
Module 1. Introduction to Machine Learning
# wget is not recognized as an internal or external command
If you encounter the error "wget is not recognized as an internal or external command", you need to install it.
On Ubuntu, run:
sudo apt-get install wgetOn Windows, you can use Chocolatey:
choco install wgetOr download a binary from here and add it to your PATH (e.g.,
C:/tools/).On Mac, use Homebrew:
brew install wget
Alternatively, you can use Python libraries:
Python
wgetlibrary:Install it first:
pip install wgetThen, in your Python code:
import wget

wget.download("URL")
Using
pandasto read a CSV directly from a URL:import pandas as pd url = "https://raw.githubusercontent.com/alexeygrigorev/datasets/master/housing.csv" df = pd.read_csv(url)Valid URL schemes include http, ftp, s3, gs, and file.
Bypassing HTTPS checks (if needed):
import ssl

ssl._create_default_https_context = ssl._create_unverified_context
Using Python's
urllibfor downloading files:import urllib.request url = "https://raw.githubusercontent.com/alexeygrigorev/datasets/master/housing.csv" urllib.request.urlretrieve(url, "housing.csv")The
urlretrieve()function allows you to download files from URLs and save them locally. It is part of the standard Python libraryurllib.request, available on all devices and platforms.
# Downloading a csv file inside notebook
The best way is to use pandas and give it the URL directly:
url = 'https://raw.githubusercontent.com/alexeygrigorev/datasets/master/housing.csv'
df = pd.read_csv(url)
You can also execute cmd/bash commands inside Jupyter:
!wget https://raw.githubusercontent.com/alexeygrigorev/datasets/master/housing.csv
The exclamation mark ! lets you execute shell commands inside your notebooks. This works for shell commands such as ls, cp, mkdir, mv, etc.
For instance, if you then want to move your data into a data directory alongside your notebook-containing directory, you could execute the following:
!mkdir -p ../data/
!mv housing.csv ../data/
# Windows: WSL and VS Code
If you have a Windows 11 device and would like to use the built-in WSL to access Linux, you can use the Microsoft Learn link Set up a WSL development environment | Microsoft Learn.
To connect this to VS Code, download the Microsoft verified VS Code extension ‘WSL’. This will allow you to remotely connect to your WSL Ubuntu instance as if it were a virtual machine.
# Uploading the homework to Github
If you encounter the following error when trying to use Git for the first time:
error: src refspec master does not match any
error: failed to push some refs to 'https://github.com/XXXXXX/1st-Homework.git'
Solution:
Make an initial commit using:
git commit -m "initial commit"Push to the main branch instead:
git push origin main
For a comprehensive guide on using GitHub, visit GitHub Quickstart.
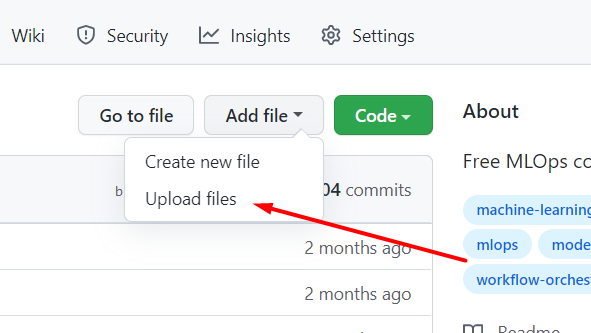
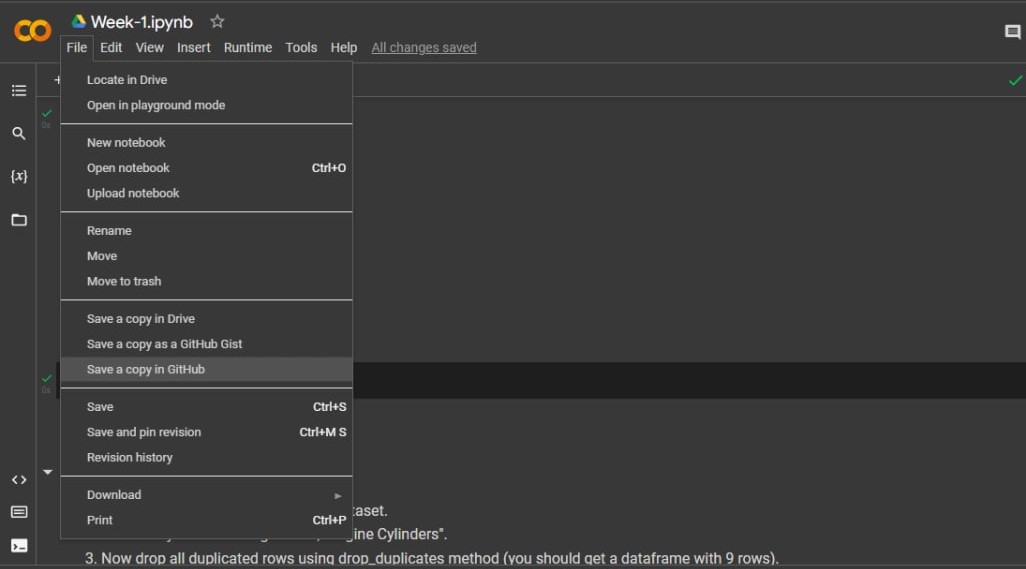
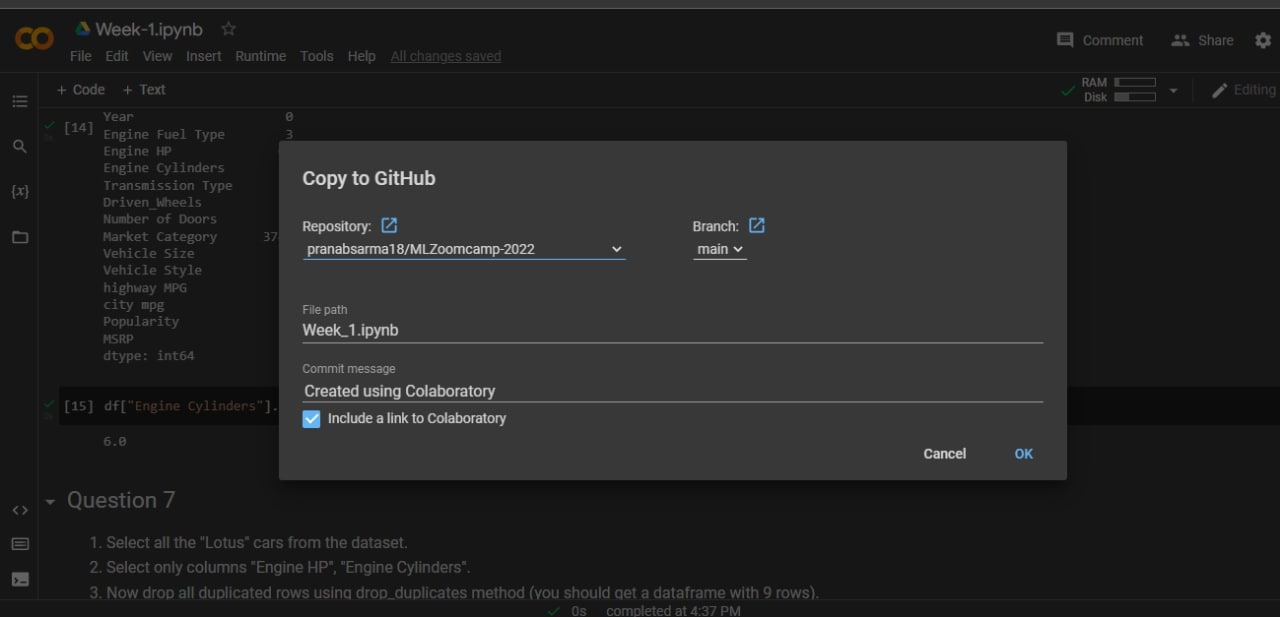
You can also use GitHub's "upload file" feature, or share your Google Colab notebooks directly to GitHub:
# Singular Matrix Error
I'm trying to invert the matrix but I got an error that the matrix is singular.
The singular matrix error is caused because not every matrix can be inverted. In particular, it happens when dealing with multiplication (using the method .dot) since multiplication is not commutative. X.dot(Y) is not necessarily equal to Y.dot(X). Respect the order; otherwise, you get the wrong matrix.
# Read-in the File in Windows OS
How do I read the dataset with Pandas in Windows?
I used the code below but it's not working:
df = pd.read_csv('C:\Users\username\Downloads\data.csv')
Unlike Linux/Mac OS, Windows uses the backslash (\) to navigate the files, which causes a conflict with Python. In Python, the \ is used for escape sequences, e.g., \n for a new line or \t for a tab. To avoid this issue, add an r before the file path to treat it as a raw string:
df = pd.read_csv(r'C:\Users\username\Downloads\data.csv')
# '403 Forbidden' error message when you try to push to a GitHub repository
To resolve a '403 Forbidden' error when pushing to a GitHub repository, follow these steps:
Check the current remote URL configuration by running:
git config -l | grep urlThe output should be similar to:
remote.origin.url=https://github.com/github-username/github-repository-name.gitChange the URL format to include your GitHub username:
git remote set-url origin "https://github-username@github.com/github-username/github-repository-name.git"Verify the change is reflected using the command in step 1. Make sure the URL is correctly updated.
# Git: Fatal: Authentication failed for https://github.com/username
I encountered a problem when trying to push code from Git Bash:
remote: Support for password authentication was removed on August 13, 2021.
remote: Please see https://docs.github.com/en/get-started/getting-started-with-git/about-remote-repositories#cloning-with-https-urls for information on currently recommended modes of authentication.
fatal: Authentication failed for 'https://github.com/username'
Solution:
- Create a personal access token from your GitHub account.
- Use this token to authenticate when you push your changes.
For more details, see the documentation on generating a new SSH key and adding it to the SSH agent.
# Kaggle: wget: unable to resolve host address raw.githubusercontent.com
In Kaggle, when you attempt to !wget a dataset from GitHub or any other public repository, you might encounter the following error:
--2022-09-17 16:55:24--  https://raw.githubusercontent.com/alexeygrigorev/datasets/master/housing.csv
Resolving raw.githubusercontent.com (raw.githubusercontent.com)... failed: Temporary failure in name resolution.
wget: unable to resolve host address 'raw.githubusercontent.com'
- In your Kaggle notebook settings, enable internet access for your session. This option is found in the settings panel on the right-hand side of the Kaggle screen.
- You will need to verify your phone number to confirm you are not a bot.
# Setting up an environment using VS Code
I found this video quite helpful: Creating Virtual Environment for Python from VS Code
Native Jupyter Notebooks Support in VS Code
In VS Code, you can have native Jupyter Notebooks support, i.e., you do not need to open a web browser to code in a Notebook. If you have port forwarding enabled, run a jupyter notebook command from a remote machine, and have a remote connection configured in .ssh/config (as Alexey’s video suggests), VS Code can execute remote Jupyter Notebook files on a remote server from your local machine: Visual Studio Code Jupyter Notebooks.
Git Support in VS Code
You can work with GitHub from VS Code. Staging and commits are easy from the VS Code’s UI:
# Port-Forwarding with SSH
If you prefer using the terminal for port forwarding, configure it in your SSH config file.
Open your SSH config file:
nano ~/.ssh/configAdd the following line to forward your Jupyter server:
LocalForward 8888 localhost:8888
# What does pandas.DataFrame.info() do?
It prints the information about the dataset, including:
- Index datatype
- Number of entries
- Column information with not-null count and datatype
- Memory usage by the dataset
We use it as:
df.info()
# NameError: name 'np' is not defined
If you're using numpy or pandas, make sure to import the libraries before using them:
import pandas as pd
import numpy as np
# How to select column by dtype
To select columns by data type, you can use the following methods:
To get columns with numeric data:
df.select_dtypes(include=np.number).columns.tolist()To get columns with object (string) data:
df.select_dtypes(include='object').columns.tolist()
# How to identify the shape of dataset in Pandas
To identify the shape of a dataset in Pandas, you can use the .shape attribute:
df.shape: Returns a tuple representing the dimensionality of the DataFrame.df.shape[0]: Returns the number of rows.df.shape[1]: Returns the number of columns.
You can also use the built-in len function to find the total number of rows:
len(df)
# Jupyter: ImportError "cannot import name 'contextfilter' from 'jinja2'"
contextfilter was removed in Jinja 3.1, but old nbconvert versions still try to import it. Upgrade nbconvert:
uv add --upgrade nbconvert
# or
pip install --upgrade nbconvert
Then restart the kernel / Jupyter server.
# wget hangs on MacOS Ventura M1
Executing the following command hangs on MacOS Ventura M1:
wget https://raw.githubusercontent.com/alexeygrigorev/datasets/master/housing.csv
If you encounter this and see IPv6 addresses in the terminal, follow these steps:
- Go to System Settings.
- Select Network.
- Choose your network connection and click Details.
- Set Configure IPv6 to Manually.
- Click OK.
- Try the command again.
# Using macOS and having trouble with WGET
Wget doesn't ship with macOS, but you can use curl as an alternative.
Example command:
curl -o ./housing.csv https://raw.githubusercontent.com/alexeygrigorev/datasets/master/housing.csv
- curl: A utility for retrieving information from the internet.
- -o: Specifies the output filename for the file being downloaded.
- filename: Your choice for naming the file.
- URL: The web address from which
curlwill download the data and save it using the specified filename.
For more information, you can refer to the Curl Documentation
# How to output only a certain number of decimal places
You can use the round() function or f-strings:
Using
round()function:round(number, 4) # This will round number up to 4 decimal placesUsing f-strings:
print(f'Average mark for the Homework is {avg:.3f}') # Formats the number to 3 decimal placesUsing
pandas.Series.roundif you need to round values in a whole Series:See the documentation for more information: pandas.Series.round
# Can’t get Jupyter running locally on your machine?
If you’re struggling to get a Jupyter notebook running locally on your machine or have other issues (like only having a cellphone available), consider using the following online platforms that don't require installation:
# Can I start Module 1 now and move ahead faster?
Yes. Lessons are already available. You can proceed to later modules without waiting for official start dates.
# Is it mandatory to use Python version 3.11?
No, Python 3.11 is not strictly mandatory for the course. You have flexibility in choosing your Python version, but here are some important considerations:
Recommended versions: (as of 2025)
- Python 3.10 or later is recommended for best compatibility
- Python 3.11 and 3.12 work well with all course materials
- Python 3.13 should also work fine for most use cases
Version compatibility check: You can verify if your Python version is still supported and secure by checking: https://endoflife.date/python
This website shows which Python versions are:
- Currently supported with security updates
- In maintenance mode (security fixes only)
- End-of-life (no longer receiving updates)
Why version matters:
- Newer Python versions include performance improvements and new features
- Some libraries used in the course may require minimum Python versions
- Using a supported version ensures you receive security updates
- Consistency with course materials helps avoid compatibility issues
How to check your version:
python --version
# or
python3 --version
As long as you're using Python 3.10 or later and it's not end-of-life, you should be able to complete all course exercises successfully.
# Homework 1: 'LinAlgError: Singular matrix' when computing np.linalg.inv(X.T @ X)
The matrix multiplication order matters. XTX should be X.T @ X (a small n_features x n_features matrix), NOT X @ X.T (an n_samples x n_samples matrix that's singular when columns are linearly dependent):
XTX = X.T @ X        # correct, e.g. shape (2, 2)
# XTX = X @ X.T      # WRONG, e.g. shape (7, 7) and singular
Also confirm you reduced X to the correct rows/columns before the multiplication (e.g., for the Asia/origin filter problems: df[df.origin == 'Asia'] first, then select columns, .head(7), then .values / .to_numpy()).
Module 1 Homework
# Floating Point Precision
I was doing Question 7 from Week 1 Homework and with step 6: Invert XTX. I created the inverse. Now, an inverse when multiplied by the original matrix should return an identity matrix. But when I multiplied the inverse with the original matrix, it gave a matrix like this:
Inverse * Original:
[[ 1.00000000e+00 -1.38777878e-16]
 [ 3.16968674e-13  1.00000000e+00]]
Solution:
It's because floating point math doesn't work well on computers as shown here: https://stackoverflow.com/questions/588004/is-floating-point-math-broken
# How to avoid Value errors with array shapes in homework?
First of all, use np.dot for matrix multiplication. When you perform matrix-matrix multiplication, remember that the order of multiplication is crucial and affects the result.
Dimension Mismatch
To perform matrix multiplication, the number of columns in the first matrix should match the number of rows in the second matrix. Rearrange the order to satisfy this condition.
# Homework Q5: How to replace NaNs with the average?
You would first get the average of the column and save it to a variable, then replace the NaN values with the average variable.
This method is called imputing - when you have NaN/null values in a column, but you do not want to get rid of the row because it has valuable information contributing to other columns.
# Homework Q5: Why the mode returns a Series instead of a single value?
When you calculate the mode using the mode() function in pandas, the function always returns a Series. This design choice allows mode() to handle cases where there may be multiple modes (i.e., multiple values with the same highest frequency). Even when there is only one mode, the function will still return a Series with that single value.
If you are certain that your column has only one mode and you want to extract it as a single value, you can access the first element of the Series returned by mode():
single_mode_value = your_dataframe['your_column'].mode()[0]
# Question 7: Mathematical formula for linear regression
In Question 7, we are asked to calculate the following:
X^T X(X^T X)^{-1}w = (X^T X)^{-1} X^T y
The initial problem w = X^{-1} y can be solved by this, where a matrix X is multiplied by some unknown weights w resulting in the target y.
Additional Reading and Videos
# Homework Q7: Final multiplication not having 5 column
This is most likely because you interchanged the first step of the multiplication.
Ensure you use:
- Correct:
XTX = XT X - Instead of incorrect:
XTX = X XT
# Homework Q7: Multiplication operators.
Matrix multiplication, such as matrix-matrix or matrix-vector multiplication, is often represented using the * operator. However, in NumPy, it is performed using the @ operator or np.matmul(). The * operator in NumPy is used for element-wise multiplication, also known as the Hadamard product).
For matrix-matrix multiplication, using the @ operator or np.matmul() is preferred, as noted in the NumPy documentation.
When multiplying by a scalar, it's preferred to use numpy.multiply() or the * operator.
References:
# Homework Q7: What do the weights represent?
The weight vector, w, contains the coefficients for a linear model fit between the target variable, y, and the input features in X, with the model estimate of y, y_est, defined as follows:
$$y_{est} = w[0]X[0] + w[1]X[1]$$
where the values in brackets refer to each column of the feature matrix, X, and the corresponding row of the weight vector, w. Each value in w describes the slope of the trend line that fits y the best for each feature. As we'll learn in Module 2, least squares yields a "best" fit that minimizes the squared difference between y and y_est. The weights, w, can be checked to see if they're reasonable by multiplying X by the weight vector, w:
$$y_{est} = X.dot(w)$$
This should produce a vector, y_est that is similar, plus or minus some error, to the original target variable, y.
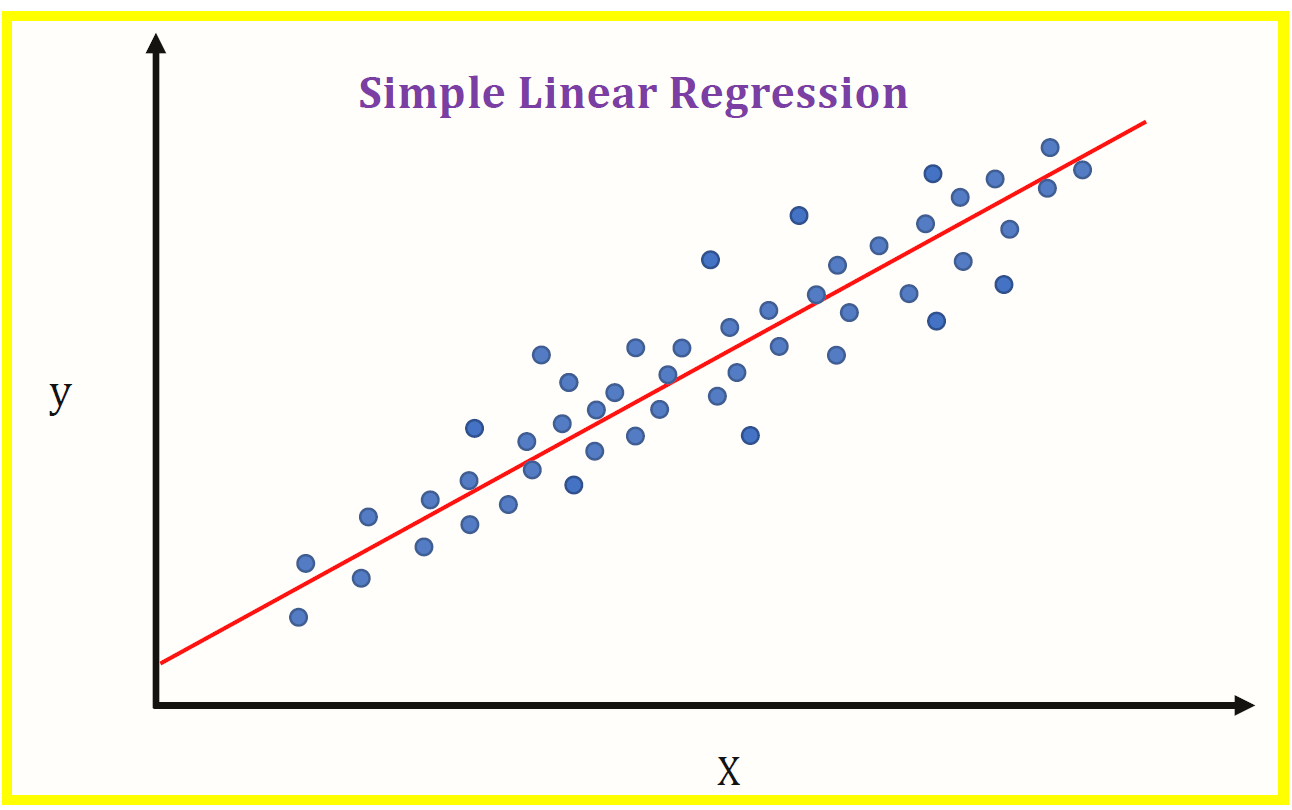
Module 2. Machine Learning for Regression
# How to avoid accidentally pushing CSV files
To avoid accidentally pushing CSV files (or any specific file type) to a Git repository, you can use a .gitignore file.
Add a rule to ignore CSV files by including:
*.csvIf the CSV files have already been committed, you can remove them from Git tracking but keep them locally by using the command:
git rm --cached filename.csv
# Checking long tail of data
To analyze the long tail of data, you can use a histogram or check skewness and descriptive statistics.
Using Histogram
import pandas as pd
import matplotlib.pyplot as plt
import seaborn as sns

# Load the data
url = 'https://raw.githubusercontent.com/alexeygrigorev/datasets/master/housing.csv'
df = pd.read_csv(url)

# EDA
sns.histplot(df['median_house_value'], kde=False)
plt.show()
Check Skewness and Descriptive Statistics
# Describe the 'median_house_value'
print(df['median_house_value'].describe())

# Calculate the skewness of the 'median_house_value' variable
skewness = df['median_house_value'].skew()

# Print the skewness value
print("Skewness of 'median_house_value':", skewness)
# LinAlgError: Singular matrix
It’s possible that when you follow the videos, you’ll get a Singular Matrix error. This will be explained in the Regularization video. Don’t worry, it’s normal to encounter this.
You might also receive this error if you invert matrix X more than once in your code.
# Getting NaNs after applying .mean()
I was using for loops to apply RMSE to a list of y_val and y_pred. However, the resulting RMSE was all NaN.
I discovered that the issue occurred during the mean calculation step in the RMSE function, after squaring the error. There were NaNs in the array, which I traced back to the initial data splitting step. I had only used fillna(0) on the training data, not on the validation and test data.
The problem was resolved by applying fillna(0) to all datasets (train, validation, and test). My for loops now successfully compute RMSE for all seed values.
# Target variable transformation
Why should we transform the target variable to logarithm distribution? Do we do this for all machine learning projects?
Only if you see that your target is highly skewed. The easiest way to evaluate this is by plotting the distribution of the target variable.
Transforming to a logarithmic scale can help address skewness and improve the distribution of your data set.
For more information, you can refer to Skewness on Wikipedia.
# Loading the dataset directly through Kaggle Notebooks
To load a dataset in Kaggle Notebooks, you can use the following command. Remember that the ! before wget is essential.
!wget https://raw.githubusercontent.com/alexeygrigorev/datasets/master/housing.csv
Once the dataset is loaded onto the Kaggle Notebook server, it can be read using the following pandas command:
df = pd.read_csv('housing.csv')
# Filter a dataset by using its values
We can filter a dataset by using its values as shown below:
# Using OR condition
 df = df[(df['ocean_proximity'] == '<1H OCEAN') | (df['ocean_proximity'] == 'INLAND')]
You can use | for 'OR', and & for 'AND'.
Alternative method:
# Using isin()
 df = df[df['ocean_proximity'].isin(['<1H OCEAN', 'INLAND'])]
# Alternative way to load the data using requests
Here's another way to load a dataset using the requests library:
import requests

url = 'https://raw.githubusercontent.com/alexeygrigorev/datasets/master/housing.csv'

response = requests.get(url)

if response.status_code == 200:
    with open('housing.csv', 'wb') as file:
        file.write(response.content)
else:
    print("Download failed.")
# Null column is appearing even if I applied .fillna()
When creating a duplicate of your dataframe, if you do the following:
X_train = df_train
X_val = df_val
You're still referencing the original variable. This is called a shallow copy. To ensure that no references are attaching both variables and to keep a copy of the data, create a deep copy:
X_train = df_train.copy()
X_val = df_val.copy()
# Can I use Scikit-Learn’s train_test_split for this week?
Yes, you can. Here we implement it ourselves to better understand how it works, but later we will only rely on Scikit-Learn’s functions. If you want to start using it earlier — feel free to do it.
# Can I use LinearRegression from Scikit-Learn for this week?
Yes, you can. We will also do that next week, so don’t worry, you will learn how to do it.
# Using Scikit-Learn for regression with and without regularization
What are the equivalents in Scikit-Learn for linear regression with and without regularization used in week 2?
Without Regularization:
sklearn.linear_model.LinearRegression
With Regularization:
sklearn.linear_model.Ridge
For more information, you can refer to the Scikit-Learn documentation on linear models:
# Why linear regression doesn’t provide a “perfect” fit?
Linear regression often provides a good approximation of the underlying relationship but rarely achieves a "perfect" fit in real-world applications.
Q: Why is y_pred different from y?
In lesson 2.8, the question arises: after training X_train to get the weights, shouldn't multiplying by X_train give exactly y?
A: Linear regression is a simple model and should not fit 100%, as this would indicate overfitting. Consider a single feature X:
As the model is linear, how would you draw a line to fit all the "dots"?
You could "fit" all the "dots" using something like scipy.optimize.curve_fit (non-linear least squares), but consider how it would perform on previously unseen data.
Refer to: scipy.optimize.curve_fit
# Random seed 42
One of the questions on the homework calls for using a random seed of 42. When using 42, all my missing values ended up in my training dataframe and not my validation or test dataframes, why is that?
The purpose of the seed value is to randomly generate the proportion split. Using a seed of 42 ensures that all learners are on the same page by getting the same behavior (in this case, all missing values ending up in the training dataframe). If using a different seed value (e.g. 9), missing values will then appear in all other dataframes.
# Shuffling the initial dataset using pandas built-in function
It is possible to shuffle the dataset using the pandas built-in function pandas.DataFrame.sample. To shuffle the complete dataset and reset the index, use the following commands:
- Set
frac=1to return a shuffled version of the complete dataset. - Set
random_state=seedfor consistent randomization.
df_shuffled = df.sample(frac=1, random_state=seed)
df_shuffled.reset_index(drop=True, inplace=True)
# Shuffling data using Numpy’s Generator Feature
While the lectures have you use the shuffle function to shuffle the index of the dataframe, it no longer accepts random seed as a parameter. This is because Numpy converted this feature into its own "Generator Class". In order to assign the random generator a seed, you have to specify the object (rng) that you are going to utilize in your code:
# Create index from range of values in array
idx = np.arange(n)

# Create random generator object and set seed
rng = np.random.default_rng(random_seed)

# Shuffle values using Generator object
rng.shuffle(idx)
# When should we transform the target variable to logarithm distribution?
When the target variable has a long tail distribution, such as prices with a wide range, you can transform it using the np.log1p() method. However, be aware that this method will not work if your target variable contains negative values.
# ValueError: shapes not aligned
X_train = prepare_X(df_train)
w_0, w = train_linear_regression(X_train, y_train)

X_val = prepare_X(df_val)
y_pred = w_0 + X_val.dot(w)

rmse(y_val, y_pred)
We get:
ValueError                                Traceback (most recent call last)
Input In [132], in <cell line: 5>()
      2 w_0, w = train_linear_regression(X_train, y_train)
      4 X_val = prepare_X(df_val)
----> 5 y_pred = w_0 + X_val.dot(w)
      7 rmse(y_val, y_pred)

ValueError: shapes (4128,) and (1,) not aligned: 4128 (dim 0) != 1 (dim 0)
If we try to perform an arithmetic operation between two arrays of different shapes or dimensions, it throws an error like operands could not be broadcast together with shapes. Broadcasting can occur in certain scenarios and will fail in others.
To solve this issue, you can use the * operator instead of the dot() method:
X_train = prepare_X(df_train)
w_0, w = train_linear_regression(X_train, y_train)

X_val = prepare_X(df_val)
y_pred = w_0 + (X_val * w)

rmse(y_val, y_pred)
Output:
0.5713144443358035
# How to copy a dataframe without changing the original dataframe?
Copy a dataframe using:
X_copy = X.copy()
This creates a deep copy of the dataframe. If you use X_copy = X, it will create a "view" and any changes to X_copy will affect the original dataframe X. This is not a real copy.
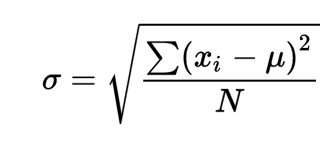
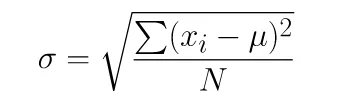
# What is standard deviation?

One of the most important characteristics of the normal distribution is that mean = median = mode, meaning the most popular value, the mean of the distribution, and 50% of the sample are under the same value. This is equivalent to saying that the area under the curve (black) is the same on the left and on the right. The long tail (red curve) results from a few observations with high values, altering the behavior of the distribution. Consequently, the area is different on each side, and the mean, median, and mode become different. The mean is no longer representative, the range is larger, and the probability of being on the left or right is not the same.
In statistics, the standard deviation is a measure of the amount of variation or dispersion of a set of values. A low standard deviation indicates that the values tend to be close to the mean (also called the expected value) of the set, while a high standard deviation indicates that the values are spread out over a wider range. Wikipedia The formula to calculate standard deviation is:
# Do we need to apply regularization techniques always? Or only in certain scenarios?
The application of regularization depends on the specific situation and problem. It is recommended to consider it when training machine learning models, especially with small datasets or complex models, to prevent overfitting. However, its necessity varies depending on the data quality and size. Evaluate each case individually to determine if it is needed.
# Shortcut: define functions for faster execution
Defining functions can speed up development significantly. You can create a function like prepare_df(initial_df, seed, fill_na_type) to prepare all three dataframes and y_vectors. The fillna() operation can be applied before splitting the initial_df.
Additionally, you can reuse functions such as rmse() and train_linear_regression(X, y, r) from the class notebook.
# Warning about modifying Dataframes inside functions
When applying a function to a DataFrame, it is important to consider that if you do not want to alter the original DataFrame, you should create a copy of it first. Failing to do so may result in unintended modifications to the original dataset.
To preserve the integrity of your data, always use df.copy() before making any changes.
# Find standard deviation with Pandas
To find the standard deviation of a list or series of data using Pandas, you can convert the list into a Pandas Series and use the .std() function. For example:
import pandas as pd

x = [1, 2, 3, 4, 5]
standard_deviation = pd.Series(x).std()
print(standard_deviation)
This will calculate the standard deviation of the list x.
# Standard Deviation Differences in Numpy and Pandas
Numpy and Pandas use different equations to compute the standard deviation. Numpy uses the population standard deviation by default, whereas Pandas uses the sample standard deviation.
Numpy
Pandas
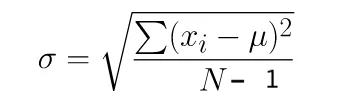
Pandas computes the standard deviation using one degree of freedom by default. You can modify the degree of freedom in Numpy to achieve a similar result by using the ddof parameter:
import numpy as np

np.std(df.weight, ddof=1)
The result will be similar if we set ddof=1 in Numpy.
# Standard deviation using Pandas built in Function
In pandas, you can use the built-in function std() to calculate the standard deviation. For example:
To get the standard deviation of a single column:
df['column_name'].std()To get the standard deviation of multiple columns:
df[['column_1', 'column_2']].std()
# How to combine train and validation datasets
Use pandas.concat function (pandas documentation) to combine two dataframes. To combine two numpy arrays, use numpy.concatenate (numpy documentation).
The code would be as follows:
df_train_combined = pd.concat([df_train, df_val])
y_train = np.concatenate((y_train, y_val), axis=0)
# Understanding RMSE and how to calculate RMSE score
The Root Mean Squared Error (RMSE) is one of the primary metrics to evaluate the performance of a regression model. It calculates the average deviation between the model's predicted values and the actual observed values, offering insight into the model's ability to accurately forecast the target variable. To calculate the RMSE score:
Import the necessary libraries:
import numpy as np
from sklearn.metrics import mean_squared_error
Calculate the Mean Squared Error (MSE):
mse = mean_squared_error(actual_values, predicted_values)Compute the RMSE:
rmse = np.sqrt(mse)
print("Root Mean Squared Error (RMSE):", rmse)
# Deep dive into normal equation for regression
I found this video useful for understanding how we derive the normal form in linear regression: Normal Equation Derivation for Regression.
# Useful Resource for Missing Data Treatment
# What sklearn version is Alexey using in the YouTube videos?
Version 0.24.2 and Python 3.8.11.
# How is RMSE a performance metric relevant to regression?
Root Mean Squared Error (RMSE) is a common metric to evaluate regression models. It measures the typical magnitude of prediction errors in the same units as the target variable and is the square root of the Mean Squared Error (MSE).
Example:
Consider five houses with the following actual prices and model predictions:
| House | Actual | Prediction |
|---|---|---|
| H1 | 100 | 120 |
| H2 | 150 | 140 |
| H3 | 200 | 230 |
| H4 | 250 | 280 |
| H5 | 300 | 240 |
Baseline (mean as prediction): the mean Actual is 200. The squared spread from the mean is
= (100-200)^2 + (150-200) + (200-200)^2 + (250-200)^2 + (300-200)^2
= 20,000 USD
Now, compute the same with the model predictions to obtain the Mean Squared Error (MSE):
= (100-120)^2 + (150-140) + (200-230)^2 + (250-280) + (300-240)^2
= 4,880
When R2 is calculated, 1 - (Total spread from mean / total spread of predictions) => 1 - 4,880 / 20,000 = 0.75 or 75%.
What does this mean in practical terms? The model has reduced the uncertainty in house prices by 75%. Without the model, our best guess for any house is the mean ($200) and the typical deviation from the mean is the standard deviation (which is the square root of the variance, i.e., sqrt(20000/5) ≈ 200 dollars). With the model, the typical error (root mean squared error) is sqrt(4880/5) = sqrt(976) ≈ 31 dollars. So, the model has reduced the typical error from about $200 to about $31.
Another explanation for R2: If you look at all the reasons why house prices in our dataset differ from the average price, our model (using features like size, location, bedrooms, etc.) can explain 75% of those reasons. 25% of the price differences remain mysterious.
In essence, in addition to RMSE (which you want to minimize), R2 should be between 0 and 1, and a higher value is better. (If it is too high, it may indicate overfitting.)
Module 2 Homework
# Homework Q4: Is r same as alpha in Scikit-Learn Ridge?
In the context of regression, particularly with regularization:
rtypically represents the regularization parameter in some algorithms. It controls the strength of the penalty applied to the coefficients of the regression model to prevent overfitting.In
sklearn.Ridge(), the parameteralphaserves the same purpose asr. It specifies the amount of regularization applied to the model. A higher value ofalphaincreases the amount of regularization, which can reduce model complexity and improve generalization.
r and alpha are both regularization parameters and control the "strength" of regularization. Increasing these values will lead to stronger regularization. However, the mathematical implementation differs:
sklearn.Ridge():||y - Xw||^2_2 + alpha * ||w||^2_2Lesson's Notebook (
train_linear_regression_regfunction):XTX = XTX + r * np.eye(XTX.shape[0])radds “noise” to the main diagonal to prevent multicollinearity, which “breaks” finding the inverse matrix.
For further reference, see the sklearn.Ridge documentation and the lesson’s notebook.
# Homework: The answer I get for one of the homework questions doesn't match any of the options. What should I do?
That's normal. We all have different environments: our computers have different versions of OS and different versions of libraries - even different versions of Python.
If your answer doesn't match the options, just select the option that's closest to your answer.
If your answer value lies in between two options, choose the option which is more than your value.
# Homework: Q3: Meaning of mean
In question 3 of HW02 it is mentioned: ‘For computing the mean, use the training only’. What does that mean?
It means that you should use only the training data set for computing the mean, not the validation or test data set. This is how you can calculate the mean:
# Calculate mean for a specific column in the training data
mean_value = df_train['column_name'].mean()
Another option:
# Get descriptive statistics, including the mean
stats = df_train['column_name'].describe()
# Caution for applying log transformation in Week-2 2023 cohort homework
The instruction for applying log transformation to the ‘median_house_value’ variable is provided before Q3 in the homework for Week-2 under the ‘Prepare and split the dataset’ heading.
However, this instruction is absent in the subsequent questions of the homework, and you might encounter issues like a huge RMSE. Remember to apply log transformation to the target variable for each question.
# Homework: is the RMSE result close to the options?
My result is about 12.4 different from the closest option. For previous questions, my answers were close, so I'm unsure why there's a large discrepancy for question 6.
For questions 5 and 6, please ensure you reinitialize with:
Idx = np.arange(n)
This should be done for each iteration of r in question 5 and also for question 6.
Module 3. Machine Learning for Classification
# What is the best way to handle missing values in the dataset before training a regression model?
You can handle missing values by:
- Imputing the missing values with the mean, median, or mode.
- Using algorithms that support missing values inherently (e.g., some tree-based methods).
- Removing rows or columns with missing data, depending on the extent of missingness.
- Utilizing feature engineering to derive new features from incomplete data.
# Error: Could not convert string to float: 'Nissan'
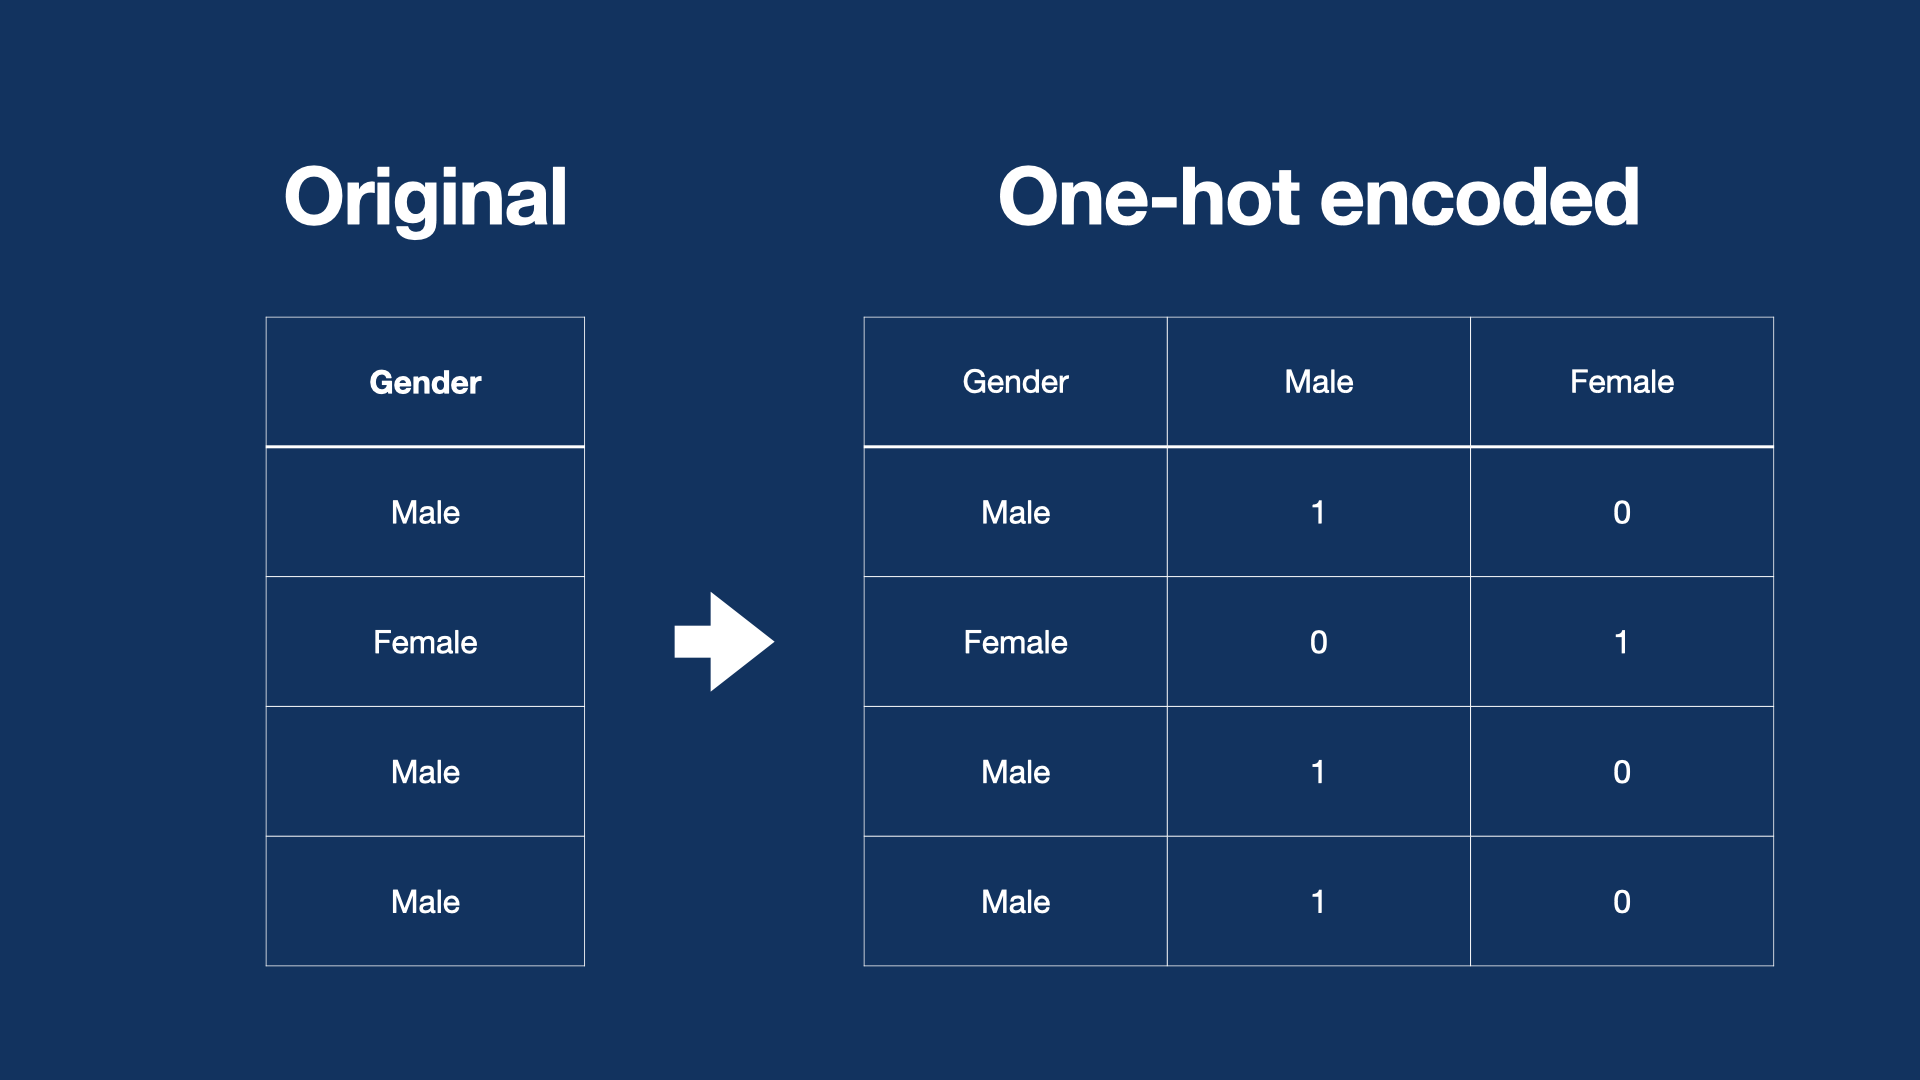
The error message "could not convert string to float: 'Nissan'" typically occurs when a machine learning model or function is expecting numerical input but receives a string instead. In this case, it seems like the model is trying to convert the car brand 'Nissan' into a numerical value, which isn’t possible.
To resolve this issue, you can encode categorical variables like car brands into numerical values. One common method is one-hot encoding, which creates new binary columns for each category/label present in the original column.
Here’s an example of how you can perform one-hot encoding using pandas:
import pandas as pd

# Assuming 'data' is your DataFrame and 'brand' is the column with car brands
data_encoded = pd.get_dummies(data, columns=['brand'])
In this code, pd.get_dummies() creates a new DataFrame where the brand column is replaced with binary columns for each brand (e.g., brand_Nissan, brand_Toyota, etc.). Each row in the DataFrame has a 1 in the column that corresponds to its brand and 0 in all other brand columns.
# Homework: Why did we change the targets to binary format when calculating mutual information score in the homework?
Mutual Information score calculates the relationship between categorical or discrete variables. In the homework, the target, median_house_value, was continuous. Thus, we changed it to a binary format to make its values discrete (either 0 or 1).
Keeping the target as a continuous variable would require the algorithm to divide it into bins, which would be highly subjective. This is why continuous variables are not used for mutual information score calculation.
# How do you find the correlation matrix?
First, you have to consider whether the data is numerical or categorical. If it’s numerical, you can correlate it directly. If it’s categorical, you can find the correlations indirectly by vectorizing the data using One-Hot encoding or a similar method.
To determine if data is numerical, check the dtypes of the DataFrame. Data types such as integer and float are numerical, while types such as objects are categorical. You can correlate the numerical data by specifying which columns are numerical and using that as input to a correlation matrix.
Example:
numerical = ['tenure', 'monthlycharges', 'totalcharges']

correlation_matrix = df[numerical].corr()
print(correlation_matrix)
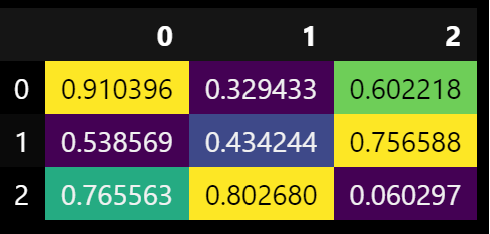
# Coloring the background of the pandas.DataFrame.corr correlation matrix directly
The background of any DataFrame, including the correlation matrix, can be colored based on its numerical values using the method pandas.io.formats.style.Styler.background_gradient.
Here is an example of how to color the correlation matrix. A color map of choice can be passed; here, 'viridis' is used:
- Ensure the DataFrame contains only numerical values before calling
corr:
corr_mat = df_numerical_only.corr()

corr_mat.style.background_gradient(cmap='viridis')
- Here is an example of how the coloring will look using a DataFrame containing random values and applying
background_gradientto it:
np.random.seed = 3

df_random = pd.DataFrame(data=np.random.random(3*3).reshape(3,3))

print(df_random.style.background_gradient(cmap='viridis'))
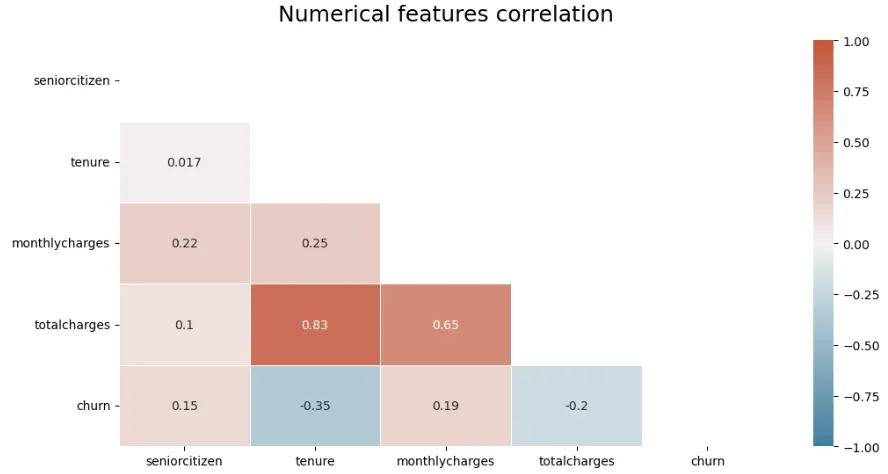
# Identifying highly correlated feature pairs easily through unstack
To identify highly correlated feature pairs using unstack:
import pandas as pd

data_corr = pd.DataFrame(data_num.corr().round(3).abs().unstack().sort_values(ascending=False))

print(data_corr.head(10))
You can also use seaborn to create a heatmap with the correlation:
import seaborn as sns

sns.heatmap(
    df[numerical_features].corr(),
    annot=True,
    square=True,
    fmt=".2g",
    cmap="crest"
)
To refine your heatmap and plot only a triangle, with a blue to red color gradient, that will show every correlation between your numerical variables without redundant information:
# Set figure size: modify it here or create new function arguments
plt.figure(figsize=(12, 6))

# define the mask to set the values in the upper triangle to True
mask = np.triu(np.ones_like(dataframe.corr(numeric_only=True), dtype=bool))

# Generate a custom diverging colormap
cmap = sns.diverging_palette(230, 20, as_cmap=True)

heatmap = sns.heatmap(
    dataframe.corr(numeric_only=True),
    mask=mask,
    cmap=cmap,
    vmin=-1,
    vmax=1,
    annot=True,
    linewidths=0.5,
)

heatmap.set_title(title, fontdict={"fontsize": 18}, pad=16)
plt.show()
Which outputs, in the case of a churn dataset:
# What data should be used for EDA?
It's indeed good practice to only rely on the train dataset for EDA. Including validation might be okay. But we aren't supposed to touch the test dataset; even just looking at it isn't a good idea. We indeed pretend that this is the future unseen data.
# DictVectorizer: Fitting on validation data
Validation datasets are used to optimize models by providing an estimate of performance on unseen data. Understanding how to properly use the DictVectorizer class is crucial for maintaining this separation between training and validation.
- Fitting on Training Data: The
fitmethod ofDictVectorizeranalyzes the training dataset to determine how to map dictionary values. Categorical features are one-hot encoded, while numeric features remain unchanged. - Avoid Fitting on Validation Data: Applying the
fitmethod to validation data can lead to information leakage, as it exposes the model to data it should not see during training. - Appropriate Usage:
- Use
fit_transformon the training dataset. - Use
transformonly on validation and test datasets.
- Use
By following these practices, the model's performance on new data can be more accurately assessed.
# FutureWarning: Function get_feature_names is deprecated; get_feature_names is deprecated in 1.0 and will be removed in 1.2
In newer versions of scikit-learn, the method has been replaced by get_feature_names_out().
Instead, use the method .get_feature_names_out() from the DictVectorizer function to resolve the warning.
# Example usage
from sklearn.feature_extraction import DictVectorizer

# Initialize the vectorizer
vectorizer = DictVectorizer()

# After fitting the vectorizer
vectorizer.fit_transform(...)

# Get feature names
feature_names = vectorizer.get_feature_names_out()
Note: The warning indicates that get_feature_names will be removed, so switching to get_feature_names_out is recommended even though the warning itself won't cause issues yet.
# Logistic regression crashing Jupyter kernel
Fitting the logistic regression takes a long time or the kernel crashes when calling predict() with the fitted model.
Ensure that the target variable for the logistic regression is binary.
# Understanding Ridge
Ridge regression is a linear regression technique used to mitigate the problem of multicollinearity (when independent variables are highly correlated) and prevent overfitting in predictive modeling. It adds a regularization term to the linear regression cost function, penalizing large coefficients.
sag Solver: The sag solver stands for "Stochastic Average Gradient." It's particularly suitable for large datasets, as it optimizes the regularization term using stochastic gradient descent (SGD). sag can be faster than some other solvers for large datasets.
Alpha: The alpha parameter controls the strength of the regularization in Ridge regression. A higher alpha value leads to stronger regularization, which means the model will have smaller coefficient values, reducing the risk of overfitting.
from sklearn.linear_model import Ridge

ridge = Ridge(alpha=alpha, solver='sag', random_state=42)

ridge.fit(X_train, y_train)
# pandas.get_dummies() and DictVectorizer(sparse=False) produce the same type of one-hot encodings:
DictVectorizer(sparse=True) produces CSR) format, which is both more memory efficient and converges better during fit().
It stores non-zero values and indices instead of adding a column for each class of each feature, which can result in large numbers of columns (e.g., models of cars).
Using "sparse" format is slower (around 6-8 minutes for Q6 task - Linear/Ridge Regression) for a high number of classes (like car models) and produces slightly worse results in both Logistic and Linear/Ridge Regression.
It also generates convergence warnings for Linear/Ridge Regression.
# ConvergenceWarning: The max_iter was reached
If you're encountering the following warning:
ConvergenceWarning: The max_iter was reached which means the coef_ did not converge
This usually happens because the solver the model uses is sensitive to feature scales.
You can do the following to address it:
Normalize Numerical Features
- Scale your numerical features using techniques like
StandardScalerorMinMaxScaler. - This ensures that all numerical features are on a similar scale, which helps the solver converge.
- Scale your numerical features using techniques like
Encode Categorical Features
- Apply
OneHotEncoder(OHE) to categorical features to represent them as binary vectors. - Use
sparse=Falsewhen necessary to return a dense array.
- Apply
Separate and Combine Features
- Process numerical and categorical features separately (scaling for numerical, OHE for categorical).
- Combine them afterward into a single feature matrix (
X_train) to use as input for Ridge regression.
Experiment with Different Scalers
- If issues persist, try different scalers as Ridge can behave differently depending on feature scaling.
By following these steps, you can reduce convergence errors and improve model stability. For a detailed example, see this notebook: notebook-scaling-ohe.ipynb.
# Sparse matrix compared to dense matrix
A sparse matrix is more memory-efficient because it only stores the non-zero values and their positions in memory. This is particularly useful when working with large datasets with many zero or missing values.
The default DictVectorizer configuration is a sparse matrix. For Week 3, Question 6, using the default sparse configuration is beneficial due to the size of the matrix. Training the model was also more performant and didn’t produce an error message like dense mode.
# How to Disable/avoid Warnings in Jupyter Notebooks
The warnings in Jupyter notebooks can be disabled or avoided with the following commands:
import warnings

warnings.filterwarnings("ignore")
# Homework: Could you please help me with HW3 Q3: "Calculate the mutual information score with the (binarized) price for the categorical variable that we have. Use the training set only." What is the second variable that we need to use to calculate the mutual information score?
You need to calculate the mutual information score between the binarized price (above_average) variable and ocean_proximity, the only original categorical variable in the dataset.
# What is the difference between OneHotEncoder and DictVectorizer?
Both work in similar ways to convert categorical features to numerical variables for use in training a model. The difference lies in the input:
- OneHotEncoder uses an array as input.
- DictVectorizer uses a dictionary.
Both will produce the same result. However, with OneHotEncoder, features are sorted alphabetically. With DictVectorizer, you stack features as desired.
# What is the difference between pandas get_dummies and sklearn OnehotEncoder?
They are basically the same. There are some key differences with regards to their input/output types, handling of missing values, etc., but they are both techniques to one-hot-encode categorical variables with identical results.
- pandas get_dummies: A convenient choice when working with Pandas DataFrames.
- sklearn OneHotEncoder: More suitable for building a scikit-learn-based machine learning pipeline to handle categorical data as part of that pipeline.
# Why am I getting TypeError while creating OneHotEncoder Object?
In scikit-learn >= 1.2, OneHotEncoder no longer accepts the sparse parameter. It now uses the sparse_output parameter to control whether the output is sparse or dense.
What to do:
- For a dense array: use
OneHotEncoder(sparse_output=False). - For a sparse matrix: use
OneHotEncoder(sparse_output=True).
If you previously wrote ohe = OneHotEncoder(sparse=False) and get a TypeError, replace it with ohe = OneHotEncoder(sparse_output=False).
Example:
from sklearn.preprocessing import OneHotEncoder

ohe = OneHotEncoder(sparse_output=False)
X_train_cat = ohe.fit_transform(df_train[categorical_columns].values)
Notes:
- A dense array will be returned if
sparse_output=False; otherwise, you’ll get a scipy sparse matrix. - If you need a dense array from a sparse result, call
.toarray()on the result. - This change ensures better memory efficiency and consistency in newer scikit-learn versions.
# Correlation before or after splitting the data
Correlation should be calculated after splitting the data, specifically on the train dataset.
To find the two most correlated features:
- Generate the correlation matrix of the train dataset.
- Identify the pair of features with the highest absolute correlation coefficient.
# Transforming Non-Numerical Columns into Numerical Columns
Use sklearn.preprocessing encoders and scalers, e.g. OneHotEncoder, OrdinalEncoder, and StandardScaler.
# What is the better option FeatureHasher or DictVectorizer?
These methods both receive a dictionary as input. While the DictVectorizer will store a large vocabulary and take up more memory, FeatureHasher creates vectors with a predefined length. They are both used for handling categorical features.
- If you have high cardinality in categorical features, it's better to use
FeatureHasher. - If you want to preserve feature names in transformed data and have a small number of unique values, use
DictVectorizer.
Your choice will depend on your data. For more information, you can visit scikit-learn.org
# Isn't it easier to use DictVertorizer or get dummies before splitting the data into train/val/test? Is there a reason we wouldn't do this? Or is it the same either way?
The reason it's recommended to do it after splitting is to avoid data leakage. You don't want any data from the test set influencing the training stage, similarly from the validation stage in the initial training. See e.g. scikit-learn documentation on "Common pitfalls and recommended practices": https://scikit-learn.org/stable/common_pitfalls.html
# Encoding Techniques
This article explains different encoding techniques used.
# Error in use of accuracy_score from sklearn in Jupyter (sometimes)
I got this error multiple times; here is the code:
accuracy_score(y_val, y_pred >= 0.5)
TypeError: 'numpy.float64' object is not callable
I solved it using:
from sklearn import metrics

metrics.accuracy_score(y_train, y_pred >= 0.5)
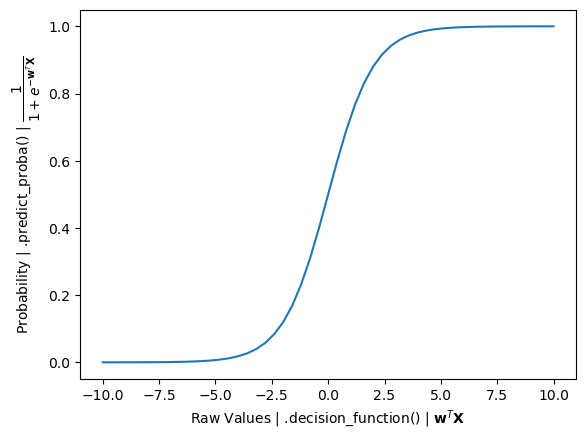
# What is the difference between .decision_function() and .predict_proba()?
In Scikit-Learn’s LogisticRegression, a model that is trained will have raw values and the predicted probabilities.
.decision_function() returns raw values that are a linear combination of the features and weights, similar to the output of Linear Regression.
.predict_proba() goes one step further by inputting these raw values into the sigmoid function to convert them into probabilities (between 0 and 1).
# Why do I get a KeyError when dropping features after one-hot encoding?
The error occurs because some features you try to drop have been one-hot encoded into multiple columns. After encoding, the original column may no longer exist, leading to the KeyError. To resolve this, identify and drop all related one-hot encoded columns (e.g., those starting with the original feature name) instead of the original feature itself.
For example, after one-hot encoding, the column marital could have been split into columns like marital_single, marital_married, etc. This means that the original column marital no longer exists, leading to the KeyError.
# DictVectorizer: 'object has no attribute get_feature_names'
get_feature_names() was removed in sklearn 1.0+. Use get_feature_names_out() instead:
list(dv.get_feature_names_out())
# TypeError: unsupported operand type(s) for /: 'str' and 'int' when running corrwith
One of the columns you think is numeric is actually stored as object/string. In the churn dataset, totalcharges has spaces (' ') for missing values, which causes pandas to store it as object. Convert it explicitly first:
df.totalcharges = pd.to_numeric(df.totalcharges, errors='coerce').fillna(0)
Make sure churn is also numeric (e.g., (df.churn == 'yes').astype(int)).
# AttributeError: 'DataFrame' object has no attribute 'TotalCharges' after running the cell again
You ran a cell that lowercases column names twice. After:
df.columns = df.columns.str.lower().str.replace(' ', '_')
the column is now totalcharges, not TotalCharges. Either:
- Reload the original dataframe before re-running the cell, or
- Split your data-prep code so the rename only runs once, or
- Make the rename idempotent: it will silently no-op the second time since the columns are already lowercase.
# How do I read bank-full.csv? Pandas isn't separating the columns
The bank dataset uses semicolons, not commas, as separators. Read it with:
df = pd.read_csv('bank-full.csv', sep=';')
# ConvergenceWarning: lbfgs failed to converge on LogisticRegression
The default max_iter in LogisticRegression is 100, which often isn't enough. Either:
- Increase
max_iter:LogisticRegression(max_iter=1000) - Scale your features first (StandardScaler).
To suppress the warning while keeping the model:
import warnings
from sklearn.exceptions import ConvergenceWarning
with warnings.catch_warnings():
    warnings.simplefilter("ignore", category=ConvergenceWarning)
    # train model here
Older course videos used Python 3.8 / older sklearn where this warning didn't appear; with current Python and sklearn it does.
Module 3 Homework
# What data should we use for correlation matrix?
Q2 asks about the correlation matrix and converting median_house_value from numeric to binary. Just to clarify, we are only dealing with df_train, not df_train_full, correct? The question explicitly mentions the train dataset.
Yes, it is only on df_train. The reason is that df_train_full also contains the validation dataset. At this stage, we don't want to make conclusions based on the validation data, since we want to test how we did without using that portion of the data.
# Feature elimination
For Q5 in homework, should we calculate the smallest difference in accuracy in real values (i.e. -0.001 is less than -0.0002) or in absolute values (i.e. 0.0002 is less than 0.001)?
We should select the “smallest” difference, and not the “lowest”, meaning we should reason in absolute values.
If the difference is negative, it means that the model actually became better when we removed the feature.
# How to select the alpha parameter in Q6
To select the alpha parameter, you need to find the RMSE for each alpha. If RMSE scores are equal, choose the lowest alpha.
# Features for homework: Q5
Do we need to train the model only with the features: total_rooms, total_bedrooms, population, and households, or with all the available features, then remove each of the previous features one at a time to compare accuracy?
- Create a list of all features and evaluate the model to obtain the original accuracy.
- Remove one feature at a time.
- Train the model each time, calculate the accuracy, and find the difference between the original accuracy and the new accuracy.
- Identify which feature has the smallest absolute accuracy difference.
While calculating differences between accuracy scores, use the smallest absolute difference. For example, if the differences are -4 and -2, the smallest absolute difference is abs(-2). Use this value to determine the impact of the feature on accuracy.
# Homework 3: Use of random seed
For the test_train_split question on week 3's homework, are we supposed to use 42 as the random_state in both splits or only the first one?
Answer: For both splits, random_state = 42 should be used.
# Homework Q6: Choosing smaller C that leads to best accuracy
When searching for the best value of C that yields the highest accuracy, be mindful that you should be looking for the maximum accuracy, not the minimum.
Although the goal is to find the smallest C value, ensure that it corresponds to the highest accuracy achieved. Always prioritize accuracy maximization while minimizing C.
# Homework: I am getting 1.0 as accuracy. Should I use the closest option?
If you are getting 1.0 as accuracy, it is possible that you have overfitted the model. Dropping the column msrp/price can help you solve this issue.
# Homework Q6: Train a regularized logistic regression with C=0.0
This is not possible since the parameter C represents the inverse of the regularization strength. Setting C to 0 means infinite regularization. Attempting this with the scikit-learn module of Logistic Regression will result in a ValueError.
# Should I fill missing values before or after splitting data (Q4)?
When working on Q4, should I handle missing values (fillna) before splitting the data, or should I do it in each individual question?
This is an important ML workflow design decision. Here are the tradeoffs:
Option A: Handle missing values before splitting
- Clean data once, use everywhere. All future scripts for q3, q4, q5, q6, etc get clean data automatically.
- More efficient as we don't repeat cleaning logic
- CAUTION: You need to be careful about data leakage (see below)
Option B: Handle missing values in each question script (after splitting)
- Each script is self-contained
- More flexible if different questions need different fillna strategies
- You'd need to repeat cleaning logic multiple times
So the critical question comes to "does your strategy means data leakage?":
- If you fill numerical with mean → you MUST compute mean from train only (so you need to do it after the split!)
- If you fill numerical with constant, like 0.0 → Safe to do before split! Because this means there would be no leakage.
For example, if the homework specifies specific fillna values:
- Categorical → 'NA' (constant)
- Numerical → 0.0 (constant)
It means that both strategies use constants, so it's safe to fill missing values before splitting and there's no data leakage risk! This is because we're not computing statistics from the data.
If the fillna in the homework uses constants as fills, filling before splitting the data is more efficient since you clean the data once and all subsequent scripts use clean data automatically. Otherwise, you need to be extremely very careful about the data splits and fillna in your scripts
In production systems, the source data is rarely filled in for misisng values during the initial ingestion step. This is because you likely want to be able to reproduce all transformation on your side starting from "source as is".
Module 4. Evaluation Metrics for Classification
# Homework: How do I import data from 'bank-full.csv'?
Import the data using the following command:
import pandas as pd

df = pd.read_csv("bank-full.csv", sep=';')
Note that the data is separated by a semicolon, not a comma.
# What exactly is taught in the evaluation module?
In Module 4, you’ll learn the core evaluation concepts used in classification tasks. Topics include:
- Metrics and diagnostics: precision, recall, ROC curves, and precision-recall curves
- Evaluation mindsets: how to think critically about metrics and validation in ML projects
- Common pitfalls: data leakage, improper validation, misinterpretation of metrics and curves
- Practical interpretation: selecting metrics based on context (class balance, costs of errors) and conveying results clearly
- Real-world applicability: how these concepts guide model comparison, threshold selection, and reporting This module is designed to be conceptual and abstract, yet practical for real-world ML work.
# Why do we sometimes use random_state and not at other times?
Refer to the sklearn documentation, random_state is used to ensure the "randomness" that is used to shuffle the dataset is reproducible. It typically requires both random_state and shuffle parameters to be set accordingly.
# How to get all classification metrics?
To get classification metrics like precision, recall, F1 score, and accuracy simultaneously, use classification_report from sklearn.
For more information, check here.
# ValueError: This solver needs samples of at least 2 classes in the data, but the data contains only one class: 0
This error indicates that your dataset's churn column only contains the class 0, but at least two classes are required.
Check your data processing steps where binary conversion might be applied. Specifically, ensure that the line:
df.churn = (df.churn == 'yes').astype(int)is operating correctly. Verify that there are indeed records where
churnshould evaluate to1(i.e., cases wherechurnequals'yes').If all values are
0, make sure your original dataset and preprocessing steps are correctly implemented to represent cases with both classes (0and1).Review data preprocessing steps and confirm the filtering, transformation, or data importing steps do not inadvertently drop or misclassify the non-zero class records.
This should resolve the error by ensuring your data contains at least one record for each class.
# Method to get beautiful classification report
Use Yellowbrick. Yellowbrick is a library that combines scikit-learn with matplotlib to produce visualizations for your models. It produces colorful classification reports.
# Use AUC to evaluate feature importance of numerical variables
Check the solutions from the 2021 iteration of the course. You should use roc_auc_score.
# How to use AUC for numerical features?
When calculating the ROC AUC score using sklearn.metrics.roc_auc_score, the function expects two parameters: y_true and y_score. For each numerical value in the dataframe, it will be passed as the y_score to the function, and the target variable will be passed as y_true each time.
# What does KFold do?
KFold is a cross-validation technique that splits your dataset into k equal parts (folds). It trains the model k times, each time using a different fold as the validation set while training on the remaining folds. This process helps provide a more reliable estimate of a model's performance by ensuring every data point gets to be in both the training and validation sets. The average score across all folds offers a robust evaluation, minimizing the risk of overfitting to a specific train-test split.
What does this line do?
KFold(n_splits=n_splits, shuffle=True, random_state=1)
Positioning in Code: Whether you instantiate KFold inside the loop over different regularization values like
[0.01, 0.1, 1, 10]or outside, it typically does not affect your answer. This is becauseKFoldis essentially a generator object containing the informationn_splits,shuffle, andrandom_state.Impact of Random State: Changing the
random_statecan yield different results because it affects how the data is shuffled. However, the creation of theKFoldobject, either inside or outside a loop, doesn't make a difference as long as the configuration (n_splits,shuffle,random_state) remains constant.Best Practice: It is recommended to create the
KFoldobject before the loop to avoid unnecessary repetition:kFold = KFold(n_splits=n_splits, shuffle=True, random_state=1) for C in [0.01, 0.1, 1, 10]: for train_idx, val_idx in kFold.split(df_full_train): # train and evaluate model
For more details, you can refer to the official scikit-learn documentation.
# ValueError: multi_class must be in ('ovo', 'ovr')
I'm getting "ValueError: multi_class must be in ('ovo', 'ovr')" when using roc_auc_score to evaluate feature importance of numerical variables in question 1.
This error occurs because the parameters were passed to roc_auc_score incorrectly. Here is the correct usage:
roc_auc_score(y_train, df_train[col])
# What is the use of inverting or negating the variables less than the threshold?
Inverting or negating variables with ROC AUC scores less than the threshold is a valuable technique to improve feature importance and model performance when dealing with negatively correlated features. It helps ensure that the direction of the correlation aligns with the expectations of most machine learning algorithms.
# Difference between `predict(X)` and `predict_proba(X)[:, 1]`
Using predict(X) provides binary classification predictions, which are either 0 or 1. This could result in inaccurate evaluation values.
The alternative is to use predict_proba(X)[:, 1], which gives the probability that the value belongs to a specific class.
predict_proba displays probabilities for each class.
# Why are FPR and TPR equal to 0.0, when threshold = 1.0?
For churn/not churn predictions, when the threshold is 1.0:
- FPR (False Positive Rate) is 0.0
- TPR (True Positive Rate) is 0.0
When the threshold is set to 1.0, the condition for belonging to the positive class (churn class) is g(x) >= 1.0. However, g(x) is a sigmoid function in a binary classification problem, which produces values between 0 and 1. The function never reaches the outermost values of 0 or 1.
Therefore, no sample will satisfy the condition for the positive class (churn), resulting in no positive (churn) predictions. Consequently, this leads to both the false positive and true positive rates being 0.0 when the threshold is 1.0.
# How can I annotate a graph?
Matplotlib has a cool method to annotate where you can provide an X,Y point and annotate with an arrow and text. For example, this will show an arrow pointing to the x,y point optimal threshold.
plt.annotate(f'Optimal Threshold: {optimal_threshold:.2f}\nOptimal F1 Score: {optimal_f1_score:.2f}',

xy=(optimal_threshold, optimal_f1_score),

xytext=(0.3, 0.5),

textcoords='axes fraction',

arrowprops=dict(facecolor='black', shrink=0.05))
# I didn’t fully understand the ROC curve. Can I move on?
It's a complex and abstract topic and it requires some time to understand. You can move on without fully understanding the concept.
Nonetheless, it might be useful for you to rewatch the video, or even watch videos/lectures/notes by other people on this topic, as the ROC AUC is one of the most important metrics used in Binary Classification models.
# How to find the intercept between precision and recall curves by using numpy?
You can find the intercept between these two curves using numpy's diff and sign functions:
Ensure your
df_scoresDataFrame is ready with three columns:threshold,precision, andrecall.Determine the indices where the precision and recall curves intersect (i.e., where the sign of the difference between precision and recall changes):
import numpy as np

idx = np.argwhere(
    np.diff(
        np.sign(np.array(df_scores['precision']) - np.array(df_scores['recall']))
    )
).flatten()
Print the result to easily read it:
print(f"The precision and recall curves intersect at a threshold equal to {df_scores.loc[idx]['threshold']}.")
# Compute Recall, Precision, and F1 Score using scikit-learn library
You can use the Scikit Learn library to calculate precision, recall, and F1 score without having to define true positive, true negative, false positive, and false negative manually.
from sklearn.metrics import precision_score, recall_score, f1_score

precision = precision_score(y_true, y_pred, average='binary')
recall = recall_score(y_true, y_pred, average='binary')
f1 = f1_score(y_true, y_pred, average='binary')
Replace y_true and y_pred with your actual data. The average parameter is set to 'binary' by default for binary classification.
# Why do we use cross validation?
Cross-validation evaluates the performance of a model and chooses the best hyperparameters. It does this by splitting the dataset into multiple parts (folds), typically 5 or 10. It then trains and evaluates your model multiple times, each time using a different fold as the validation set and the remaining folds as the training set.
"C" is a hyperparameter typically associated with regularization in models like Support Vector Machines (SVM) and logistic regression.
Smaller "C" values: They introduce more regularization, which means the model will try to find a simpler decision boundary, potentially underfitting the data. This is because it penalizes the misclassification of training examples more severely.
Larger "C" values: They reduce the regularization effect, allowing the model to fit the training data more closely, potentially overfitting. This is because it penalizes misclassification less severely, allowing the model to prioritize getting training examples correct.
# Evaluate the Model using scikit learn metrics
Model evaluation metrics can be easily computed using the off-the-shelf calculations available in the scikit-learn library. This method is more precise compared to calculating from scratch using numpy and pandas libraries.
from sklearn.metrics import (
    accuracy_score,
    precision_score,
    recall_score,
    f1_score,
    roc_auc_score
)

accuracy = accuracy_score(y_val, y_pred)
precision = precision_score(y_val, y_pred)
recall = recall_score(y_val, y_pred)
f1 = f1_score(y_val, y_pred)
roc_auc = roc_auc_score(y_val, y_pred)

print(f'Accuracy: {accuracy}')
print(f'Precision: {precision}')
print(f'Recall: {recall}')
print(f'F1-Score: {f1}')
print(f'ROC AUC: {roc_auc}')
# Are there other ways to compute Precision, Recall and F1 score?
Scikit-learn offers another way: precision_recall_fscore_support.
Example:
from sklearn.metrics import precision_recall_fscore_support

precision, recall, fscore, support = precision_recall_fscore_support(y_val, y_val_pred, zero_division=0)
# When do I use ROC vs Precision-Recall curves?
ROC curves are appropriate when the observations are balanced between each class, whereas precision-recall curves are appropriate for imbalanced datasets.
The reason for this recommendation is that ROC curves present an optimistic picture of the model on datasets with a class imbalance. This is because of the use of true negatives in the False Positive Rate in the ROC Curve and the careful avoidance of this rate in the Precision-Recall curve.
If the proportion of positive to negative instances changes in a test set, the ROC curves will not change. Metrics such as accuracy, precision, lift, and F scores use values from both columns of the confusion matrix. As a class distribution changes these measures will change as well, even if the fundamental classifier performance does not. ROC graphs are based upon TP rate and FP rate, in which each dimension is a strict columnar ratio, so cannot give an accurate picture of performance when there is class imbalance.
# Dependence of the F-score on class imbalance
Precision-recall curves, and thus the F-score, explicitly depend on the ratio of positive to negative test cases. This means that comparing the F-score across different problems with differing class ratios can be problematic.
One way to address this issue is to use a standard class ratio when making such comparisons.
# Quick way to plot Precision-Recall Curve
We can import precision_recall_curve from scikit-learn and plot the graph as follows:
from sklearn.metrics import precision_recall_curve

precision, recall, thresholds = precision_recall_curve(y_val, y_predict)

plt.plot(thresholds, precision[:-1], label='Precision')
plt.plot(thresholds, recall[:-1], label='Recall')
plt.legend()
# What is Stratified k-fold?
For multiclass classification, it is important to keep class balance when you split the dataset. Stratified k-fold returns folds that contain approximately the same percentage of samples of each class.
Please check the implementation in the scikit-learn library: https://scikit-learn.org/stable/modules/cross_validation.html#stratified-k-fold
# Why is accuracy not always the best metric for evaluating a classification model?
Accuracy is the proportion of correct predictions made by the model, but it can be misleading, especially with imbalanced datasets. For example, if 95% of your data belongs to one class, a model that always predicts this majority class will have high accuracy, even though it completely fails to identify the minority class. In such cases, metrics like precision, recall, F1-score, or AUROC might be more appropriate, as they provide a clearer view of model performance on both classes.
# How to easily remember precision and recall?
Precision is TruePositive/PredictedPositive and recall means TruePositive / ActualPositive.
- Precision: Precise predictions (how accurate are our YES predictions?)
- Recall: Remembering (how many real YES cases did we find?)
# How do I interpret precision and recall?
Precision:
Memory tip: Think of Precision as "How Precise Are Our Positive Predictions?" It relates to the accuracy of the positive results, emphasizing how many of the predicted positive instances are actually correct.
Interpretation:
High Precision:
- Most of the predicted positives are correct.
- This makes the model more reliable.
Low Precision:
- Indicates a higher rate of false positives.
- This decreases trust in the positive predictions.
When to prioritize precision: In scenarios like email spam detection, where marking a legitimate email as spam (false positive) can lead to missed communications, high precision is preferred to ensure that most flagged emails are indeed spam.
Recall:
Memory tip: Think of Recall as "How Sensitive Are We to the Positives?" It emphasizes capturing all actual positive cases. A high recall means that the model is good at identifying most of the positives.
Interpretation:
High Recall:
- The model captures most of the true positives.
- This is crucial in situations where missing a positive case is costly.
Low Recall:
- Many actual positives are overlooked.
- This highlights potential issues in detection.
When to prioritize recall: In medical diagnostics for a severe or highly contagious disease, missing a true positive (an actual case of the disease) can have serious public health implications.
Balancing Precision and Recall:
- Improving one metric may lead to a decrease in the other.
- The choice between precision and recall depends on specific goals and acceptable trade-offs in a given application.
# How to address UndefinedMetricWarning: F-score is ill-defined and being set to 0.0 in labels with no predicted samples?
This warning occurs when your model doesn't predict any samples for certain labels, causing a zero-division error when calculating the F-score. The warning is triggered when there are no true positives or predicted positives for certain labels, leading to undefined precision or recall.
To address this, you can use the zero_division parameter in scikit-learn's f1_score function. This parameter defines what should happen in cases of zero division:
- Set
zero_division=1: This will set the precision, recall, and F-score to 1 when no positive samples are predicted. - Set
zero_division=0: This is the default behavior, setting the metric to 0 when there are no predicted samples for a given label. - Set
zero_division='warn': This is the default behavior, acts like 0 but also raises a warning.
Example usage:
from sklearn.metrics import f1_score, precision_score, recall_score

# For precision score
precision = precision_score(y_true, y_pred, average='weighted', zero_division='warn')

# For recall score
recall = recall_score(y_true, y_pred, average='weighted', zero_division=0)

# For f1-score
f1 = f1_score(y_true, y_pred, average='weighted', zero_division=0)
# What does 'use the numerical variable as a score' mean for AUC?
You're treating each numerical feature as if it were the model's predicted score, and computing how well it discriminates the two classes:
from sklearn.metrics import roc_auc_score
auc = roc_auc_score(y_train, df_train['balance'])
If auc < 0.5, invert the score by passing -df_train['column'] (or take 1 - auc). The numerical values don't need to be in [0, 1] — AUC only cares about ranking, not magnitudes.
# Why are all my predicted probabilities negative when I use predict_log_proba?
predict_log_proba returns log-probabilities (always ≤ 0), not probabilities. For AUC and threshold-based metrics, use predict_proba and take the positive class column:
y_pred = model.predict_proba(X_val)[:, 1]
Module 4 Homework
# Multiple thresholds for Q4
I am getting multiple thresholds with the same F1 score. Does this indicate I am doing something wrong, or is there a method for choosing? Should I just pick the lowest?
- Choose the threshold closest to any of the options.
You can also use scikit-learn (or other standard libraries/packages) to verify results obtained using your own code. For example, use classification_report to obtain precision, recall, and F1-score.
Refer to the documentation: scikit-learn classification_report
# Homework: I’m not getting the exact result
That’s fine, use the closest option.
# What dataset should I use to compute the metrics in Question 3
You must use the dt_val dataset to compute the metrics asked in Question 3 and onwards, as you did in Question 2.
# Homework: Why do I have different values of accuracy than the options in the homework?
One main reason behind this issue is the method of splitting the data. For example, if we want to split the data into train/validation/test with the ratios 60%/20%/20%, different methods may yield different results even if the final ratios are the same.
Method 1:
df_train, df_temp = train_test_split(df, test_size=0.4, random_state=42)
df_val, df_test = train_test_split(df_temp, test_size=0.5, random_state=42)
Method 2:
df_full_train, df_test = train_test_split(df, test_size=0.2, random_state=42)
df_train, df_val = train_test_split(df_full_train, test_size=0.25, random_state=42)
While both methods achieve the same ratio, the data split differently, resulting in variations in accuracy. It is recommended to use the second method, as it is more consistent with the lessons and homeworks.
# How to evaluate feature importance for numerical variables with AUC?
You can use the roc_auc_score function from the sklearn.metrics module. Pass the vector of the target variable (e.g., above_average) as the first argument and the vector of feature values as the second one. This function will return the AUC score for the feature that was passed as the second argument.
from sklearn.metrics import roc_auc_score

# Example usage:
auc_score = roc_auc_score(target_variable, feature_values)
# Homework Q1 is not clear to me. What do I do here?
Q1 is not making sense to me. The score should be between 0 to 1. I tried computing roc_curve (df_train['age'], y) and the graph does not have the model line. Can anyone clarify?'
The idea of the question is to evaluate the importance of features with respect to the prediction of the binary target variable (yes/no).
In my case, I did the following:
Identified the numerical features in the dataset.
For each feature in the list of numerical features, I calculated the AUC:
roc_auc_score(y_target, feature_vector)Here,
y_targetis the target variable, andfeature_vectorcontains the values for each numerical column in the train dataset.Created a data frame with two columns: the name of the numerical feature and the ROC AUC score.
Sorted the data frame by the ROC AUC score to determine the numerical feature with the highest ROC AUC.
Module 5. Deploying Machine Learning Models
# Errors related to the default environment: WSL, Ubuntu, proper Python version, installing pipenv etc.
While weeks 1-4 can relatively easily be followed and the associated homework completed with just about any default environment or local setup, week 5 introduces several layers of abstraction and dependencies.
It is advised to prepare your “homework environment” with a cloud provider of your choice. A thorough step-by-step guide for doing so for an AWS EC2 instance is provided in an introductory video taken from the MLOPS course here:
https://www.youtube.com/watch?v=IXSiYkP23zo
Note that (only) small instances can be run for free, and larger ones will be billed hourly based on usage (but can and should be stopped when not in use).
Alternative ways are sketched here: https://github.com/alexeygrigorev/mlbookcamp-code/blob/master/course-zoomcamp/01-intro/06-environment.md
# How to download CSV data via Jupyter NB and the Kaggle API, for one seamless experience
To download CSV data via Jupyter Notebook using the Kaggle API, follow these steps:
Set up a Kaggle account:
- Go to your Kaggle account settings, navigate to the API section, and click
Create New Token. This will download akaggle.jsonfile containing yourusernameandkey.
- Go to your Kaggle account settings, navigate to the API section, and click
Place the
kaggle.jsonfile:- Ensure the
kaggle.jsonfile is in the same directory as your Jupyter Notebook.
- Ensure the
Set permissions for the
kaggle.jsonfile:!chmod 600 <ENTER YOUR FILEPATH>/kaggle.jsonConfigure the environment:
- Import the
osmodule and set the Kaggle config directory:
import os os.environ['KAGGLE_CONFIG_DIR'] = '<STRING OF YOUR FILE PATH>'- Import the
Download the dataset:
- Use the Kaggle API to download your desired dataset:
!kaggle datasets download -d kapturovalexander/bank-credit-scoringUnzip and access the CSV file:
!unzip -o bank-credit-scoring.zip
Follow these steps to seamlessly integrate Kaggle data retrieval into your Jupyter workflow.
# Basic Ubuntu Commands:
cd ..Go back to the previous directory.
lsList the contents of the current directory.
cd 'path'/Navigate to the specified path.
pwdPrint the current working directory.
cat 'file name'Display the contents of a file.
# Installing and updating to the python version 3.10 and higher
To check your current Python version, open your terminal and run:
python3 --version
For Windows:
- Visit the official Python website to download the desired version: Python Downloads.
- Run the installer and ensure you check the box that says "Add Python to PATH" during installation.
- Complete the installation by following the prompts.
For Python 3:
Open your command prompt or terminal and run the following command:
pip install --upgrade python
# How to install WSL on Windows 10 and 11?
Windows 10:
- Open PowerShell as Admin.
- Run the following command:
wsl --install - Restart your computer.
- Set up your Linux distribution (e.g., Ubuntu).
Windows 11:
- Open Windows Terminal as Admin.
- Run:
wsl --install - Restart if prompted.
- Set up your Linux distribution.
Additional Notes:
- To install a specific distribution, use:
wsl --install -d <DistributionName> - For updates, run:
wsl --update
It is important to ensure that the "Virtual Machine Platform" feature is activated in your Windows "Features." You can check this by searching for "features" in the search bar to see if the checkbox is selected. Additionally, ensure that your system (in the BIOS) supports virtualization.
In the Microsoft Store, search for ‘Ubuntu’ or ‘Debian’ (or any Linux distribution you want) and install it. After downloading, open the app and choose a username and a password. Note that while typing your password, it may not display any characters (this is normal).
Once inside your Linux system, you can try commands such as pwd. To navigate back to your Windows system:
Use
cd ../..twice.Go to the "mnt" directory:
cd mntList your files to view your disks and move to the desired folder.
mfouesnard@DESKTOP-39IH8UP:/mnt/c/Users/Melanie/ML_Zoomcamp/ML_ZoomCamp$ ls
Homework_week2.ipynb  Homework_week3_2023.ipynb  README.md  car_price.csv  data.csv  housing.csv
Homework_week3_2022.ipynb  Homework_week4_2023.ipynb  Untitled.ipynb  churn.csv  homework_week1.ipynb
Python should be already installed, but you can check with:
sudo apt install python3
To make your current folder the default when opening Ubuntu terminal, use:
echo "cd ../../mnt/your/folder/path" >> ~/.bashrc
To disable bell sounds, edit the inputrc file:
- Open the file:
sudo vim /etc/inputrc - Uncomment
set bell-style none:- Press
i(for insert), navigate to the line, delete#, pressEscape, and then:wqto save and quit.
- Press
- Open a new terminal to check the changes.
To install pip, run:
sudo apt install python3-pip
Possible Error
You might encounter the following error when installing pipenv:
/sbin/ldconfig.real: Can't link /usr/lib/wsl/lib/libnvoptix_loader.so.1 to libnvoptix.so.1
/sbin/ldconfig.real: /usr/lib/wsl/lib/libcuda.so.1 is not a symbolic link
To resolve, create a symbolic link:
sudo ln -s /usr/lib/wsl/lib/libcuda.so.1 /usr/lib64/libcuda.so
# Error building Docker images on Mac with M1 silicon
Do you get errors building the Docker image on the Mac M1 chipset?
The error received was:
Could not open '/lib64/ld-linux-x86-64.so.2': No such file or directory
To fix this error:
Open the
mlbookcamp-code/course-zoomcamp/01-intro/environment/Dockerfile.Replace line 1 with:
FROM --platform=linux/amd64 ubuntu:latestNow build the image as specified.
Note: Building the image may take over 2 hours, but it should complete successfully.
# Method to find the version of any installed Python libraries in Jupyter Notebook
To find the version of a Python library in a Jupyter Notebook, you can use the following method:
import waitress

print(waitress.__version__)
Simply replace waitress with the name of the library you want to check.
# Docker: Cannot connect to the docker daemon. Is the Docker daemon running?
Ensure Docker Daemon Is Running
On Windows:
- Open Docker Desktop (admin rights may be required).
- Check if it’s running, and restart Docker Desktop if necessary.
On Linux:
Run the following command to start the Docker daemon:
sudo systemctl start dockerVerify it’s running with:
sudo systemctl status docker
Verify Docker Group Membership (Linux Only)
Check if your user is in the Docker group:
groups $USERIf "docker" isn’t listed, add yourself with:
sudo usermod -aG docker $USERLog out and back in to apply changes.
Restart the Docker Service (Linux)
sudo systemctl restart docker
Check Docker Socket Permissions (Linux)
Run the following command to confirm Docker socket permissions:
sudo chmod 666 /var/run/docker.sock
Try Running Docker with sudo (Linux)
Run the following to check if permissions are causing the issue:
sudo docker ps
Test Docker Setup
Run a test Docker command to verify connection:
docker run hello-world
Solution for WSL Error
If you’re encountering the error on WSL, re-install Docker by removing the Docker installation from WSL and installing Docker Desktop on your host machine (Windows).
On Linux, start the docker daemon with either of these commands:
Start the Docker daemon:
sudo dockerdor
sudo service docker start
# Docker: The command '/bin/sh -c pipenv install --deploy --system && rm -rf /root/.cache' returned a non-zero code: 1
After using the command docker build -t churn-prediction . to build the Docker image, this error occurs, and the image is not created.
To fix this issue, adjust the Python version in your Dockerfile to match the version installed on your system:
Determine your Python version by running:
python --versionExample output:
Python 3.9.7Update the first line of your Dockerfile with the correct Python version:
FROM python:3.9.7-slim
Make sure to replace 3.9.7 with your actual Python version.
# Running "pipenv install sklearn==1.0.2" gives errors. What should I do?
When installing sklearn version 1.0.2, you may encounter errors. This issue is due to the package name. Instead of "sklearn," you should use its full name. Here's how you can resolve this:
Use the following command to install the correct version:
pipenv install scikit-learn==1.0.2If your homework requires version 1.3.1, use the following command:
pipenv install scikit-learn==1.3.1
Using the correct full package name should resolve the installation issues.
# Error: Failed to lock files with Pipfile.lock
When adding libraries to the virtual environment in lesson 5.5, the trainer used the command:
pipenv install numpy scikit-learn==0.24.2 flask
However, some people using Python 3.11 or later may encounter an error, failing to lock files correctly with Pipfile.lock. You may need to install scikit-learn==1.4.2 as the error differs from the trainer's example. This should resolve the issue.
If you are still having problems, try the following steps:
- Delete the
Pipfile.lockusing:rm Pipfile.lock - Rebuild the lock with:
pipenv lock - If it still doesn't work, delete the pipenv environment,
Pipfile, andPipfile.lock, and create a new one:pipenv --rm rm Pipfile*
# How do I resolve the "No module named flask" error?
I initially installed Flask with pipenv, but I received a "No module named 'flask'" error. I then reinstalled Flask using pip, and after that, I was able to import Flask successfully.
# Why do we need the --rm flag?
When running Docker containers, using the --rm flag ensures that the containers are removed upon exit. This helps in managing disk space by preventing the accumulation of stopped containers, which can consume unnecessary space.
Here are the main points regarding the use of the --rm flag:
- Space Management: Running containers with the
--rmflag prevents the accumulation of stopped containers, thus conserving disk space. - Development and Testing: During these phases, containers often don't need to persist, making the
--rmflag useful for automatic removal. - Images vs Containers: It's crucial to differentiate between them. Images are not modified upon execution; containers are the instances created from these images. The
--rmflag affects containers, not the images themselves. - Rebuilding: When a file like a Pipfile changes, the image is rebuilt, often under the same or a new tag, and the
--rmflag helps maintain a clean environment.
Use docker images to list images and docker ps -a to list all containers, helping you manage your Docker resources efficiently.
# Failed to read Dockerfile
When you create the Dockerfile, ensure the name is Dockerfile without any extensions. A common mistake is naming it with an extension, such as Dockerfile.dockerfile, which results in an error during the image build. To avoid this, create the file simply as Dockerfile.
# Incorrect way:
Dockerfile.dockerfile

# Correct way:
Dockerfile
# Install docker on MacOS
Refer to the page https://docs.docker.com/desktop/install/mac-install/. Remember to check if you have an Apple chip or Intel chip.
# Dumping/Retrieving only the size of for a specific Docker image
To list all information for all local Docker images, you can use the following commands:
docker images
docker image ls
To retrieve information for a specific image, use:
docker image ls <image_name>
Or alternatively:
docker images <image_name>
To dump only the size of a specified image, use the --format option. This will display only the image size:
docker image ls --format "{{.Size}}" <image_name>
Or alternatively:
docker images --format "{{.Size}}" <image_name>
# Where does pipenv create environments and how does it name them?
Pipenv creates environments in different locations depending on the operating system:
- OSX/Linux:
~/.local/share/virtualenvs/folder-name_cryptic-hash - Windows:
C:\Users\<USERNAME>\.virtualenvs\folder-name_cryptic-hash
For example:
C:\Users\Ella\.virtualenvs\code-qsdUdabf(for module-05 lesson)
The environment name is based on the name of the last folder in the directory where the pipenv install command was executed. For example, if you run any pipenv command in the directory ~/home/user/Churn-Flask-app, it will create an environment named Churn-Flask-app-some_random_characters, and its path will look like:
/home/user/.local/share/virtualenvs/churn-flask-app-i_mzGMjX
All libraries for this environment will be installed inside this folder. To activate the environment, navigate back to the project folder and type pipenv shell. Essentially, the location of the project folder acts as an identifier for an environment, replacing any specific name.
# Docker: How do I debug a docker container?
To debug a Docker container, follow these steps:
Launch the container image in interactive mode while overriding the entrypoint, so that it starts with a bash command:
docker run -it --entrypoint bash <image>If the container is already running, execute a command in the specific container:
First, find the container ID by listing the running containers:
docker psThen, execute bash in the container:
docker exec -it <container-id> bash
# Docker: The input device is not a TTY when running docker in interactive mode (Running Docker on Windows in GitBash)
docker exec -it 1e5a1b663052 bash
Error:
the input device is not a TTY. If you are using mintty, try prefixing the command with 'winpty'
Fix:
winpty docker exec -it 1e5a1b663052 bash
A TTY is a terminal interface that supports escape sequences, moving the cursor around, etc. Winpty is a Windows software package providing an interface similar to a Unix pty-master for communicating with Windows console programs.
For more information on terminal, shell, and console applications:
# Failed to write the dependencies to pipfile and piplock file
Create a virtual environment using the command line and use the pip freeze command to write the requirements to a text file.
# 'pipenv' is not recognized as an internal or external command, operable program or batch file.
This error occurs because pipenv is installed but not accessible from the PATH.
You might encounter this error when running:
pipenv --version
or
pipenv shell
Solution for Windows:
Open this option:
Click here:
Click the Edit button:
Ensure the following locations are included in the PATH. If not, add them:
C:\Users\AppData\...\Python\PythonXX\C:\Users\AppData\...\Python\PythonXX\Scripts\

Note: This solution is for setups without Anaconda. If you use Windows, Anaconda might be a better and less error-prone choice.
# AttributeError: module ‘collections’ has no attribute ‘MutableMapping’
Following the instruction from video week-5.6, using pipenv to install Python libraries throws the error shown below:
naneen@xps:ml_zoomcamp_ht$ pipenv install numpy
Traceback (most recent call last):
  File "/usr/bin/pipenv", line 33, in <module>
    sys.exit(load_entry_point('pipenv==11.9.0', 'console_scripts', 'pipenv')())
  File "/usr/lib/python3/dist-packages/pipenv/vendor/click/core.py", line 722, in __call__
    return self.main(*args, **kwargs)
  File "/usr/lib/python3/dist-packages/pipenv/vendor/click/core.py", line 697, in main
    rv = self.invoke(ctx)
  File "/usr/lib/python3/dist-packages/pipenv/vendor/click/core.py", line 1066, in invoke
    return _process_result(sub_ctx.command.invoke(sub_ctx))
  File "/usr/lib/python3/dist-packages/pipenv/vendor/click/core.py", line 895, in invoke
    return ctx.invoke(self.callback, **ctx.params)
  File "/usr/lib/python3/dist-packages/pipenv/vendor/click/core.py", line 535, in invoke
    return callback(*args, **kwargs)
  File "/usr/lib/python3/dist-packages/pipenv/cli/py.py", line 347, in install
    from . import core
  File "/usr/lib/python3/dist-packages/pipenv/core.py", line 21, in <module>
    import requests
  File "/usr/lib/python3/dist-packages/pipenv/vendor/requests/__init__.py", line 65, in <module>
    from . import utils
  File "/usr/lib/python3/dist-packages/pipenv/vendor/requests/utils.py", line 27, in <module>
    from .cookies import RequestsCookieJar, cookiejar_from_dict
  File "/usr/lib/python3/dist-packages/pipenv/vendor/requests/cookies.py", line 172, in <module>
    class RequestsCookieJar(cookielib.CookieJar, collections.MutableMapping):
AttributeError: module 'collections' has no attribute 'MutableMapping'
naneen@xps:ml_zoomcamp_ht$
Solution:
- Ensure you are working with Python version 3.10+
# ValueError: Path not found or generated: WindowsPath('C:/Users/username/.virtualenvs/envname/Scripts')
After entering pipenv shell, ensure you use exit before pipenv --rm. Failing to do so may cause installation errors, making it unclear whether you are "in the shell" on Windows, as there are no clear markers for it.
If this messes up your PATH, use these terminal commands to fix it:
For Windows:
set VIRTUAL_ENV ""For Unix:
export VIRTUAL_ENV=""
Additionally, manually re-creating the removed folder at C:\Users\username\.virtualenvs\removed-envname can help. The removed-envname can be identified in the error message.
# ConnectionError: ('Connection aborted.', RemoteDisconnected('Remote end closed connection without response'))
Set the host to '0.0.0.0' on the Flask app and Dockerfile, then run the URL using localhost.
# docker: build ERROR COPY [Pipfile, Pipfile.lock]
% docker build -t zoomcamp_test .

[+] Building 0.1s (10/10) FINISHED
 => [internal] load build definition from Dockerfile
 => => transferring dockerfile: 332B
 => [internal] load .dockerignore
 => => transferring context: 2B
 => [internal] load build context
 => => transferring context: 2B
 => [internal] load metadata for docker.io/svizor/zoomcamp-model:3.9.12-slim
 => [1/6] FROM docker.io/svizor/zoomcamp-model:3.9.12-slim
 => [internal] load build context
 => => transferring context: 2B
 => CACHED [2/6] RUN pip install pipenv
 => CACHED [3/6] WORKDIR /app
 => ERROR [4/6] COPY [Pipfile, Pipfile.lock, ./]
 => CACHED [5/6] RUN pipenv install --system --deploy
 => ERROR [6/6] COPY [q5_predict.py, model1.bin, dv.bin, ./]
This error occurred because I used single quotes around the filenames. Stick to double quotes.
# Docker: Fix error during installation of Pipfile inside Docker container
(hw5) (base) home@ls-MacBook-Pro hw5 % docker build -t zoomcamp_test .
[+] Building 19.7s (9/10)
 => [internal] load build definition from Dockerfile
 => => transferring dockerfile: 332B
 => [internal] load .dockerignore
 => => transferring context: 2B
 => [internal] load metadata for docker.io/svizor/zoomcamp-model:3.9.12-slim
 => CACHED [1/6] FROM docker.io/svizor/zoomcamp-model:3.9.12-slim
 => [internal] load build context
 => => transferring context: 19.77kB
 => [2/6] RUN pip install pipenv
 => [3/6] WORKDIR /app
 => [4/6] COPY [Pipfile, Pipfile.lock, ./]
 => ERROR [5/6] RUN pipenv install --system --deploy
------
 > [5/6] RUN pipenv install --system --deploy:
#8 0.659 Your Pipfile.lock (65dad0) is out of date. Expected: (f3760a).
#8 0.660 Usage: pipenv install [OPTIONS] [PACKAGES]...
#8 0.660 ERROR:: Aborting deploy
I tried the first solution on Stackoverflow which recommended running pipenv lock to update the Pipfile.lock.
However, this didn’t resolve it. The following switch to the pipenv installation worked:
RUN pipenv install --system --deploy --ignore-pipfile
# Bind for 0.0.0.0:9696 failed: port is already allocated
I was getting the following error when I rebuilt the Docker image, although the port was not allocated, and it was working fine.
Error message:
Error response from daemon: driver failed programming external connectivity on endpoint beautiful_tharp (875be95c7027cebb853a62fc4463d46e23df99e0175be73641269c3d180f7796): Bind for 0.0.0.0:9696 failed: port is already allocated.
The issue can be resolved by running the following command:
docker kill $(docker ps -q)
For more information, refer to the GitHub issue on Docker for Windows.
# ConnectionError 'Connection aborted.' for --bind 127.0.0.1:5000
I was getting an error on the client side with this:
Client Side Error:
File "C:\python\lib\site-packages\urllib3\connectionpool.py", line 703, in urlopen ...

raise ConnectionError(err, request=request)

requests.exceptions.ConnectionError: ('Connection aborted.', RemoteDisconnected('Remote end closed connection without response'))
Server Side:
An error was shown for Gunicorn, although the waitress command was running smoothly from the server side.
Solution:
- Use the IP address
0.0.0.0:8000or0.0.0.0:9696. They are the ones which work most of the time.
# Installing md5sum on Macos
To install md5sum on macOS, use the following command:
brew install md5sha1sum
Then run the command to check the hash for a file to see if it matches the provided hash:
md5sum model1.bin dv.bin
# How to run a script while a web-server is working?
I started a web-server in a terminal (command window, PowerShell, etc.). How can I run another Python script that makes a request to this server?
- Open another terminal (command window, PowerShell, etc.).
- Run your Python script from this new terminal.
# Trying to unpickle estimator from version 1.1.1 when using version 0.24.2
When executing the commands:
pipenv shell
pipenv run gunicorn --bind 0.0.0.0:9696 predict:app
the following warning may occur:
UserWarning: Trying to unpickle estimator DictVectorizer from version 1.1.1 when using version 0.24.2. This might lead to breaking code or invalid results. Use at your own risk.
- Ensure you create the virtual environment with the same version of Scikit-Learn that was used to train the model, in this case, version 1.1.1.
- Resolve version conflicts by verifying that the model and
DictVectorizerfiles are compatible with the Scikit-Learn version used for the project.
# Python_version and Python_full_version error after running pipenv install:
If you install packages via pipenv install, and encounter an error like this:
pipenv.vendor.plette.models.base.ValidationError: {'python_version': '3.9', 'python_full_version': '3.9.13'}

python_full_version: 'python_version' must not be present with 'python_full_version'

python_version: 'python_full_version' must not be present with 'python_version'
Follow these steps to resolve the issue:
Open the
Pipfilein a text editor, such asnano:nano PipfileRemove either the
python_versionorpython_full_versionline.Save the changes by pressing
CTRL+X, then typeYand pressEnter.Run the following command to create the
Pipfile.lock:pipenv lock
You can now continue with your work.
# Your Pipfile.lock (221d14) is out of date (during Docker build)
If during running the docker build command, you get an error like this:
Your Pipfile.lock (221d14) is out of date. Expected: (939fe0).

Usage: pipenv install [OPTIONS] [PACKAGES]...

ERROR:: Aborting deploy
You can try the following solutions:
Delete and Rebuild Pipfile.lock:
Delete the
Pipfile.lockusing the command:rm Pipfile.lockRebuild the lock file:
pipenv lockRetry the
docker buildcommand.
Remove and Recreate Pipenv Environment:
Remove the pipenv environment:
pipenv --rmRemove the Pipfile and Pipfile.lock:
rm Pipfile*Create a new environment before retrying the Docker build.
# Completed creating the environment locally but could not find the environment on AWS.
Ensure that you are in the correct AWS region. Check if you are in eu-west-1 (Ireland) when reviewing your Elastic Beanstalk environments. It's possible you might be in a different region in your AWS console.
# Waitress on Windows / Git Bash: "waitress-serve: command not found"
pip install waitress does install waitress-serve.exe, but Python's Scripts/ directory may not be on Git Bash's PATH. The pip output usually warns about this:
WARNING: The script waitress-serve.exe is installed in 'C:\Users\<you>\...\Scripts'
which is not on PATH.
To fix, add that Scripts directory to Git Bash's PATH permanently:
nano ~/.bashrc
# add this line, with the path from the warning:
export PATH="/c/Users/<you>/.../Scripts:$PATH"
Close Git Bash and reopen it. waitress-serve --help should now work.
If you're using uv, this isn't an issue because uv run waitress-serve ... runs the binary directly from the venv without needing it on PATH.
# Warning: the environment variable LANG is not set!
This is an error encountered while using Pipenv to install Scikit-Learn version 1.3.1 in the ml-zoomcamp conda environment. The error indicates that explicit language specifications are not set in the bash profile.
The error is not fatal and can usually be ignored. However, if you'd like to address it, consider the following quick-fix:
Visit this discussion for more details: StackOverflow - Getting error while trying to run this command 'pipenv install requests' in ma.
In most cases, you can proceed without fixing this warning.
# Terminal Used in Week 5 videos:
# Waitress: waitress-serve shows Malformed application
When running the command:
pipenv run waitress-serve --listen=localhost:9696 q4-predict:app
You may encounter the following error message:
There was an exception (ValueError) importing your module.

It had these arguments:

1. Malformed application 'q4-predict:app'
Waitress doesn’t accept a dash in the Python file name.
To resolve this, rename the file by replacing the dash with an underscore, for example, use q4_predict.py.
# Testing HTTP POST requests from command line using curl
I wanted to have a fast and simple way to check if the HTTP POST requests are working just by running a request from the command line. This can be done using curl. (Used with WSL2 on Windows; should also work on Linux and MacOS)
curl --json '<json data>' <url>
Piping the structure to the command:
cat <json file path> | curl --json @- <url>
echo '<json data>' | curl --json @- <url>
Example using piping:
echo '{"job": "retired", "duration": 445, "poutcome": "success"}' \
| curl --json @- http://localhost:9696/predict
# Error: NotSupportedError - You can use "eb local" only with preconfigured, generic, and multicontainer Docker platforms.
When executing:
eb local run --port 9696
You may encounter the following error:
ERROR: NotSupportedError - You can use "eb local" only with preconfigured, generic and multicontainer Docker platforms.
There are two options to fix this issue:
Re-initialize the Environment:
- Run the initialization command:
eb init -i - Choose the appropriate options from the list provided (the first default option for the Docker platform should suffice).
- Run the initialization command:
Manually Edit Configuration:
- Open and edit the ‘.elasticbeanstalk/config.yml’ file.
- Change
default_platformfromDockerto:default_platform: Docker running on 64bit Amazon Linux 2023 - Note that this option might not be available in the future.
Alternative Solution:
- Re-run the init command and change the
-pflag value:eb init -p "Docker running on 64bit Amazon Linux" <appname> - Then re-run:
eb local run --port 9696
Original solution from Stack Overflow
# Requests Error: No connection adapters were found for 'localhost:9696/predict'.
You need to include the protocol scheme: [http://localhost:9696/predict](http://localhost:9696/predict).
Without the http:// part, requests has no idea how to connect to the remote server.
Note that the protocol scheme must be all lowercase; if your URL starts with HTTP:// for example, it won’t find the http:// connection adapter either.
# Getting the same result
While running the Docker image, if you get the same result, check which model you are using.
Remember, you are using a model by downloading the model and Python version. Ensure to change the model in your file when running your prediction test.
# Docker: Trying to run a docker image I built but it says it’s unable to start the container process
Ensure that you used pipenv to install the necessary modules including gunicorn. Follow these steps:
- Use
pipenv shellto enter the virtual environment. - Build and run your Docker image.
Make sure all dependencies are correctly specified in your Pipfile.
# How do I copy files from my local machine to a docker container?
You can copy files from your local machine into a Docker container using the docker cp command. Here's how to do it:
To copy a file or directory from your local machine into a running Docker container, use the following syntax:
docker cp /path/to/local/file_or_directory container_id:/path/in/container
# How do I copy files from a different folder into a Docker container’s working directory?
You can copy files from your local machine into a Docker container using the docker cp command.
In the Dockerfile, you can specify the folder containing the files you want to copy. The basic syntax is as follows:
COPY ["src/predict.py", "models/xgb_model.bin", "./"]
# AWS Elastic Beanstalk: I can’t create the environment with the command proposed during the video
I struggled with the command:
eb init -p docker tumor-diagnosis-serving -r eu-west-1
Which resulted in an error when running:
eb local run --port 9696
ERROR: NotSupportedError - You can use "eb local" only with preconfigured, generic and multicontainer Docker platforms.
I replaced it with:
eb init -p "Docker running on 64bit Amazon Linux 2" tumor-diagnosis-serving -r eu-west-1
This allowed the recognition of the Dockerfile and the build/run of the docker container.
# Docker: Dockerfile missing when creating the AWS ElasticBean environment
I encountered this error when creating an AWS ElasticBean environment using the command:
eb create tumor-diagnosis-env
Error Message:
ERROR Instance deployment: Both 'Dockerfile' and 'Dockerrun.aws.json' are missing in your source bundle. Include at least one of them. The deployment failed.
The error occurred because I had not committed the files used to build the container, particularly the Dockerfile. After performing the following Git operations, the command worked properly:
Add the modified files to staging:
git add .Commit the changes:
git commit -m "Add Dockerfile and necessary files"
# eb create: ERROR: CommandError - git could not find the HEAD
When creating and launching an AWS Elastic Beanstalk environment with eb create, you might encounter the following error:
ERROR: CommandError - git could not find the HEAD; most likely because there are no commits present
Explanation and Steps to Resolve:
This error indicates that your project directory has not been initialized as a Git repository or is in a "detached HEAD" state. Elastic Beanstalk's CLI relies on Git for managing application versions. Here's how to resolve it:
Check Git Initialization:
Run:
git statusIf Git is not initialized, you will see an error or a message indicating no repository exists.
Initialize Git:
git initCreate an Initial Commit (if none exists):
git add .
git commit -m "Initial commit"
Manage "Detached HEAD" State:
Create a new branch (if needed):
git checkout -b mainOr switch to an existing branch:
git checkout main
Reinitialize Elastic Beanstalk (if necessary):
eb initRetry Deployment:
eb create <env_name> --enable-spot
# Why doesn’t the eb create command use the latest version of my Dockerfile?
When you make local changes to the Dockerfile or any other files and do not commit these changes, AWS Elastic Beanstalk (EB) won’t deploy them. By default, the EB CLI deploys the latest commit in the current branch.
If you want to deploy to your environment without committing, you can use the –-stage option to deploy changes that have been added to the staging area.
If the Docker image creation fails during the eb create process, you can still create the image and deploy it by running eb deploy.
To deploy changes without committing:
Add new and changed files to the staging area:
~/eb$ git add .Deploy the staged changes with
eb deploy:~/eb$ eb deploy --staged
# Elastic Beanstalk ‘eb create’: ERROR Creating Auto Scaling launch configuration failed Reason: Resource handler returned message: "The Launch Configuration creation operation is not available in your account. Use launch templates to create configuration templates for your Auto Scaling groups."
To resolve this issue, you can create your environment using the --enable-spot flag, which automatically uses Launch Templates.
Example:
eb create med-app-env --enable-spot
Another option is to run eb create and follow the wizard options:
Enter Environment Name:
- Default:
churn-serving-dev - Example:
churn-serving-dev
- Default:
Enter DNS CNAME prefix:
- Default:
churn-serving-dev - Example:
churn-serving-dev
- Default:
Select a load balancer type:
1) classic
2) application
3) network
(default is 2): 1
Would you like to enable Spot Fleet requests for this environment?
- Prompt:
(y/N): - Example:
y
- Prompt:
Enter a list of one or more valid EC2 instance types separated by commas (at least two instance types are recommended).
- Defaults provided on Enter: Press
Enter
- Defaults provided on Enter: Press
# AWS: Discontinues Support for Launch Configurations
Starting on October 1, 2024, the Amazon EC2 Auto Scaling service will no longer support the creation of launch configurations for new accounts. This change is due to launch configurations being phased out and replaced by launch templates by the Amazon EC2 Auto Scaling service.
For more details refer to: AWS Documentation
This replacement of launch configurations by launch templates is what caused the error described previously (“...use launch templates to create configuration templates for your Auto Scaling groups).
# Default VPC Error when deploying to AWS Elastic Beanstalk:
When encountering a VPC configuration error during the deployment to AWS Elastic Beanstalk, follow these steps:
Execute the command:
eb create churn-prediction-envIf the environment creation initially appears successful but later shows an error related to VPC configuration, it likely means there is no default VPC for the selected region.
Go to the AWS Console and select your region from the top bar (e.g.,
us-east-2).Search for "VPC" and from the left menu, navigate to "Your VPCs".
If no VPCs are present, the option to create a default VPC will be available. Click on it.
Once the default VPC is created, rerun the command.
# What's the advantage of using Gunicorn with Flask in Docker?
Gunicorn is a Python WSGI HTTP server that is more suitable for production than the default Flask development server:
- Performance: Better at handling multiple simultaneous requests.
- Stability: More robust and can manage worker processes.
Usage:
Modify the CMD in your Dockerfile:
CMD ["gunicorn", "--bind", "0.0.0.0:9696", "app:app"]
# Fix warning: Python 3.12 was not found on your system… Neither 'pyenv' nor 'asdf' could be found to install Python.
This warning occurs because the Pipfile is expecting Python 3.12, but the local container is likely running an older version, such as Python 3.8.12-slim, as shown in the video 5.6 - Environment Management : Docker.
To resolve this issue, update the Dockerfile to use the appropriate version:
FROM python:3.12.7-slim
Ensure that both Python versions (the local version shown in the Pipfile and the container version) match to guarantee compatibility.
# Pipenv: how do I use a specific Python version (e.g. 3.11)?
Use uv to install the Python version you want, then point pipenv at that interpreter:
# Install Python 3.11 via uv
uv python install 3.11

# Find the path uv installed it to
uv python find 3.11

# Tell pipenv to use that interpreter
pipenv --python /path/to/python3.11
Alternatively, if your OS package manager already has Python 3.11 (e.g. apt install python3.11, brew install python@3.11), pass that path directly to pipenv --python.
Avoid running pipenv from inside another venv — let it manage its own environment.
# Pipenv is taking forever to lock file. I have deleted the lockfile, and restarted my pc. Please, what is a possible solution?
You could try running your homework on GitHub Codespaces instead of your local computer. In my experience, the compute resources on GitHub Codespaces are quite sufficient for Homework 5. No issues at all in terms of speed.
# How to save/download jupyter notebook to python script
You can convert a Jupyter notebook to a Python script using the following methods:
Using the terminal
Run the command below in the terminal:
jupyter nbconvert --to python notebook.ipynbThis converts the notebook into a Python script with the same name but with a
.pyextension.Using the Jupyter Notebook interface
- Navigate to
Filein the menu. - Select
Save and Export Notebook As. - Choose
Executable Scripts.
This will download the file to your downloads folder.
- Navigate to
# Does it matter if we let the Python file create the server or if we run gunicorn directly?
They both do the same; it's just less typing from the script.
# No module named ‘ping’?
When you encounter the error stating that there is no module named 'ping', it means the 'ping' module is not found in your Python environment.
To fix this, you can import the 'ping' function directly from the specific file where it is defined using:
from [file name] import ping
Replace [file name] with the actual file name where the 'ping' function is located.
# docker: Error response from daemon: failed to create task for container: failed to create shim task: OCI runtime create failed: runc create failed: unable to start container process: exec: "gunicorn": executable file not found in $PATH: unknown.
This error indicates that the executable gunicorn is not found in the container's $PATH. To resolve this, you need to add gunicorn and flask to your Pipfile.
Update your Pipfile as follows:
[[source]]
url = "https://pypi.org/simple"
verify_ssl = true
name = "pypi"

[packages]
scikit-learn = "==1.5.2"
gunicorn = "*"
flask = "*"

[dev-packages]

[requires]
python_version = "3.11"
After making these changes, follow these steps:
- Run
pipenv lockto update thePipfile.lock. - Build the Docker image with:
docker build -t [name] . - Run the Docker container with:
docker run [name]
# Can I use pre-trained models and focus on deployment?
Yes, you can use pre-trained models and focus on deployment, but you must include some training element (such as fine-tuning, retraining, or a comparable approach). Without a training element, you’ll lose points in training-related criteria, though you can still pass overall if other parts are strong.
# How to run a FastAPI app for serving a Python pickle-based model and resolve common startup errors (uvicorn/fastapi) when deploying on a local port?
The error described is typically due to using an incorrect command to start the FastAPI server. Use uvicorn to run the FastAPI app and specify the module and app object correctly. If your script is named your_script_fastapi_app.py and defines a FastAPI instance app, start the server with:
uvicorn your_script_fastapi_app:app --host 0.0.0.0 --port 9696 --reload
Notes:
- Ensure the script defines the app:
from fastapi import FastAPI; app = FastAPI(). - The syntax
uvicorn module:appis required - If you still get errors, verify the module imports succeed (no syntax/runtime errors) and that the port is not already in use.
- You can test the API by curling
http://localhost:9696/or hitting your defined endpoints.
# UserWarning: Trying to unpickle estimator from version X.Y.Z when using version A.B.C
The model was pickled with a different sklearn version than your runtime has. The warning sometimes works ("Will it actually be wrong? Maybe!"), sometimes the unpickle outright fails.
Pin the same version in your deployment env:
pipenv install scikit-learn==1.5.2
# or
uv add scikit-learn==1.5.2
If you don't know the version the model was pickled with, retrain it with whichever sklearn you're going to deploy.
# pipenv install fails with 'Failed to lock Pipfile.lock' or 'Python X.Y was not found'
The Pipfile pins a Python version that isn't on your machine. Either:
- Install that Python version (
uv python install 3.11, or your OS package manager) and try again. - Or edit the
[requires]section of your Pipfile to match the Python version you have, deletePipfile.lock, and runpipenv installagain.
Other tips for slow / hanging locks:
pipenv --rmto wipe the existing environment, then start over.- Run from an empty / clean folder.
- Use GitHub Codespaces if local resolution is too slow.
# ModuleNotFoundError: No module named 'numpy._core' when running gunicorn / waitress
This is a numpy/sklearn version mismatch between the env that pickled the model and the env that's loading it. Common fix:
- Match versions. If the model was trained with numpy 2.x, install numpy 2.x in the deployment env:
pipenv install "numpy>=2.0" # or uv add "numpy>=2.0" - Or downgrade to a known-good combination (e.g.,
numpy==1.24.3) and re-pickle the model.
If you're using Docker, the same versions need to be in the image. With pipenv install --system --deploy inside Docker, the lockfile is the source of truth — pin versions there.
# Docker container fails: 'gunicorn: executable file not found in $PATH'
gunicorn wasn't installed inside the image because it's not in the Pipfile/lockfile. Add it under [packages]:
[packages]
gunicorn = "*"
Then pipenv lock and rebuild. Same applies for waitress if you're on Windows.
# Apple Silicon (M1/M2/M3): docker run says 'requested image's platform (linux/amd64) does not match' or container fails with executable not found
The base image is built for amd64, but your Mac is arm64. Force the platform on both build and run:
docker build --platform linux/amd64 -t my-image .
docker run --platform linux/amd64 -p 9696:9696 my-image
Or set --platform=linux/amd64 in the FROM line of your Dockerfile so it's always applied.
If the image still won't run after that, GitHub Codespaces (which is amd64 native) is the simplest workaround.
# Docker image size doesn't match any of the homework options
Image sizes vary by Docker version, host OS, and architecture. The number from docker images is the uncompressed local size; the number on Docker Hub is the compressed download size — they're different. Pick the closest option from the homework choices.
For ties between two options, pick the larger one.
# eb create fails: 'Creating Auto Scaling launch configuration failed ... Use launch templates'
AWS deprecated launch configurations in October 2024. Easiest fix: pass --enable-spot, which forces EB to use launch templates:
eb create churn-serving-env --enable-spot
Alternatively, run the interactive eb create wizard and answer YES to "Spot fleet requests".
# eb local run: 'NotSupportedError - You can use eb local only with preconfigured, generic and multicontainer Docker platforms'
Recent EB CLI versions don't support eb local for the default Docker platform. Three workarounds:
- Re-init with
eb init -iand pick the default Docker platform option, or edit.elasticbeanstalk/config.ymlto setdefault_platform: Docker running on 64bit Amazon Linux 2023. - Downgrade the CLI:
pipenv install awsebcli==3.19.4 --dev. - Skip
eb localentirely —docker buildanddocker runlocally do the same job.
# After eb init, EB ignores my profile / picks the wrong region
Pass --profile and -r (region) explicitly:
eb init --profile myprofile -p docker -r eu-west-3 churn-serving
# Can I use FastAPI instead of Flask?
Yes. The course teaches Flask, but FastAPI is a fine alternative for the project (and is the canonical path in the uv + FastAPI workshop included in 2025+ cohorts).
Just describe your choice clearly in your project README so peer reviewers know what they're looking at.
# ConnectionRefusedError [Errno 61/111] Connection refused when calling Flask from predict-test.py
The Flask server isn't reachable from where the test script runs. Checklist:
- Is the Flask process actually running? Start it in a separate terminal and leave it running.
- Is the port the same in the server and the client? Match
app.run(port=9696)with the URL inpredict-test.py. - Try
127.0.0.1instead oflocalhost, or vice versa. - On Windows, check whether the port is taken or blocked:
netstat -aon | findstr :9696. - Test with
curl http://127.0.0.1:9696/predictfirst to isolate Python from networking.
# Module 5 has both a Pipenv + Flask version and a uv + FastAPI workshop. Which should I follow?
For current cohorts, follow the workshop in 05-deployment/workshop/ — it uses uv and FastAPI, and the homework expects this path. The original Pipenv + Flask lectures are kept for reference because the deployment concepts are the same, but the new uv + FastAPI workshop is canonical.
# After uv add, uv.lock has the package but pyproject.toml shows empty dependencies = []
Run uv sync after uv add to reconcile pyproject.toml and uv.lock. Don't manually edit dependencies if uv.lock already has them — uv sync (or rerunning uv add) is the right fix.
Make sure you're running uv add from the directory that contains your pyproject.toml.
# Homework 5: ModuleNotFoundError: No module named 'sklearn' inside the Docker container
The Dockerfile isn't installing dependencies into the system Python that runs at container start. With uv, in your Dockerfile you need:
WORKDIR /code
COPY pyproject.toml uv.lock ./
RUN uv sync
The base image (agrigorev/zoomcamp-model:2025) has its working directory at /code — set WORKDIR /code so your uv sync runs there.
Also: don't COPY pipeline_v2.bin . — the file already exists at /code/pipeline_v2.bin inside the base image. Just point your loader at that path.
# How do I deploy my Dockerized API to Render (free tier)?
Quickest path:
- Push your image to Docker Hub:
docker push <your-username>/<image>:latest - In Render, create a new Web Service → "Deploy an existing image from a registry" → paste the Docker Hub URL.
- Set the start command (e.g.
uvicorn predict:app --host 0.0.0.0 --port $PORT). Render injects$PORTat runtime — listen on it, don't hardcode. - Free tier sleeps after ~15 min idle, so the first request after that takes ~30s to wake up.
Render is the most popular free-tier choice for this course's project deployment because it doesn't require a credit card. Other options: Fly.io, Google Cloud Run (both require a card), Railway, PythonAnywhere.
Don't post Docker Hub itself as your "deployment" — it's a registry, not a runtime.
Module 5 Homework
# Docker: I cannot pull the image with docker pull command
Problem: When trying to pull the image using the docker pull svizor/zoomcamp-model command, an error occurs:
Using default tag: latest
Error response from daemon: manifest for svizor/zoomcamp-model:latest not found: manifest unknown: manifest unknown
Solution: Docker defaults to the latest tag. To resolve this, use the correct tag from the image description. Use the following command:
docker pull svizor/zoomcamp-model:3.10.12-slim
# Error: failed to compute cache key: "/model2.bin" not found: not found
Initially, I did not assume there was a model2. I copied the original model1.bin and dv.bin. Then when I tried to load using:
COPY ["model2.bin", "dv.bin", "./"]
I got the error above in MINGW64 (git bash) on Windows.
The temporary solution I found was to use:
COPY ["*", "./"]
This seems to combine all the files from the original Docker image and the files in your working directory.
# Homework Q6: Which model and dict vectorizer to use?
The provided image FROM svizor/zoomcamp-model:3.10.12-slim has a model and DictVectorizer that should be used for question 6. "model2.bin", "dv.bin".
# The homework instructions say Docker file has a new pipeline. Do I need to do any changes in my code to reflect it?
Yes. Since the homework specifies a new pipeline file, update your code to load pipeline_v2.bin instead of pipeline_v1.bin. Use the following snippet:
with open('pipeline_v2.bin', 'rb') as f_in:
    pipeline = pickle.load(f_in)
# I have M1 and don't use Docker Desktop.
- If you replaced Docker Desktop with 'lima', you can create an instance of Lima using the following template. Follow the instructions listed on the page to create an instance using the supplied template.
- Switch your current Docker context to the context associated with this new (running) image.
- Use
svizor/zoomcamp-model:3.11.5-slimas a base image and run your built image without issues.
Simple Solution:
Specify the platform:
docker run --platform linux/amd64 -it --rm -p 9696:9696 <your-docker-image-name>
Module 6. Decision Trees, Ensembles & Gradient Boosting
# XGBoost: TypeError: Expecting a sequence of strings for feature names, got: <class 'numpy.ndarray'>
This error occurs because recent versions of xgb.DMatrix expect the feature_names parameter to be a list of strings rather than a NumPy array. Older tutorial videos might use feature_names=dv.get_feature_names_out() directly, which now results in this error.
Convert dv.get_feature_names_out() to a list using .tolist(). Here's an updated example:
# Convert feature names to a list
feature_names = dv.get_feature_names_out().tolist()

# Create DMatrix objects with the corrected feature names
dfulltrain = xgb.DMatrix(
    X_full_train,
    label=y_full_train,
    feature_names=feature_names
)

dtest = xgb.DMatrix(
    X_test,
    feature_names=feature_names
)
Explanation: The dv.get_feature_names_out() method returns a NumPy array, but xgb.DMatrix now expects feature_names to be a list of strings. Using .tolist() converts the array into a compatible format, allowing the code to run without errors.
# How to ensure "none" values are not interpreted as NaN when reading a CSV file in Pandas
To ensure that the string values like "None" are treated as valid strings rather than being converted to NaN when reading a CSV file, you can read the CSV file with keep_default_na set to False and specify the values you want to consider as NaN with the na_values parameter.
Here’s an example of how to do this:
import pandas as pd

df = pd.read_csv("dataset_path.csv", keep_default_na=False, na_values=['', 'NaN', 'null'])
Using keep_default_na=False prevents Pandas from applying its default set of NaN values, allowing "None" to be read as a regular string.
# How to fix when %%capture output is not working in Google Collab Notebook
I was using Google Collab Notebook for the 2024 cohort HW 06. For Question 6, the following was not working in the Collab Notebook:

This led me to find a solution as follows:
Import the required libraries:
import io
import sys
Capture output using
io.StringIO:output_capture = io.StringIO() sys.stdout = output_capture # Redirect stdout to the StringIO buffer # Train the model with eta=0.3 model_eta_03 = xgb.train(xgb_params, dtrain, num_boost_round=num_rounds, verbose_eval=2, evals=watchlist) # Reset stdout sys.stdout = sys.__stdout__ # Retrieve and print the captured output captured_output = output_capture.getvalue()Modify the parser function for one line:
Replace this line in Alexey’s parser function:
for line in output.stdout.strip().split('\n'):With this line:
for line in output.strip().split('\n'):Call the parser function:
Use
df_score_03 = parse_xgb_output(captured_output)to get the desired dataframe.
# How to get the training and validation metrics from XGBoost?
During the XGBoost lesson, we created a parser to extract the training and validation AUC from the standard output. However, we can accomplish that in a more straightforward way.
We can use the evals_result parameter, which takes an empty dictionary and updates it for each tree. Additionally, you can store the data in a dataframe and plot it in an easier manner.

# How to solve regression problems with random forest in scikit-learn?
You should create a sklearn.ensemble.RandomForestRegressor object. It’s similar to sklearn.ensemble.RandomForestClassifier for classification problems. For more information, check the official documentation.
# ValueError: feature_names must be string, and may not contain [, ] or <:
When creating DMatrix for train and validation, you might encounter the error:
ValueError: feature_names must be string, and may not contain [, ] or <
The cause of this error is special characters in feature names, such as = and <. To fix this error, you can remove or replace these characters:
features = [i.replace("=<", "_").replace("=","_") for i in features]
If the equal sign = is not a problem for you, the following adjustment could also work:
features = []

for f in dv.feature_names_:
    string = f.replace("=<", "-le")
    features.append(string)
# Q6: ValueError or TypeError while setting xgb.DMatrix(feature_names=)
If you’re encountering a TypeError like this:
TypeError: Expecting a sequence of strings for feature names, got: <class 'numpy.ndarray'>
This might be because you have executed:
features = dv.get_feature_names_out()
This returns a numpy.ndarray instead of a list. Converting it to a list with list(features) won't solve the issue.
If you face a ValueError such as:
ValueError: feature_names must be string, and may not contain [, ] or <
This could be because you have tried one of these:
features = list(dv.get_feature_names_out())features = dv.feature_names_
The problem originates from the output of DictVectorizer, which might look like:
['households',
 'housing_median_age',
 'latitude',
 'longitude',
 'median_income',
 'ocean_proximity=<1H OCEAN',
 'ocean_proximity=INLAND',
 'population',
 'total_bedrooms',
 'total_rooms']
The symbols [, ] or < are not compatible with XGBoost.
Solutions:
Do not specify
feature_names=when creatingxgb.DMatrix.Alternatively, you can clean your feature names using regex:
import re
features = dv.feature_names_
pattern = r'[\[\]<>]'
features = [re.sub(pattern, '  ', f) for f in features]
# How to Install Xgboost
To install Xgboost, use the following command directly in your Jupyter Notebook:
pip install xgboost
Note: Pip 21.3+ is required.
You can update your pip using the command below:
pip install --upgrade pip
For more information about Xgboost and installation details, check the official documentation.
# What is eta in XGBoost
Sometimes someone might wonder what eta means in the tunable hyperparameters of XGBoost and how it helps the model.
ETA is the learning rate of the model. XGBoost uses gradient descent to calculate and update the model. In gradient descent, we are looking for the minimum weights that help the model to learn the data very well. This minimum weight for the features is updated each time the model passes through the features and learns them during training. Tuning the learning rate helps you tell the model what speed it would use in deriving the minimum for the weights.
# What is the difference between bagging and boosting?
For ensemble algorithms during week 6, one bagging algorithm and one boosting algorithm were presented: Random Forest and XGBoost, respectively.
Random Forest trains several models in parallel. The output can be, for example, the average value of all the outputs of each model. This is called bagging.
XGBoost trains several models sequentially: the previous model error is used to train the following model. Weights are used to ponderate the models so that the best models have higher weights and are therefore favored for the final output. This method is called boosting.
Note that boosting is not necessarily better than bagging.
Bagging stands for “Bootstrap Aggregation”:
- It involves taking multiple samples with replacement to derive multiple training datasets from the original training dataset (bootstrapping).
- A classifier (e.g., decision trees or stumps for Random Forests) is trained on each such training dataset.
- The predictions are combined (aggregation) to obtain the final prediction.
- For classification, predictions are combined via voting; for regression, via averaging.
- Bagging can be done in parallel since the various classifiers are independent.
- Bagging decreases variance (but not bias) and is robust against overfitting.
Boosting, on the other hand, is sequential:
- Each model learns from the mistakes of its predecessor.
- Observations are given different weights - observations/samples misclassified by the previous classifier are given a higher weight.
- This process is continued until a stopping condition is reached (e.g., a maximum number of models is reached, or error is acceptably small).
- Boosting reduces bias and is generally more accurate than bagging, but can be prone to overfitting.
# Capture stdout for each iteration of a loop separately
I wanted to directly capture the output from the XGBoost training for multiple eta values to a dictionary without needing to run the same cell multiple times, edit the eta value manually, or copy the code for different eta values.
Using the magic cell command %%capture output, I could only capture the complete output for all iterations of the loop. I was able to solve this using the following approach. This is just a code sample to illustrate the idea:
from IPython.utils.capture import capture_output
import sys

different_outputs = {}

for i in range(3):
    with capture_output(sys.stdout) as output:
        print(i)
        print("testing capture")
    different_outputs[i] = output.stdout

# Output:
# different_outputs
# {0: '0\ntesting capture\n',
#  1: '1\ntesting capture\n',
#  2: '2\ntesting capture\n'}
# ValueError: continuous format is not supported
Calling roc_auc_score() to get AUC is throwing the above error.
Solution to this issue is to ensure that you pass y_actuals as the first argument and y_pred as the second argument.
roc_auc_score(y_train, y_pred)
# What is one method to visualize decision trees?
To visualize decision trees, you can use Graphviz along with Scikit-learn's export_graphviz method and plot_tree function.
Here are two approaches:
Using
export_graphviz:from sklearn import tree import graphviz dot_data = tree.export_graphviz(regr, out_file=None, feature_names=boston.feature_names, filled=True) graphviz.Source(dot_data, format="png")Using
plot_tree:from sklearn import tree tree.plot_tree(dt, feature_names=dv.feature_names_)
Both methods help in generating a visual representation of the decision tree.
# ValueError: Unknown label type: 'continuous'
This problem occurs when using DecisionTreeClassifier instead of DecisionTreeRegressor.
To resolve this issue:
- Check whether you want to use a decision tree for classification or regression.
- Use
DecisionTreeRegressorfor regression tasks.
from sklearn.tree import DecisionTreeRegressor

# Example: for regression
model = DecisionTreeRegressor()
model.fit(X_train, y_train)
# Different values of AUC, each time code is re-run
When running dt = DecisionTreeClassifier() in Jupyter on the same laptop, different AUC values are observed each time it is re-run or after restarting the kernel. Examples include values like 0.674, 0.652, 0.642, 0.669, etc. This variability is discussed in a video between 7:40-7:45 of section 6.3.
Solution:
Set a random seed to ensure reproducibility by using:
dt = DecisionTreeClassifier(random_state=22)
# DictVectorizer: feature names
The DictVectorizer has a function to get the feature names using get_feature_names_out()). This is helpful if you need to analyze feature importance but are using the dict vectorizer for one-hot encoding.
Keep in mind that it returns a NumPy array, so you may need to convert this to a list depending on your usage. For example:
dv.get_feature_names_out()will return an ndarray of string objects.list(dv.get_feature_names_out())will convert it to a standard list of strings.
Also, ensure that you fit the predictor and response arrays before accessing the feature names.
# Visualize Feature Importance by using horizontal bar chart
To make it easier to determine which features are important, we can use a horizontal bar chart to illustrate feature importance sorted by value.
Extract the feature importances from the model
feature_importances = list(zip(features_names, rdr_model.feature_importances_))
importance_df = pd.DataFrame(feature_importances, columns=['feature_names', 'feature_importances'])
Sort the DataFrame in descending order using the feature_importances value
importance_df = importance_df.sort_values(by='feature_importances', ascending=False)Create a horizontal bar chart
plt.figure(figsize=(8, 6))
sns.barplot(x='feature_importances', y='feature_names', data=importance_df, palette='Blues_r')
plt.xlabel('Feature Importance')
plt.ylabel('Feature Names')
plt.title('Feature Importance Chart')
# RMSE using metrics.root_meas_square()
Instead of using np.sqrt() as a second step, you can extract it using:
mean_squared_error(y_val, y_predict_val, squared=False)
# Features Importance graph
I like this visual implementation of features importance in scikit-learn library:
https://scikit-learn.org/stable/auto_examples/ensemble/plot_forest_importances.html
It adds standard errors to features importance, allowing you to trace the stability of features—important for a model’s explainability—over different parameters of the model.
# xgboost.core.XGBoostError: This app has encountered an error. The original error message is redacted to prevent data leaks.
Expanded error:
xgboost.core.XGBoostError: sklearn needs to be installed in order to use this module.
Solution:
- Ensure that
sklearnis listed in your requirements and installed. This should solve the problem.
# Information Gain
Information gain in Y due to X, or the mutual information of Y and X:
Where ( I(Y; X) = H(Y) - H(Y | X) ).
- If X is completely uninformative about Y, then ( I(Y; X) = 0 ).
- If X is completely informative about Y, then ( I(Y; X) = H(Y) ).
# Data Leakage
Filling in missing values using an entire dataset before splitting for training/testing/validation causes data leakage.
# Saving and loading Xgboost
If you have problems with pickling the models, you can use an alternative approach.
Save model by calling save_model, load with load_model:
model.save_model('model.bin')

...

bst = xgb.Booster()
bst.load_model('model.bin')
# Why does DecisionTreeClassifier and DecisionTreeRegressor not throw an error when there are nan (missing) values in the feature matrix?
In lesson 6.3 around 6:00, there is an error due to missing values. Subsequently, .fillna(0) is used on df_train to deal with this. However, since version 1.3, support for missing values has been added for DecisionTreeClassifier and DecisionTreeRegressor.
More details can be found here under sklearn.tree.
# Traversing feature names and feature importance values
To pair feature names with their importance values, use dv.get_feature_names_out() to retrieve the feature names and rf.feature_importances_ for the importances. Then, combine them with zip(feature_names, importances) to view or sort by importance.
# Assuming rf is your RandomForest model and dv is your DictVectorizer

feature_names = dv.get_feature_names_out()
feature_importances = rf.feature_importances_

# Pair feature names with their importance values
feature_importance_dict = dict(zip(feature_names, feature_importances))

# Sort by importance (optional)
sorted_feature_importance = sorted(feature_importance_dict.items(), key=lambda x: x[1], reverse=True)

# Display results
for feature, importance in sorted_feature_importance:
    print(f"{feature}: {importance}")
# Which XGBoost parameters are the most important to start with?
XGBoost’s performance stems from its flexibility, thanks to a range of parameters.
For initial tuning, focus on:
- learning_rate: Controls the impact of each tree. Lower values (e.g., 0.01–0.1) typically improve performance but require more trees (
n_estimators). - n_estimators: Sets the number of boosting rounds; adjust this in conjunction with
learning_rate. - max_depth: Prevents overfitting by limiting the tree’s depth.
- subsample: Dictates the fraction of samples used for training each tree, adding randomness to improve generalization.
Begin with these parameters before exploring others, like gamma and min_child_weight, for additional control over model complexity and performance.
# How to get feature importance for XGboost model
Using model.feature_importances_ can give you an error:
AttributeError: 'Booster' object has no attribute 'feature_importances_'
If you train the model like this: model = xgb.train, you should use get_score() instead.
# Reading the homework CSV converts the string 'None' to NaN
Pandas treats 'None' as a missing value by default. For columns where 'None' is a real category, use:
df = pd.read_csv("path.csv", keep_default_na=False, na_values=['', 'NaN', 'null'])
This preserves the literal string 'None' in categorical columns like Parent_Education_Level.
# Random Forest gives the same RMSE for all n_estimators values
Common bugs:
- Forgetting to call
.fit(X_train, y_train)inside the loop — you score the same untrained model each iteration. - Using
predict_probainstead ofpredictfor a regression task. max_depth=1(or another fixed shallow setting) implicitly forcing every model to be a stump.
Make sure each iteration creates a fresh RandomForestRegressor, fits it on the training data, predicts on X_val, and computes RMSE.
Module 6 Homework
# Homework Q3: What does it mean that RMSE stops improving?
Question 3 of homework 6 if I see that RMSE goes up at a certain
number of n_estimators but then goes back down lower than it was before, should
the answer be the number of n_estimators after which RMSE initially went up, or
the number after which it was its overall lowest value?
When RMSE stops improving, it means when it stops decreasing or remains nearly the same.
Projects (Midterm and Capstone)
# Could I partner up for the mid and final projects?
No, you need to do projects individually, but it’s okay to partner up to discuss weekly lectures or exchange ideas.
# Are projects solo or collaborative/group work?
All midterms and capstones are meant to be solo projects.
# What modules, topics, problem-sets should a midterm/capstone project cover? Can I do xyz?
Ideally, midterms should cover up to module-06, while capstone projects should include all modules in the cohort’s syllabus. However, you can include any other topics you wish to feature. Ensure that you document anything not covered in class.
Also, consider watching office hours from previous cohorts. Visit the DTC YouTube channel, click on Playlists, and search for {course yyyy}. ML Zoomcamp was first launched in 2021.
More discussions can be found in relevant Slack channels (links omitted for privacy).
# How to conduct peer reviews for projects?
Previous cohorts' projects page has instructions (YouTube).
Alexey and his team will compile a Google Sheet with links to submitted projects using our hashed emails, similar to how we check the leaderboard for homework. These will be our projects to review within the evaluation deadline.
# Learning in public links for the projects
For the learning in public for this midterm project, it seems the total value is 14. Does this mean that we need to make 14 posts, or the regular seven posts for each module, each one with a value of 2? Or just one with a total value of 14?
- You need to make 14 posts: one for each day and another 2 posts for evaluating other participants' projects.
# My dataset is too large and I can't load it in GitHub. Does anyone know about a solution?
You can use Git LFS for uploading large files to a GitHub repository.
# What do I need to earn the certificate?
- You must pass 2 out of the 3 projects to earn the certificate: Midterm + Capstone 1, or Capstone 1 + Capstone 2.
- Certificates show pass/fail only—no percentage or rank.
- Eligibility for the certificate also follows the existing two-project policy: If you have submitted two projects and peer-reviewed at least 3 course-mates’ projects for each submission, you will receive the certificate. According to the course coordinator, only two projects are needed to get the course certificate.
- Are projects solo or collaborative? All midterms and capstones are solo projects.
- Grading basis: The pass decision is based on the scores across projects; no overall percentage or rank is awarded.
# What datasets are acceptable for projects?
Choose something non-toy (e.g., at least 100 rows) that lets you demonstrate the full ML pipeline: data preparation → modeling → evaluation → deployment. You may also collect your own data.
# I did the first two projects and skipped the last one so I wouldn't have two peer reviews in the second capstone, right?
Yes. You only need to review peers when you submit your project.
# How many models should I train?
Regarding Point 4 in the midterm deliverables, which states, "Train multiple models, tune their performance, and select the best model," you might wonder, how many models should you train? The answer is simple: train as many as you can. The term "multiple" implies having more than one model, so as long as you have more than one, you're on the right track.
# Do you pass a project based on the average of everyone else’s scores or based on the total score you earn?
“It’s based on all the scores to make sure most of you pass.”
# Does your mid term project need to use a neural network to get maximum number of points?
No, even though it’s mentioned in the marking rubric, it's not compulsory. It’s just one of the many possible methods you may use.
# How are projects run and graded?
- Each project spans ~3 weeks: ~2 weeks building, ~1 week for peer review.
- You must complete three peer reviews to pass.
- Rubrics focus on practical ML engineering and deployment.
# Can I submit a medical project for the final project if deployment is impossible, and will my grade be reduced?
Yes, you can do it, but the points will be reduced due to the lack of deployment.
# Can I use Streamlit alone as the deployment for my project?
No. Streamlit is a UI framework, not a model-serving framework. The deployment criterion requires a service (Flask/FastAPI) wrapped in Docker, optionally on Kubernetes or a cloud platform.
Streamlit can be a nice optional UI layer on top of your service, but it doesn't satisfy the deployment requirement on its own.
# Can I use FastAPI / PyTorch / a different framework than what was taught for the project?
Yes. You can use any tech stack (FastAPI, PyTorch, LightGBM, CatBoost, Hugging Face, etc.) as long as you clearly explain in the README what you used and how to run it — your peer reviewer may not know it. The grading rubric is framework-agnostic.
PyTorch is now officially in the syllabus alongside TensorFlow.
# For the midterm, do I need to train multiple models or is one enough?
The rubric:
- 1 point: one model, no parameter tuning.
- 2 points: multiple models (e.g. linear + tree-based), no extensive tuning.
- 3 points: multiple models AND tuned hyperparameters for them.
You only need to deploy ONE final model — your train.py and predict.py only handle that one. Comparing the others happens in the notebook.
Module 8. Neural Networks and Deep Learning
# How to install Tensorflow in Ubuntu WSL2
Running a CNN on your CPU can take a long time, and once you’ve run out of free time on some cloud providers, it’s time to pay up. Both can be tackled by installing TensorFlow with CUDA support on your local machine if you have the right hardware.
I was able to get it working by using the following resources:
- CUDA on WSL :: CUDA Toolkit Documentation (nvidia.com)
- Install TensorFlow with pip
- Start Locally | PyTorch
I included the link to PyTorch so that you can get that one installed and working too while everything is fresh on your mind. Just select your options, and for Computer Platform, I chose CUDA 11.7 and it worked for me.
If you need GPU support, check this article: https://knowmledge.com/2023/12/07/ml-zoomcamp-2023-project/
# How to use Kaggle for Deep Learning?
- Create or import your notebook into Kaggle.
- Click on the three dots at the top right-hand side.
- Click on "Accelerator."
- Choose "T4 GPU."
# How to use Google Colab for Deep Learning?
- Create or import your notebook into Google Colab.
- Click on the drop-down at the top right-hand side.
- Click on “Change runtime type.”
- Choose T4 GPU.
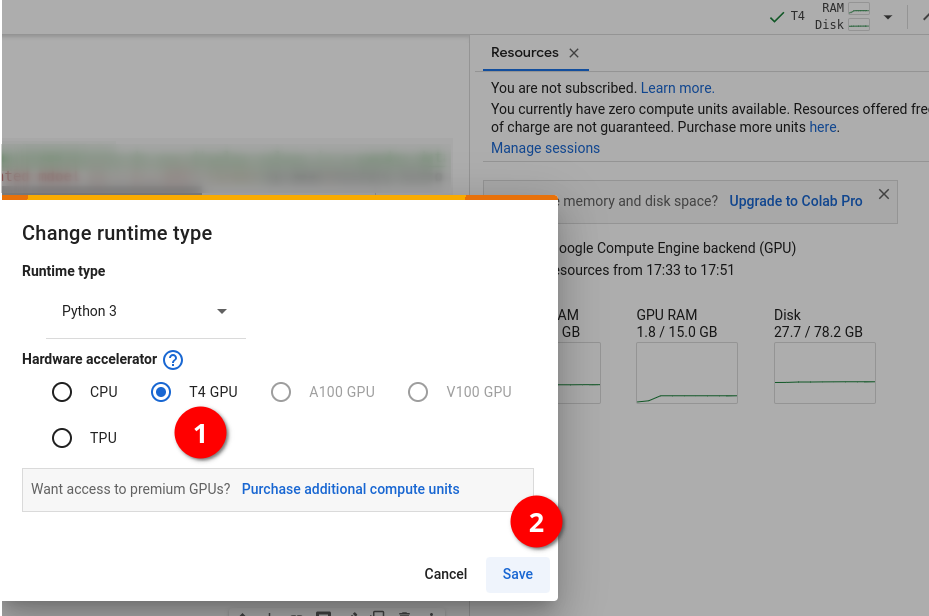
# How to install CUDA & cuDNN on Ubuntu 22.04
In order to run TensorFlow with GPU on your local machine, you’ll need to set up CUDA and cuDNN.
The process can be overwhelming. Here’s a simplified guide.
# ValueError: Unable to load weights saved in HDF5 format into a subclassed Model
When loading a saved model, you encounter the error:
ValueError: Unable to load weights saved in HDF5 format into a subclassed Model which has not created its variables yet. Call the Model first, then load the weights.
Before loading the model, you need to evaluate the model on input data:
model.evaluate(train_ds)
# Cloning into 'clothing-dataset'... Host key verification failed.
Getting an error using
git clone git@github.com:alexeygrigorev/clothing-dataset-small.git
The error:
Cloning into 'clothing-dataset'...

Host key verification failed.

fatal: Could not read from remote repository.

Please make sure you have the correct access rights
and the repository exists.
When cloning the repo, you can also choose HTTPS, then it should work. This error occurs when your SSH key is not configured.
Use the following command:
git clone https://github.com/alexeygrigorev/clothing-dataset-small.git
# The same accuracy on epochs
The accuracy and the loss are both the same or nearly the same while training.
- In the homework, set
class_mode='binary'while reading the data. - The problem may also occur if you choose the wrong optimizer, batch size, or learning rate.
# Model breaking after augmentation – high loss + bad accuracy
When resuming training after augmentation, the loss skyrockets (1000+ during the first epoch) and accuracy settles around 0.5 – i.e. the model becomes as good as a random coin flip.
Check that the augmented ImageDataGenerator still includes the rescale option as specified in the preceding step.
# Missing channel value error while reloading model:
While attempting to reload a model with TensorFlow, you might encounter the following error:
ValueError: The channel dimension of the inputs should be defined. The input_shape received is (None, None, None, None), where axis -1 (0-based) is the channel dimension, which found to be `None`.
This error is usually caused when the number of channels is not explicitly defined in the Input layer of the model.
Ensure that you explicitly specify the number of channels in the Input layer of the model architecture.
Example:
import tensorflow as tf
from tensorflow import keras

# Model architecture:
inputs = keras.Input(shape=(input_size, input_size, 3))

base = base_model(inputs, training=False)
vectors = keras.layers.GlobalAveragePooling2D()(base)
inner = keras.layers.Dense(size_inner, activation='relu')(vectors)
drop = keras.layers.Dropout(droprate)(inner)
outputs = keras.layers.Dense(10)(drop)

model = keras.Model(inputs, outputs)
This configuration ensures that the channel dimension is explicitly defined, preventing the reload error.
# How to unzip a folder with an image dataset and suppress output?
If you unzip a dataset within a Jupyter Notebook using the ! unzip command, you may encounter extensive output messages for each file. To suppress this output, follow these solutions:
Using Magic Commands
%%capture

! unzip zipped_folder_name.zip -d destination_folder_name
Using Python's zipfile Library
import zipfile

local_zip = 'data.zip'
zip_ref = zipfile.ZipFile(local_zip, 'r')
zip_ref.extractall('data')
zip_ref.close()
Use Solution 1 to suppress output directly in the notebook. Solution 2 provides an alternative approach using Python code.
# How does keras flow_from_directory know the names of classes in images?
Keras flow_from_directory understands the names of classes from the names of folders.
- When using
train_gen.flow_from_directory(), the class names are derived from the folder names within the specified directory. - For example, if you create a folder named "xyz", it will be considered a class.
- This behavior aligns with the function name
flow_from_directory.
A detailed explanation can be found in this tutorial.
# How are numeric class labels determined in flow_from_directory using binary class mode and what is meant by the single probability predicted by a binary Keras model:
The command to read folders in the dataset in the TensorFlow source code is:
for subdir in sorted(os.listdir(directory)):
Reference: Keras Image Preprocessing, line 563.
This means folders will be read in alphabetical order. For example, with a folder named dino and another named dragon, dino will be read first and will have class label 0, whereas dragon will be read next and will have class label 1.
When a Keras model predicts binary labels, it returns one value, which is the probability of class 1. This occurs with the sigmoid activation function in the last dense layer with 2 neurons. The probability of class 0 can be calculated as:
prob(class(0)) = 1 - prob(class(1))
In the case of using from_logits to get results, you will receive two values for each of the labels.
A prediction of 0.8 indicates that the probability the image has class label 1 (in this case, dragon) is 0.8. Conversely, the probability that the image has class label 0 is 0.2.
# What if your accuracy and std training loss don’t match HW?
Running the wasp/bee model on a Mac laptop might result in higher reported accuracy and lower standard deviation than expected from the HW answers. This discrepancy could be related to the version of the SGD optimizer being used. A message may appear about new and legacy versions.
- Try running the same code on Google Colab or another platform. The results may align closer with HW answers on Colab.
- Change the runtime to use a T4 GPU for faster execution compared to CPU.
# Using multi-threading for data generation in “model.fit()”
When running model.fit(...), an additional parameter workers can be specified for speeding up data loading and generation. The default value is 1. Try different values between 1 and the CPU count on your system to check which performs best.
For more information, refer to the TensorFlow documentation.
# Reproducibility with TensorFlow using a seed point
Reproducibility for training runs can be achieved by following these instructions: TensorFlow Documentation
seed = 1234

tf.keras.utils.set_random_seed(seed)

tf.config.experimental.enable_op_determinism()
This ensures consistent results when the script is executed multiple times.
# Can we use PyTorch for this lesson/homework?
PyTorch is also a deep learning framework that allows you to perform equivalent tasks as Keras. Here is a tutorial to create a CNN from scratch using PyTorch:
Writing CNNs from Scratch in PyTorch
The functions have similar goals, although the syntax may vary slightly. For the lessons and the homework, we use Keras, but you are free to make a pull request with the equivalent implementation using PyTorch for the lessons and homework!
# Keras: Model training fails with “Failed to find data adapter”
While training a Keras model, you may encounter the error:
Failed to find data adapter that can handle input: <class 'keras.src.preprocessing.image.ImageDataGenerator'>, <class 'NoneType'>
This typically occurs if you accidentally pass the image generator instead of the dataset to the model. Here is an example of incorrect usage:
train_gen = ImageDataGenerator(rescale=1./255)

train_ds = train_gen.flow_from_directory(…)

history_after_augmentation = model.fit(
    train_gen,  # this should be train_ds!!!
    epochs=10,
    validation_data=test_gen  # this should be test_ds!!!
)
The fix is straightforward. Use the training and validation datasets (train_ds and val_ds) returned from flow_from_directory:
- Ensure you pass
train_dsinstead oftrain_genwhen callingmodel.fit(). - Similarly, use
val_dsforvalidation_datainstead oftest_gen.
# Running ‘nvidia-smi’ in a loop without using ‘watch’
The command nvidia-smi has a built-in function that allows it to run in a loop, updating every N seconds, without using the watch command.
nvidia-smi -l <N seconds>
For example, the following command will run nvidia-smi every 2 seconds until interrupted by pressing CTRL+C:
nvidia-smi -l 2
# Checking GPU and CPU utilization using ‘nvitop’
The Python package nvitop is an interactive GPU process viewer similar to htop for CPU.
https://pypi.org/project/nvitop/
Image source: https://pypi.org/project/nvitop/
# Where does the number of input features to the first Linear layer after a CNN/Flatten come from, and how can I determine it reliably?
The number of features input to the first Linear layer (the in_features for the Linear) is the size of the tensor after the CNN/pooling layers and after Flatten. In practice, there are several reliable ways to determine this without manually deriving the dimensions for every layer.
1) Use a model summary utility (recommended)
- torchinfo (formerly torch-summary) can show the output shape of each layer, ending with the Flatten, so you can read off the number of features.
# Install and import
!pip install torchinfo
from torchinfo import summary

input_size = (1, 3, 150, 150)  # batch size, channels, height, width
model = CNN()
summary(model, input_size=input_size)
Output will include an entry for the Flatten layer with its output size, e.g. (1, 10000) which indicates in_features should be 10000 for the next Linear layer.
Note: If you prefer the older torchsummary, you can use it similarly, but be mindful of the batch dimension when supplying
input_size.
from torchsummary import summary
summary(model, input_size=(3, 150, 150))
2) Forward a dummy input through the CNN up to Flatten Create a model that runs the CNN portion and returns the flattened features, then inspect the feature dimension.
model = CNN()  # as defined in your example
# Create a dummy input matching the CNN's expected input
dummy_input = torch.randn(1, 3, 150, 150)
# Forward through the CNN (including Flatten)
out = model(dummy_input)
# in_features for the first Linear layer
in_features_calc = out.size(1)
print(in_features_calc)  # e.g., 10000
This yields the exact value you should use for nn.Linear(in_features_calc, ...).
3) Use a LazyLinear layer for automatic in_features inference If you want to avoid computing the exact dimension, you can use a lazy linear layer for the first fully connected layer:
import torch.nn as nn
class CNNWithLazy(nn.Module):
    def __init__(self):
        super().__init__()
        self.conv1 = nn.Conv2d(3, 16, kernel_size=(2, 2), stride=2, padding=2)
        self.relu = nn.ReLU()
        self.maxpool = nn.MaxPool2d((3, 3))
        self.flatten_dim = None  # will be inferred by LazyLinear
        self.fc = nn.LazyLinear(out_features=10)  # plans to learn 10 classes, features inferred
    def forward(self, x):
        x = self.conv1(x)
        x = self.relu(x)
        x = self.maxpool(x)
        x = torch.flatten(x, 1)
        x = self.fc(x)
        return x
The
nn.LazyLinearwill infer the requiredin_featuresfrom the input tensor size during the first forward pass.
4) Reason about shapes with a concrete example Consider a CNN where:
- Input: 3 channels, 150x150 image
- After Conv2d(in_channels=3, out_channels=16, kernel_size=(2,2), stride=2, padding=2): output shape depends on padding/stride
- After ReLU and MaxPool2d((3,3)): final feature map size could be e.g. [N, 16, 25, 25]
- Flatten yields 16 * 25 * 25 = 10000 features
# Example confirmation
# Suppose after the CNN layers you get a flattened vector of length 10000
num_features = 10000
self.fc = nn.Linear(num_features, num_classes)
In this scenario, the next linear layer should be defined with in_features = 10000.
Practical example with your CNN from the prompt Given:
- Final pooled feature map size: [N, 16, 25, 25]
- Flatten to [N, 162525] = [N, 10000]
Therefore, the first linear layer should be defined as:
self.fc1 = nn.Linear(10000, num_classes)
Note: If your input size or layer parameters differ, recompute the Flatten output accordingly using any of the methods above. The key concept is: in_features equals the total number of elements in the flattened feature tensor per sample (i.e., batch-independent dimension).
- The direct geometric/product approach is accurate but can be error-prone for complex architectures.
- Use
torchinfo.summaryor a forward pass with a dummy input to read off or compute the flattened feature size. - Alternatively, use
nn.LazyLinearto inferin_featuresautomatically. - Always ensure your chosen
in_featuresmatches the actual tensor size just before the firstnn.Linearto avoid shape mismatches.
# Sequential vs. Functional Model Modes in Keras (TF2)
It’s useful to understand that all types of models in the course are a plain stack of layers where each layer has exactly one input tensor and one output tensor. See the Sequential model TF page and the Sequential class.
You can start with an “empty” model and add more layers in sequential order. This is called the “Sequential Model API,” which is easier to use.
In Alexey’s videos, it’s implemented as chained calls of different entities (“inputs,” “base,” “vectors,” “outputs”) in a more advanced mode, the “Functional Model API.” A more complicated approach makes sense for Transfer Learning, where you want to separate the “Base” model from the rest, but in homework, you're required to recreate the full model from scratch. It might be easier to work with a sequence of similar layers.
For more information, see this TF2 tutorial.
A useful Sequential model example is available in Kaggle’s “Bee or Wasp” dataset folder: notebook.
# Out of memory errors when running tensorflow
I found this code snippet fixed my OOM errors, as I have an Nvidia GPU. Can't speak to OOM errors on CPU, though.
physical_devices = tf.config.list_physical_devices('GPU')

try:
    tf.config.experimental.set_memory_growth(physical_devices[0], True)
except:
    # Invalid device or cannot modify virtual devices once initialized.
    pass
# How did I resolve the out of memory (OOM) issue when training my model on a GPU?
To address the out of memory (OOM) issue, I followed these steps:
Check GPU Memory Usage:
I ran the following command to see how much memory was being used and which processes were occupying it:
!nvidia-smiThis command provided details about memory usage and active processes on the GPU.
Identify Active Processes:
From the output of
nvidia-smi, I noticed that a Python process (e.g.,...a3/envs/tensorflow2_p310/bin/python) was consuming a significant amount of GPU memory.Terminate the Python Process:
I used the process ID (PID) to kill the Python process that was consuming the excessive memory. For example, to kill a process with PID 11208, I executed:
!kill 11208Kernel Restart:
After terminating the process, I noticed that the kernel automatically restarted, freeing up the GPU memory.
Recheck GPU Memory:
I ran
nvidia-smiagain to confirm that the memory usage had decreased, and there were no longer any blocking processes.
By following these steps, I was able to free up GPU memory and continue training my model successfully.
# Model training very slow in google colab with T4 GPU
When training models in Google Colab, you can improve performance by specifying the number of workers/threads in the fit function.
Increasing the number of threads can also be beneficial for GPUs. This adjustment proved useful for the T4 GPU in Google Colab, as the default value for workers is 1, which can result in very slow processing.
To improve performance:
- Change the
workersvariable to a higher value, such as 2560, to accelerate model training.
For further information, consult this Stack Overflow thread.
# Using image_dataset_from_directory instead of ImageDataGenerator for loading images
From the Keras documentation:
Deprecated: tf.keras.preprocessing.image.ImageDataGenerator is not recommended for new code.
Prefer loading images with tf.keras.utils.image_dataset_from_directory and transforming the output tf.data.Dataset with preprocessing layers.
For more information, see the tutorials for loading images and augmenting images, as well as the preprocessing layer guide.
# How can data augmentation improve model performance?
Data augmentation artificially expands the training dataset by applying transformations like flipping, cropping, and adjusting brightness or contrast. This improves model robustness by exposing it to varied data and helps reduce overfitting.
# How many feature maps are produced by a PyTorch Conv2D layer, and how do you compute the spatial output size?
In PyTorch, a Conv2d layer outputs a 4D tensor of shape (N, C_out, H_out, W_out) where:
Nis the batch sizeC_outis the number of output channels (out_channels)H_outandW_outare the spatial dimensions after the convolution
The spatial size is computed (for dilation = 1) as:
H_out = floor((H_in - K_H + 2*P_H) / S_H) + 1
W_out = floor((W_in - K_W + 2*P_W) / S_W) + 1
For the general case (including dilation D):
H_out = floor((H_in + 2*P_H - D*(K_H - 1) - 1) / S_H + 1)
W_out = floor((W_in + 2*P_W - D*(K_W - 1) - 1) / S_W + 1)
If you have dilation = 1 (the common case), this reduces to the simplified formula above.
Example for your parameters (assuming input has 3 channels and batch size 1):
import torch
import torch.nn as nn

conv = nn.Conv2d(in_channels=3, out_channels=16, kernel_size=(2,2), stride=(2,2), padding=(2,2))
x = torch.randn(1, 3, 150, 150)
y = conv(x)
print(y.shape)  # torch.Size([1, 16, 77, 77])
Notes:
- The number of feature maps equals
out_channels. - If you only care about spatial size, apply the height/width formula above; you can also verify with a quick forward pass or by using a library like
torchsummaryto inspect the model.
# ImportError: cannot import name 'load_img' from 'tensorflow.keras.preprocessing.image'
The import path moved in newer TF/Keras. Use:
from tensorflow.keras.utils import load_img
instead of the older tensorflow.keras.preprocessing.image path shown in the videos.
# model.save_weights(...) fails with newer Keras
Keras 3 requires the filename to end with .weights.h5 if you only want weights, and dropped the save_format argument:
model.save_weights('model_v1.weights.h5')
For the ModelCheckpoint callback, set save_weights_only=True and use the .weights.h5 suffix:
checkpoint = keras.callbacks.ModelCheckpoint(
    'xception_v1_{epoch:02d}_{val_accuracy:.3f}.weights.h5',
    save_weights_only=True,
    save_best_only=True,
    monitor='val_accuracy',
    mode='max',
)
If you want the whole model (architecture + weights), use the new format: model.save('model.keras').
# Should I install the CUDA build of PyTorch, or is CPU-only enough?
For learning and the homework, the CPU-only build is fine and much smaller (~200 MB vs ~2 GB).
pip install torch torchvision --index-url https://download.pytorch.org/whl/cpu
# or
uv add torch torchvision --index-url https://download.pytorch.org/whl/cpu
You only need the CUDA build if you have an NVIDIA GPU on the same machine. Otherwise, train on Google Colab (free GPU runtimes) and keep your local install CPU-only.
# import tensorflow fails: 'TypeError: Unable to convert function return value to a Python type! The signature was () -> handle'
This is a numpy 2.x / older TensorFlow incompatibility. Two fixes:
- Upgrade TensorFlow to a numpy-2-compatible version (2.16+):
pip install --upgrade tensorflow - Or downgrade numpy and restart the kernel:
pip install "numpy<2"
Module 9. Serverless Deep Learning
# Where is the model for week 9?
# Why ONNX Runtime for DL deployment?
ONNX Runtime provides a cross-framework inference engine for models exported to the ONNX format. If you train in TensorFlow or PyTorch, you can export your model to ONNX and run it with ONNX Runtime, enabling a common deployment path across different environments. This can simplify Lambda/Kubernetes serving by reducing the need to maintain separate framework-specific runtimes (such as TensorFlow Serving or TorchServe) and by providing optimizations available in ONNX Runtime.
# Executing the command echo ${REMOTE_URI} returns nothing.
In Unit 9.6, the command echo ${REMOTE_URI} is used to print the URI address, but if it returns nothing, the variable may not be set correctly. Here's a solution to address this:
Set a local variable and assign the URI address in the terminal:
REMOTE_URI=2278222782.dkr.ecr.ap-south-1.amazonaws.com/clothing-tflite-imagesUse this variable to log in to the registry. Note that this variable will be lost once the session is terminated.
Here's a step-by-step example on Ubuntu terminal, which faced the same issue:
Execute the following command to set the environment variable:
export REMOTE_URI=1111111111.dkr.ecr.us-west-1.amazonaws.com/clothing-tflite-images:clothing-model-xception-v4-001Display the value of the variable:
echo $REMOTE_URIThis should print:
111111111.dkr.ecr.us-west-1.amazonaws.com/clothing-tflite-images:clothing-model-xception-v4-001
Note:
- The command
echo $REMOTE_URIdoes not require curly brackets, unlike in video 9.6. - Replace
REMOTE_URIwith your actual URI.
# Getting a syntax error while trying to get the password from aws-cli
The command aws ecr get-login --no-include-email returns an invalid choice error:
Invalid choice error
The solution is to use the following command instead:
aws ecr get-login-password
To simplify the login process, replace <ACCOUNT_NUMBER> and <REGION> with your values:
export PASSWORD=`aws ecr get-login-password`

docker login -u AWS -p $PASSWORD <ACCOUNT_NUMBER>.dkr.ecr.<REGION>.amazonaws.com/clothing-tflite-images
# Pass many parameters in the model at once
We can use the keras.models.Sequential() function to pass many parameters of the CNN at once.
# Getting ERROR [internal] load metadata for public.ecr.aws/lambda/python:3.8
This error is produced sometimes when building your Docker image from the Amazon Python base image.
The following could solve the problem:
Update Docker Desktop: Ensure you have the latest version installed.
Restart Docker and Terminal: Try restarting Docker Desktop and your terminal application, then build the image again.
Disable BuildKit: If the above steps do not work, run the following command to disable Docker BuildKit and build your image:
DOCKER_BUILDKIT=0 docker build .
# Problem: 'ls' is not recognized as an internal or external command, operable program or batch file.
When trying to run the command !ls -lh in a Windows Jupyter Notebook, you may receive an error:
'ls' is not recognized as an internal or external command, operable program or batch file.
Solution:
Instead of !ls -lh, you can use this command:
!dir
This will provide similar output.
# ImportError: generic_type: type "InterpreterWrapper" is already registered!
When importing tflite_runtime.interpreter using:
import tflite_runtime.interpreter as tflite
You might encounter the error:
ImportError: generic_type: type "InterpreterWrapper" is already registered!
This error occurs if you import both tensorflow and tflite_runtime.interpreter in the same environment. To resolve it:
Restart the kernel.
Import only
tflite_runtime.interpreter:import tflite_runtime.interpreter as tflite
# WARNING: You are using pip version 22.0.4; however, version 22.3.1 is available
When running docker build -t dino-dragon-model, you might encounter the warning about an outdated pip version.
This warning often comes up due to a mismatch in the versions of the wheel file shown in Alex's video. The video might show a version compatible with Python 8, but you need a wheel for the version you are working on, such as Python 9.
Additionally, ensure you download the wheel file using its raw format link, as copying the link might cause errors. Use the following link:
Ensure to address the pip version warning when possible by updating pip using:
pip install --upgrade pip
# How to do AWS configure after installing awscli
In video 9.6, after installing awscli, we should configure it with aws configure. It asks for Access Key ID, Secret Access Key, Default Region Name, and Default Output Format. What should we put for Default Output Format? Is leaving it as None okay?
Yes, you can leave everything as the provided defaults (except for the Access Key and the Secret Access Key).
# Object of type float32 is not JSON serializable
While passing local testing of the lambda function without issues, trying to test the same input with a running Docker instance results in an error message like:
{
  'errorMessage': 'Unable to marshal response: Object of type float32 is not JSON serializable',
  'errorType': 'Runtime.MarshalError',
  'requestId': 'f155492c-9af2-4d04-b5a4-639548b7c7ac',
  'stackTrace': []
}
This occurs when a model returns estimation values as NumPy float32 values. These need to be converted to base-Python floats to become serializable.
In the following example, the dino vs dragon model returns a label and predicted probability for each class. Below is an excerpt of the predict() function in lambda_function.py:
preds = [interpreter.get_tensor(output_index)[0][0], \
         1-interpreter.get_tensor(output_index)[0][0]]
To fix the serialization issue, convert the values to floats:
preds = [float(interpreter.get_tensor(output_index)[0][0]), \
         float(1-interpreter.get_tensor(output_index)[0][0])]
You can resolve the rest by following the instructions in Chapter 9 (and/or Chapter 5) lecture videos.
# Error with the line interpreter.set_tensor(input_index, X)
I had this error when running the command:
interpreter.set_tensor(input_index, x)
You might see this around 12 minutes into video 9.3.
Error message:
ValueError: Cannot set tensor: Got value of type UINT8 but expected type FLOAT32 for input 0, name: serving_default_conv2d_input:0
This occurs because X is an integer, but a float is expected.
To resolve this issue, convert X to float32 before using set_tensor:
X = np.float32(X)
With this conversion, the code works properly. Note that this was tested on TensorFlow 2.15.0, and newer versions may require such changes.
# How to easily get file size in PowerShell terminal?
To check your file size using the PowerShell terminal, you can use the following command lines:
$File = Get-Item -Path path_to_file
$fileSize = (Get-Item -Path $File).Length
Now you can check the size of your file, for example in MB:
Write-Host "MB: " ($fileSize/1MB)
# How do Lambda container images work?
To understand how Lambda container images work and how Lambda functions are initialized, refer to the following documentation:
# How to use AWS Serverless Framework to deploy on AWS Lambda and expose it as REST API through APIGatewayService?
The Docker image for AWS Lambda can be created and pushed to AWS ECR, and it can be exposed as a REST API through APIGatewayService using AWS Serverless Framework. Refer to the article below for a detailed walkthrough.
# Error building docker image on M1 Mac
While trying to build the Docker image in Section 9.5 with the command:
docker build -t clothing-model .
It throws a pip install error for the tflite runtime .whl file:
ERROR: failed to solve: process "/bin/sh -c pip install https://github.com/alexeygrigorev/tflite-aws-lambda/blob/main/tflite/tflite_runtime-2.14.0-cp310-cp310-linux_x86_64.whl" did not complete successfully: exit code: 1
Try using this direct link for the
.whlfile:If the link above does not work:
- The problem occurs due to the ARM architecture of the M1. You may need to run the code on a PC or Ubuntu OS.
You can also try the commands below:
To build the Docker image:
docker build --platform linux/amd64 -t clothing-model .To run the built image:
docker run -it --rm -p 8080:8080 --platform linux/amd64 clothing-model:latest
# Error invoking API Gateway deploy API locally
When attempting to test the API gateway in 9.7 - API Gateway: Exposing the Lambda Function, running the command:
python test.py
You might encounter the following error message:
{'message': 'Missing Authentication Token'}
You need to ensure you have the correct deployed API URL for the specific path you are invoking. An example of a correct URL format is:
https://<random_string>.execute-api.us-east-2.amazonaws.com/test/predict
# Error: Could not find a version that satisfies the requirement tflite_runtime (from versions: none)
When trying to install tflite_runtime using the command below, you receive an error message:
!pip install --extra-index-url https://google-coral.github.io/py-repo/ tflite_runtime
tflite_runtime is only available for specific OS-Python version combinations. You can find the available combinations here: https://google-coral.github.io/py-repo/tflite-runtime/. Your environment combination might be missing.
To proceed, follow these steps:
Check if any of the available versions work for you at https://github.com/alexeygrigorev/tflite-aws-lambda/tree/main/tflite.
Install the needed version using pip. For example:
pip install https://github.com/alexeygrigorev/tflite-aws-lambda/raw/main/tflite/tflite_runtime-2.7.0-cp38-cp38-linux_x86_64.whlReference how it's done in the lecture code here.
Alternatively, you can:
- Use a virtual machine (e.g., VM VirtualBox) with a Linux system.
- Run the code on a virtual machine within a cloud service such as Vertex AI Workbench on GCP, which provides notebooks and terminals for tasks execution.
# Error: A module that was compiled using NumPy 1.x cannot be run in NumPy 2.2.0 as it may crash
After installing the tflite runtime using the wheel suggested in Homework 9, I encountered a runtime error while testing the lambda handler. The error was:
ImportError:

A module that was compiled using NumPy 1.x cannot be run in
NumPy 2.2.0 as it may crash. To support both 1.x and 2.x
versions of NumPy, modules must be compiled with NumPy 2.0.
Some modules may need to be rebuilt instead, e.g., with 'pybind11>=2.12'.
The issue with the version of NumPy was due to it being overwritten by the installation of tflite-runtime. To prevent this, you should install the wheel using the --no-deps option.
RUN pip install --no-deps https://github.com/alexeygrigorev/tflite-aws-lambda/raw/main/tflite/tflite_runtime-2.14.0-cp310-cp310-linux_x86_64.whl
# Docker: run error
docker: Error response from daemon: mkdir /var/lib/docker/overlay2/37be849565da96ac3fce34ee9eb2215bd6cd7899a63ebc0ace481fd735c4cb0e-init: read-only file system.
To resolve this error, restart the Docker services.
# Docker: Save Docker Image to local machine and view contents
The Docker image can be saved/exported to tar format on a local machine using the following command:
docker image save <image-name> -o <name-of-tar-file.tar>
The individual layers of the Docker image for the filesystem content can be viewed by extracting the layer.tar present in the <name-of-tar-file.tar> created from above.
# Running out of space for AWS instance.
Due to experimenting extensively, I've run out of space on my 30-GB AWS instance. Deleting Docker images alone does not free up the space as expected. After removing Docker images, you need to run the following command:
docker system prune
# Using Tensorflow 2.15 for AWS deployment
Using Tensorflow 2.14 with Python 3.11 works fine.
If it doesn’t work, try using Tensorflow 2.4.4 with supported Python versions like 3.8. Installing Tensorflow 2.4.4 with unsupported versions may cause issues.
# Command aws ecr get-login --no-include-email returns “aws: error: argument operation: Invalid choice…”
The error occurs because the aws ecr get-login command is deprecated.
Instead, use the following command to authenticate Docker to an ECR registry:
aws ecr get-login-password --region <your-region> | docker login --username AWS --password-stdin <your-account-id>.dkr.ecr.<your-region>.amazonaws.com
Replace <your-region> with your AWS region and <your-account-id> with your account ID.
# What IAM permission policy is needed to complete Week 9: Serverless?
Sign in to the AWS Console: Log in to the AWS Console.
Navigate to IAM: Go to the IAM service by clicking on "Services" in the top left corner and selecting "IAM" under the "Security, Identity, & Compliance" section.
Create a new policy:
- In the left navigation pane, select "Policies" and click on "Create policy."
Select the service and actions:
- Click on "JSON" and copy and paste the JSON policy for the specific ECR actions.
{
  "Version": "2012-10-17",
  "Statement": [
    {
      "Sid": "VisualEditor0",
      "Effect": "Allow",
      "Action": [
        "ecr:CreateRepository",
        "ecr:GetAuthorizationToken",
        "ecr:BatchCheckLayerAvailability",
        "ecr:BatchGetImage",
        "ecr:InitiateLayerUpload",
        "ecr:UploadLayerPart",
        "ecr:CompleteLayerUpload",
        "ecr:PutImage"
      ],
      "Resource": "*"
    }
  ]
}
- Review and create the policy:
- Click on "Review policy."
- Provide a name and description for the policy.
- Click on "Create policy."
Error Resolution
If you encounter the following error:
ERROR: failed to solve: public.ecr.aws/lambda/python:3.10: error getting credentials - err: exec: "docker-credential-desktop.exe": executable file not found in $PATH, out: ``
- Solution: Delete the file
~/.docker/config.json
# Docker: Temporary failure in name resolution
Add the following lines to your Docker daemon configuration file using vim /etc/docker/daemon.json:
{
    "dns": ["8.8.8.8", "8.8.4.4"]
}
Then, restart Docker using the command:
sudo service docker restart
# Keras model *.h5 doesn’t load. Error: weight_decay is not a valid argument, kwargs should be empty for `optimizer_experimental.Optimizer`
Solution: Add compile=False to the load_model function.
keras.models.load_model('model_name.h5', compile=False)
# How to test AWS Lambda + Docker locally?
This deployment setup can be tested locally using AWS RIE (Runtime Interface Emulator).
If your Docker image is built upon the base AWS Lambda image (e.g., FROM public.ecr.aws/lambda/python:3.10), use specific ports for docker run and a specific localhost link for testing:
docker run -it --rm -p 9000:8080 name
This command runs the image as a container and starts an endpoint locally at:
localhost:9000/2015-03-31/functions/function/invocations
Post an event to the following endpoint using a curl command:
curl -XPOST "http://localhost:9000/2015-03-31/functions/function/invocations" -d '{}'
Examples of Curl Testing:
Windows Testing:
curl -XPOST "http://localhost:9000/2015-03-31/functions/function/invocations" -d "{\"url\": \"https://habrastorage.org/webt/rt/d9/dh/rtd9dhsmhwrdezeldzoqgijdg8a.jpeg\"}"Unix Testing:
curl -XPOST "http://localhost:9000/2015-03-31/functions/function/invocations" -d '{"url": "https://habrastorage.org/webt/rt/d9/dh/rtd9dhsmhwrdezeldzoqgijdg8a.jpeg"}'
If during testing you encounter an error like this:
{
  "errorMessage": "Unable to marshal response: Object of type float32 is not JSON serializable",
  "errorType": "Runtime.MarshalError",
  "requestId": "7ea5d17a-e0a2-48d5-b747-a16fc530ed10",
  "stackTrace": []
}
just convert your response in lambda_handler() to a string using str(result).
# "Unable to import module 'lambda_function': No module named 'tensorflow'" when running `python test.py`
Ensure that all the code in test.py does not have any dependencies on the TensorFlow library. A common cause of this error is that tflite is still imported from TensorFlow. Change the import statement:
import tensorflow.lite as tflite
To:
import tflite_runtime.interpreter as tflite
# Install Docker (udocker) in Google Colab
To work with Docker in Google Colab, follow these steps:
Open your Google Colab notebook.
Run the following commands:
%%shell
pip install udocker
udocker --allow-root install
Test the installation:
!udocker --allow-root run hello-world
For more details, refer to this gist.
# Lambda API Gateway errors:
Authorization header requires 'Credential' parameter. Authorization header requires 'Signature' parameter. Authorization header requires 'SignedHeaders' parameter. Authorization header requires existence of either a 'X-Amz-Date' or a 'Date' header.

Missing Authentication Token
To test invoke a method using Boto3, you can use the following Python script:
import boto3

client = boto3.client('apigateway')

response = client.test_invoke_method(
    restApiId='your_rest_api_id',
    resourceId='your_resource_id',
    httpMethod='POST',
    pathWithQueryString='/test/predict', # Adjust path as per API setup
    body='{"url": "https://habrastorage.org/webt/rt/d9/dh/rtd9dhsmhwrdezeldzoqgijdg8a.jpeg"}')

print(response['body'])
# Unable to run pip install tflite_runtime from github wheel links?
To overcome this issue, you can download the .whl file to your local project folder and in the Dockerfile add the following lines:
COPY <file-name> .

RUN pip install <file-name>
# Python 3.12 vs TF Lite 2.17
The latest versions of TF Lite don't support Python 3.12 yet. See update.md for the 2024 cohort in the main repository.
# How can I monitor and maintain models deployed on AWS Lambda?
To monitor Lambda deployments, use AWS CloudWatch to access detailed logs, metrics, and alarms. Metrics like invocation count, duration, error rate, and memory usage can help diagnose performance issues. Use AWS X-Ray for tracing requests and analyzing latency.
For model maintenance:
- Set up an automated CI/CD pipeline to retrain models on updated data.
- Redeploy using tools like Amazon SageMaker or custom workflows.
- Regularly evaluate model performance with a monitoring service to detect drift in predictions or data quality issues.
# How to Use AWS SAM CLI to Create a Lambda Function as a Container Image
Set Up SAM CLI on Your Machine
Follow the installation guide for the AWS SAM CLI: AWS SAM CLI Installation Guide
Additional reference: Getting started with AWS SAM
Create a New Project
Open your command prompt and run the following command to generate boilerplate code:
sam init
Follow the SAM CLI Wizard:
- Select "AWS Quick Start Templates".
- Choose "Machine Learning" as the application type.
- Select the version of Python you will use for your runtime.
- When prompted for the starter template, choose "TensorFlow Machine Learning Inference API".
After these steps, a new folder will be created with your selected name. This is your "SAM project folder". Inside, you'll find an "app" folder.
Add Required Files for Deployment
Move all the deployment files (such as the TensorFlow Lite model and your Lambda function) into the "app" folder.
Modify Files Inside the "app" Folder
requirements.txt
Replace the TensorFlow dependency with tflite-runtime, and add any other dependencies. Example content:
pillow==11.1.0
requests==2.32.3
numpy==1.26.4
tflite-runtime==2.7.0
Dockerfile
Modify the Dockerfile to copy the necessary files for deployment. Example Dockerfile:
FROM public.ecr.aws/lambda/python:3.9

COPY requirements.txt ./

RUN python3.9 -m pip install -r requirements.txt -t .

COPY app.py ./
COPY class_indices.json ./
COPY classification_model.tflite ./

ENV MODEL_PATH ./classification_model.tflite
ENV CLASSES_PATH ./class_indices.json

CMD ["app.lambda_handler"]
Build the Lambda Function
From the SAM project directory, build the Lambda function:
sam build --build-dir .aws-build
After building, verify the Docker image by running:
docker images
Test the Lambda Function Locally
Modify the app/event/event.json file to include the expected JSON input:
{
  "url": "http://bit.ly/mlbookcamp-pants"
}
Run the following command from the SAM project folder:
sam local invoke -t .aws-build/template.yaml -e events/event.json
This command will start a container, send the event, and display the response. The Docker image name used for the container will be shown.
Deploy the Image
To deploy the image, follow classroom instructions or use:
sam deploy --guided
AWS SAM will handle creating an ECR repository.
# Tflite_runtime unable to install
When trying to install tflite_runtime in a pipenv environment, the following error message appears:
ERROR: Could not find a version that satisfies the requirement tflite_runtime (from versions: none)
ERROR: No matching distribution found for tflite_runtime
This version of tflite_runtime does not run on Python 3.10. To resolve this issue, follow these steps:
- Install Python 3.9: Use Python 3.9 instead of Python 3.10.
- Reinstall
tflite_runtime: With Python 3.9, the installation should proceed without issues.
Check all available versions here: TFLite Runtime Versions
If no suitable version is found, consider the options provided at GitHub Repository. You can install it using:
pip install "https://github.com/alexeygrigorev/tflite-aws-lambda/raw/main/tflite/tflite_runtime-2.7.0-cp38-cp38-linux_x86_64.whl"For local development, use the TFLite included in TensorFlow and Docker for testing Lambda.
# Why am I getting the 'image manifest, config or layer media type' not supported error when creating an AWS Lambda function from a Docker image?
This error occurs when the Docker image media type pushed to ECR is in the old OCI image index format (application/vnd.oci.image.index.v1+json). AWS Lambda expects the image manifest in the new format (application/vnd.docker.distribution.manifest.v2+json).
How to verify:
docker inspect <docker-image-name>
Check the output for the media type/manifest format. If it shows an OCI index or an old format, Lambda will report that the image manifest, config or layer media type is not supported.
How to fix (force manifest v2):
docker build --platform linux/amd64 --provenance false -t <docker-image-name> .
This command targets a manifest v2-compatible image. After rebuilding, push the image to ECR and create the Lambda function again using this docker container image.
Notes:
- Ideally, a standard docker build with a tag (e.g.,
docker build -t <tag> .) should produce a manifest v2 image, but misconfigurations can result in the older format. - You can repeat the build/push steps to ensure the pushed image uses the correct manifest type.
# HW9 Docker: 'A module that was compiled using NumPy 1.x cannot be run in NumPy 2.2.0' loading tflite_runtime
The wheel tflite_runtime-2.14.0 was compiled against numpy<2, but installing it pulls in numpy 2.x by default. Pin numpy first, then install with --no-deps:
RUN pip install numpy==1.23.1
RUN pip install --no-deps https://github.com/alexeygrigorev/tflite-aws-lambda/raw/main/tflite/tflite_runtime-2.14.0-cp310-cp310-linux_x86_64.whl
Order matters — pin numpy first, then install the wheel without dependencies. See also https://github.com/DataTalksClub/machine-learning-zoomcamp/blob/master/09-serverless/updates.md
# HW9 PyTorch/ONNX: model expects (1, 3, 200, 200) but my preprocessing gives (1, 200, 200, 3)
TensorFlow uses NHWC (channels-last); PyTorch/ONNX use NCHW (channels-first). Reorder the channel axis with np.transpose BEFORE adding the batch dim:
x = np.transpose(x, (2, 0, 1))    # (200, 200, 3) -> (3, 200, 200)
x = np.expand_dims(x, axis=0)     # -> (1, 3, 200, 200)
np.swapaxes only swaps two axes; transpose lets you specify the full new ordering, which is what you need for NHWC → NCHW.
# HW9 prediction value is far from the answer options (e.g. 0.0xyz vs 0.24/0.44/0.64/0.84)
Use simple [0, 1] rescaling, NOT the Xception-style preprocessing from earlier lectures:
def preprocess_input(x):
    return x / 255.0
x / 127.5 - 1 is correct for transfer learning from Xception, but the homework's model was trained from scratch with [0, 1] rescaling. Match what the model was trained with.
# AWS Lambda: 'The image manifest, config or layer media type for the source image is not supported'
Newer Docker BuildKit defaults to OCI manifest format, which Lambda doesn't accept. Force the older Docker v2 manifest with --provenance=false:
docker build --platform linux/amd64 --provenance=false -t my-image .
Then push to ECR and create the Lambda function. Without --provenance=false, BuildKit creates a multi-arch index image that Lambda rejects.
Module 10. Kubernetes and TensorFlow Serving
# What tools are recommended for setting up a local Kubernetes environment for model deployment practice?
Several tools can help set up a local Kubernetes environment:
- Kind: Runs Kubernetes clusters in Docker containers, suitable for testing and development.
- Minikube: Runs a single-node Kubernetes cluster on your local machine.
- K3s: A lightweight Kubernetes distribution ideal for local development.
- MicroK8s: A minimal Kubernetes distribution for local development.
- Docker Desktop: Includes a standalone Kubernetes server and client for development.
# How do you determine the minimum number of replicas needed to guarantee zero-downtime for model updates in production, taking startup latency and readiness probes into account?
To guarantee zero-downtime during model updates in production, determine the minimum number of replicas by considering baseline capacity, update duration, and per-pod latency, and by configuring Kubernetes RollingUpdate with readiness and startup probes. The core idea is to ensure that, during an update, enough pods are ready to serve traffic while new pods are brought up and become ready before old pods are terminated. A practical starting point is to run at least two replicas and enable maxUnavailable: 0 with maxSurge: 1, along with proper readinessProbe and startupProbe settings. If startup latency or traffic bursts require more headroom, scale beyond two—the exact minimum depends on your traffic load, pod readiness time, and update window.
Recommended steps:
- Define your service's baseline concurrency (requests per second) and target latency.
- Estimate per-pod capacity (how many requests a single pod can handle while staying within latency SLO).
- Choose deployment strategy:
- RollingUpdate with maxUnavailable: 0 to avoid taking pods out of service during the update.
- maxSurge: 1 (or higher) to temporarily run additional pods during upgrades.
- Implement readinessProbe to ensure traffic is not routed to a pod until it is ready.
- Implement startupProbe for slow-start scenarios to avoid premature termination of old pods.
- Compute minimum replicas as the smallest number R such that, during the upgrade, the number of ready pods stays above your required capacity. In practice:
- If your baseline requirement is 2 pods and you can upgrade one pod at a time, R_min = 2 with maxSurge: 1.
- If startup latency is high or you expect bursts, set R_min higher (e.g., 3 or 4) to maintain service during upgrades.
Example Deployment fragment:
apiVersion: apps/v1
kind: Deployment
spec:
  replicas: 2
  strategy:
    type: RollingUpdate
    rollingUpdate:
      maxSurge: 1
      maxUnavailable: 0
  template:
    spec:
      containers:
        - name: ml-model
          image: my-registry/ml-model:latest
          readinessProbe:
            httpGet:
              path: /healthz
              port: 8080
            initialDelaySeconds: 5
            periodSeconds: 5
          startupProbe:
            httpGet:
              path: /health
              port: 8080
            failureThreshold: 30
            periodSeconds: 5
Additional considerations:
- Canary/blue-green deployments can further reduce risk but add complexity.
- Monitor during upgrades (latency, error rate, CPU/memory) and adjust replicas dynamically.
- Use horizontal pod autoscaling with careful cooldown to maintain capacity while updates occur.
# Allocator (GPU_0_bfc) ran out of memory
If you are running TensorFlow on your own machine and you start getting the following errors:
Allocator (GPU_0_bfc) ran out of memory trying to allocate 6.88GiB with freed_by_count=0. The caller indicates that this is not a failure, but this may mean that there could be performance gains if more memory were available.
Try adding this code in a cell at the beginning of your notebook:
config = tf.compat.v1.ConfigProto()
config.gpu_options.allow_growth = True
session = tf.compat.v1.Session(config=config)
After doing this, most issues should be resolved. Occasionally, the error may still appear during high-demand epochs, but re-running the code should typically resolve it.
# Problem with recent version of protobuf
In session 10.3, when creating the virtual environment with pipenv and trying to run the script gateway.py, you might encounter the following error:
TypeError: Descriptors cannot not be created directly.

If this call came from a _pb2.py file, your generated code is out of date and must be regenerated with protoc >= 3.19.0.
If you cannot immediately regenerate your protos, consider these workarounds:
Downgrade the protobuf package to 3.20.x or lower.
Set the environment variable:
PROTOCOL_BUFFERS_PYTHON_IMPLEMENTATION=pythonThis will use pure-Python parsing but may be slower.
For more information, visit developers.google.com.
This issue occurs with newer versions of protobuf. As a workaround, you can fix the protobuf version to an older one. Here's a command that addresses this issue:
pipenv install --python 3.9.13 requests grpcio==1.42.0 flask gunicorn \
keras-image-helper tensorflow-protobuf==2.7.0 protobuf==3.19.6
# WSL: Cannot Connect To Docker Daemon
Due to machine uncertainties, you might encounter the following error when trying to run a Docker command:
Cannot connect to the Docker daemon at unix:///var/run/docker.sock. Is the docker daemon running?
Solution:
The issue may arise if Docker Desktop is not correctly connecting to the WSL Linux distribution. To resolve this:
Open Docker Desktop settings.
Navigate to the "Resources" section.
Click on "WSL Integration."
Enable additional distros, even if it matches the default WSL distro.
That's all you need to do.
# HPA instance doesn’t run properly (easier solution)
If the HPA instance does not run correctly even after installing the latest version of Metrics Server from the components.yaml manifest with:
kubectl apply -f https://github.com/kubernetes-sigs/metrics-server/releases/latest/download/components.yaml
And the targets still appear as <unknown>, run the following command:
kubectl apply -f https://raw.githubusercontent.com/Peco602/ml-zoomcamp/main/10-kubernetes/kube-config/metrics-server-deployment.yaml
This uses a metrics server deployment file already embedding the --kubelet-insecure-tls option.
# Pods not starting
This issue can be caused by several factors:
Resource Allocation: Ensure that your Pods have enough CPU and memory resources allocated. If resources are too low, the Kubernetes scheduler might fail to schedule your Pods.
Image Issues: Verify that the Docker image specified for your Pod is correctly built and accessible. If the image cannot be pulled from the repository, the Pod won’t start.
# Windows pip install: "OSError [WinError 5] Access is denied"
ERROR: Could not install packages due to an OSError: [WinError 5] Access is denied
Consider using the `--user` option or check the permissions.
This means pip is trying to write into a system-wide Python install where you don't have write permission.
Two fixes:
- Install into your user site instead:
pip install --user grpcio==1.42.0 tensorflow-serving-api==2.7.0 - Better: install into a project venv (no admin needed, no
--userworkaround):uv venv && source .venv/bin/activate # or .venv\Scripts\activate on Windows uv add grpcio==1.42.0 tensorflow-serving-api==2.7.0
# TypeError: Descriptors cannot not be created directly.
You may encounter the following error when running gateway.py:
TypeError: Descriptors cannot not be created directly.
This error appears in the following context:
File "C:\Users\Asia\Data_Science_Code\Zoompcamp\Kubernetes\gat.py", line 9, in <module>
  from tensorflow_serving.apis import predict_pb2
File "C:\Users\Asia\.virtualenvs\Kubernetes-Ge6Ts1D5\lib\site-packages\tensorflow_serving\apis\predict_pb2.py", line 14, in <module>
  from tensorflow.core.framework import tensor_pb2 as tensorflow_dot_core_dot_framework_dot_tensor__pb2
File "C:\Users\Asia\.virtualenvs\Kubernetes-Ge6Ts1D5\lib\site-packages\tensorflow\core\framework\tensor_pb2.py", line 14, in <module>
  from tensorflow.core.framework import resource_handle_pb2 as tensorflow_dot_core_dot_framework_dot_resource__handle__pb2
File "C:\Users\Asia\.virtualenvs\Kubernetes-Ge6Ts1D5\lib\site-packages\tensorflow\core\framework\resource_handle_pb2.py", line 14, in <module>
  from tensorflow.core.framework import tensor_shape_pb2 as tensorflow_dot_core_dot_framework_dot_tensor__shape__pb2
File "C:\Users\Asia\.virtualenvs\Kubernetes-Ge6Ts1D5\lib\site-packages\tensorflow\core\framework\tensor_shape_pb2.py", line 36, in <module>
  _descriptor.FieldDescriptor(
File "C:\Users\Asia\.virtualenvs\Kubernetes-Ge6Ts1D5\lib\site-packages\google\protobuf\descriptor.py", line 560, in __new__
  _message.Message._CheckCalledFromGeneratedFile()

TypeError: Descriptors cannot not be created directly.
This message indicates that your generated protobuf code is out of date, and must be regenerated using protoc >= 3.19.0.
To resolve the issue, you have several options:
Regenerate your Protocol Buffers: If possible, regenerate your .proto files using
protoc >= 3.19.0.Downgrade the protobuf package:
Downgrade the protobuf package to version 3.20.x or lower.
pipenv install protobuf==3.20.1Use a different implementation:
Set the environment variable to use a slower, pure-Python implementation:
set PROTOCOL_BUFFERS_PYTHON_IMPLEMENTATION=python
The issue can often be resolved by downgrading protobuf to version 3.20.1. This was confirmed to work in the described scenario.
# How to install easily kubectl on Windows?
To install kubectl on Windows using PowerShell in VSCode, follow these steps:
Download kubectl with curl
- Use the following command lines as per the Kubernetes documentation.
Copy the Executable
- At step 3 of the tutorial, copy the
kubectl.exefile to a specific folder on your C drive.
- At step 3 of the tutorial, copy the
Update the System PATH
- Add the folder path to the PATH in your environment variables.
You can also install kind similarly using the curl command on Windows by specifying a folder that will be added to the PATH environment variable.
For detailed guidance, refer to this Medium tutorial.
# Install kind through choco library
First, launch a PowerShell terminal with administrator privileges.
To install the choco library, use the following command in PowerShell:
Set-ExecutionPolicy Bypass -Scope Process -Force; [System.Net.ServicePointManager]::SecurityProtocol = [System.Net.ServicePointManager]::SecurityProtocol -bor 3072; iex ((New-Object System.Net.WebClient).DownloadString('https://chocolatey.org/install.ps1'))
# Install Kind via Go package
If you are having challenges installing Kind through the Windows Powershell or Choco Library, you can install Kind through Go.
Download and Install Go: https://go.dev/doc/install
Confirm installation:
go versionInstall Kind:
go install sigs.k8s.io/kind@v0.20.0Confirm Kind installation:
kind --version
It works perfectly.
# The connection to the server localhost:8080 was refused - did you specify the right host or port?
I encountered an issue where kubectl wasn't working, and I received the following error when trying to execute a command:
kubectl get service

The connection to the server localhost:8080 was refused - did you specify the right host or port?
Here is the solution that worked for me:
Delete the existing cluster:
kind delete clusterRemove the Kubernetes configuration directory:
rm -rf ~/.kubeCreate a new cluster:
kind create cluster
After performing these steps, the command worked successfully:
kubectl get service

NAME         TYPE        CLUSTER-IP   EXTERNAL-IP   PORT(S)   AGE
kubernetes   ClusterIP   10.96.0.1    <none>        443/TCP   53s
# Docker: Running out of storage after building many docker images
Due to experimenting extensively, I ran out of storage on my 30-GB AWS instance. Removing empty directories did not resolve the issue as those primarily contained code, which did not occupy much space.
Check Existing Images:
Use the following command to list all Docker images:
docker imagesThis showed over 20 GBs of superseded or duplicate models.
Remove Unnecessary Images:
Remove unwanted images using:
docker rmi <image_id>However, this did not free up space as anticipated.
Free Up Space:
To actually free up storage, execute:
docker system prune
For more details on why this happens, see: Stack Overflow Discussion
# Homework: In HW10 Q6 what does it mean “correct value for CPU and memory”? Aren’t they arbitrary?
Yes, the question requires you to specify values for CPU and memory in the yaml file. However, the part of the question regarding the form only refers to the port, which does have a defined correct value for this specific homework.
# Why do CPU values for Kubernetes deployment.yaml look like "100m" and "500m"? What does "m" mean?
In Kubernetes resource specifications, such as CPU requests and limits, the "m" stands for milliCPU, which is a unit of computing power. It represents one thousandth of a CPU core.
cpu: "100m"means the container is requesting 100 milliCPUs, which is equivalent to 0.1 CPU core.cpu: "500m"means the container has a CPU limit of 500 milliCPUs, which is equivalent to 0.5 CPU core.
These values are specified in milliCPUs to allow fine-grained control over CPU resources. It allows you to express CPU requirements and limits in a more granular way, especially in scenarios where your application might not need a full CPU core.
# Kind: cannot load docker image
Problem: Failing to load docker-image to cluster (when you've named a cluster)
kind load docker-image zoomcamp-10-model:xception-v4-001

ERROR: no nodes found for cluster "kind"
Solution: Specify the cluster name with -n
kind -n clothing-model load docker-image zoomcamp-10-model:xception-v4-001
# What’s the difference between Flask and FastAPI for model deployment?
FastAPI vs Flask for ML model deployment
- Performance: FastAPI is built on ASGI and supports asynchronous endpoints, which can yield higher throughput and lower latency for ML API workloads. Flask runs on WSGI and is synchronous by default, which can be a bottleneck under high concurrent load.
- Type hints & validation: FastAPI uses Python type hints and Pydantic models to automatically validate and serialize requests and responses, reducing boilerplate and minimizing invalid input. Flask relies on manual validation or external libraries/extensions.
- Auto documentation: FastAPI auto-generates API docs (Swagger UI and ReDoc) from your code and type hints. Flask typically requires external extensions to provide similar documentation.
- Development speed: Built-in validation, dependency injection, and async support in FastAPI reduce boilerplate and accelerate development for ML APIs.
- Community & maturity: Flask has a larger, established ecosystem. FastAPI is newer but growing quickly and is popular for modern ML API deployments.
Deployment context: Both frameworks can be containerized and deployed to cloud providers or Kubernetes. For higher-concurrency and modern ML APIs, FastAPI’s async capabilities and automatic docs often offer practical advantages. The course currently endorses Python with FastAPI for ML model deployments (updated from Flask). If you have constraints that favor Flask (e.g., legacy codebases or specific extensions), Flask remains a viable option, but you should be prepared to add validation and docs tooling manually.
# 'kind' is not recognized as an internal or external command, operable program or batch file. (In Windows)
Problem:
I downloaded kind using the following command:
curl.exe -Lo kind-windows-amd64.exe https://kind.sigs.k8s.io/dl/v0.17.0/kind-windows-amd64
When I try to run:
kind --version
I receive the error:
'kind' is not recognized as an internal or external command, operable program or batch file.
Solution:
- The default name of the executable is
kind-windows-amd64.exe. Rename this file tokind.exe. - Place
kind.exein a specific folder. - Add this folder to the
PATHenvironment variable.
# Running kind on Linux with Rootless Docker or Rootless Podman
Using kind with Rootless Docker or Rootless Podman requires some changes on the system (Linux). See kind – Rootless (k8s.io).
# Kubernetes-dashboard
# Correct AWS CLI version for eksctl
Ensure you are using AWS CLI v2. You can check your current version with the following command:
aws --version
For more details, refer to the AWS CLI v2 migration instructions.
# TypeError: __init__() got an unexpected keyword argument 'unbound_message' while importing Flask
In video 10.3, while testing a Flask service, the following error occurred:
TypeError: __init__() got an unexpected keyword argument 'unbound_message'
This error was encountered when running docker run ... in one terminal and then executing python gateway.py in another terminal.
This issue is related to the versions of Flask and Werkzeug.
To debug the issue:
Run
pip freeze > requirements.txtto check the installed versions of Flask and Werkzeug.- Example output:
Flask==2.2.2
Werkzeug==2.2.2
- Example output:
The error occurs when using an old version of Werkzeug (2.2.2) with a new version of Flask (2.2.2).
To resolve, pin the version of Flask to an older version:
pipenv install Flask==2.1.3
This should resolve the compatibility issue.
# Command aws ecr get-login --no-include-email returns "aws: error: argument operation: Invalid choice…"
As per AWS documentation:
You need to execute the following command:
aws ecr get-login-password --region <region> | docker login --username AWS --password-stdin <aws_account_id>.dkr.ecr.<region>.amazonaws.com
- Replace
<region>and<aws_account_id>with your specific details.
Alternatively, you can run the following command without changing anything, given you have a default region configured:
aws ecr get-login-password --region $(aws configure get region) | docker login --username AWS --password-stdin "$(aws sts get-caller-identity --query "Account" --output text).dkr.ecr.$(aws configure get region).amazonaws.com"
# Error downloading tensorflow/serving:2.7.0 on Apple M1 Mac
While trying to run the Docker code on M1:
docker run --platform linux/amd64 \
   -it --rm \
   -p 8500:8500 \
   -v $(pwd)/clothing-model:/models/clothing-model/1 \
   -e MODEL_NAME="clothing-model" \
   tensorflow/serving:2.7.0
It outputs the error:
Status: Downloaded newer image for tensorflow/serving:2.7.0
[libprotobuf FATAL external/com_google_protobuf/src/google/protobuf/generated_message_reflection.cc:2345] CHECK failed: file != nullptr:
terminate called after throwing an instance of 'google::protobuf::FatalException'
what():  CHECK failed: file != nullptr:
qemu: uncaught target signal 6 (Aborted) - core dumped
/usr/bin/tf_serving_entrypoint.sh: line 3:     8 Aborted                 tensorflow_model_server --port=8500 --rest_api_port=8501 --model_name=${MODEL_NAME} --model_base_path=${MODEL_BASE_PATH}/${MODEL_NAME} "$@"
Solution:
Pull the alternative Docker image:
docker pull emacski/tensorflow-serving:latestRun the container with the alternative image:
docker run -it --rm \
-p 8500:8500 \
-v $(pwd)/clothing-model:/models/clothing-model/1 \
-e MODEL_NAME="clothing-model" \
emacski/tensorflow-serving:latest-linux_arm64
See more here: GitHub Repository
# Illegal instruction error when running tensorflow/serving image on Mac M2 Apple Silicon (potentially on M1 as well)
Problem:
While trying to run the following Docker code on Mac M2 Apple Silicon:
docker run --platform linux/amd64 -it --rm \
-p 8500:8500 \
-v $(pwd)/clothing-model:/models/clothing-model/1 \
-e MODEL_NAME="clothing-model" \
tensorflow/serving
You get an error:
/usr/bin/tf_serving_entrypoint.sh: line 3: 7 Illegal instruction tensorflow_model_server --port=8500 --rest_api_port=8501 --model_name=${MODEL_NAME} --model_base_path=${MODEL_BASE_PATH}/${MODEL_NAME} "$@"
Solution:
Use Bitnami TensorFlow-Serving Base Image
Launch it either using
docker run:docker run -d \ --name tf_serving \ -p 8500:8500 \ -p 8501:8501 \ -v $(pwd)/clothing-model:/bitnami/model-data/1 \ -e TENSORFLOW_SERVING_MODEL_NAME=clothing-model \ bitnami/tensorflow-serving:2Or use the following
docker-compose.yaml:version: '3' services: tf_serving: image: bitnami/tensorflow-serving:2 volumes: - ${PWD}/clothing-model:/bitnami/model-data/1 ports: - 8500:8500 - 8501:8501 environment: - TENSORFLOW_SERVING_MODEL_NAME=clothing-modelAnd run it with:
docker compose upAlternative since Oct 2024:
Beta release of Docker VMM - the more performant alternative to Apple Virtualization Framework on macOS (requires Apple Silicon and macOS 12.5 or later). Docker VMM Documentation
# HPA: CPU metrics don't show
CPU metrics show "Unknown"
NAME         REFERENCE           TARGETS         MINPODS   MAXPODS   REPLICAS   AGE

credit-hpa   Deployment/credit   <unknown>/20%   1         3         1          18s

FailedGetResourceMetric       2m15s (x169 over 44m)  horizontal-pod-autoscaler  failed to get cpu utilization: unable to get metrics for resource cpu: unable to fetch metrics from resource metrics API:
Delete HPA:
kubectl delete hpa credit-hpaApply the metrics server configuration:
kubectl apply -f https://raw.githubusercontent.com/pythianarora/total-practice/master/sample-kubernetes-code/metrics-server.yamlRecreate the HPA.
This should solve the CPU metrics report issue.
# HW10 Autoscaling (optional) command does not work
The following command encountered issues:
kubectl autoscale deployment subscription --name subscription-hpa --cpu-percent=20 --min=1 --max=3
Error logs indicated certificate validation issues due to the server's certificate lacking a valid Subject Alternative Name (SAN) for the node's IP address.
Suggested Steps:
Run the following command to skip TLS verification:
kubectl patch deployment metrics-server -n kube-system --type='json' -p='[{"op": "add", "path": "/spec/template/spec/containers/0/args/-", "value": "--kubelet-insecure-tls"}]'Restart the deployment:
kubectl rollout restart deployment metrics-server -n kube-system
Note: Avoiding TLS certificate validation is not recommended for production systems, but may suffice for this case.
# Error validating 'deployment.yaml' when running kubectl apply
Cause:
- This error typically occurs when you do not have a local Kubernetes cluster running.

Solution:
1) Create a local cluster using kind:
   ```bash
   kind create cluster --name mlzoomcamp
- Verify it is running:
kubectl cluster-info kubectl get nodes - Re-run your deployment:
kubectl apply -f deployment.yaml
Notes:
- If you still encounter validation errors after the cluster is up, ensure your Kubernetes context is pointing to the correct cluster and that the YAML is valid for the API version you’re targeting.
- The --validate=false option can bypass client-side schema validation, but should be used with caution and not as a first option.
# Why do I fail to create a cluster with Kind in Module 10 Kubernetes, and should I use an older kindest/node image?
Problem: You’re failing to create a Kind cluster as part of Module 10 Kubernetes. The exercise guidance suggests using an older node image.
Solution: Explicitly specify a compatible node image when creating the cluster.
kind create cluster --image kindest/node:v1.32.0
This approach aligns with the exercise guidance to use a specific older image. If you continue to have issues, verify Docker is running and that you have network access. If problems persist, try using a different node image version that matches the chapter’s expected environment and consult the module notes for any version recommendations.
# HPA shows cpu: <unknown>/20% and never scales (kind cluster)
The metrics-server in kind clusters doesn't trust kubelet's TLS cert by default. Patch it to skip TLS verification:
kubectl patch deployment metrics-server -n kube-system --type='json' \
    -p='[{"op": "add", "path": "/spec/template/spec/containers/0/args/-", "value": "--kubelet-insecure-tls"}]'
kubectl rollout restart deployment metrics-server -n kube-system
After this, kubectl get hpa <name> --watch should start showing real CPU percentages and scale up under load. Don't use --kubelet-insecure-tls in production.
# Module 10 / Apple Silicon: tensorflow/serving:2.7.0 exits with 'Illegal instruction'
The official tensorflow/serving image isn't built for arm64. Two options:
- Update Docker Desktop to ≥ 4.35 and enable Docker VMM (Beta) which uses Rosetta to emulate amd64 — the official image then runs.
- Use the
bitnami/tensorflow-serving:2image. Slightly different config: model files go under/bitnami/model-data/1/, and the env var becomesTENSORFLOW_SERVING_MODEL_NAMEinstead ofMODEL_NAME.
# Module 10 pipenv install grpcio==1.42.0 ... tensorflow-protobuf==2.7.0 fails to lock
The pinned versions in the lecture are old and don't resolve on Python 3.11+. Either:
- Use Python 3.8 inside Docker only (your host can be 3.11) and keep the original pins.
- Or use newer pins that resolve on 3.11+ Linux:
python_version = "3.12"
grpcio = "==1.68.1"
flask = "==3.1.0"
gunicorn = "*"
keras-image-helper = "*"
tensorflow-protobuf = "==2.11.0"
On macOS Apple Silicon the lock often hangs forever — switch to Linux (Codespaces / EC2) or skip locking locally and only build inside Docker.
Miscellaneous
# Why do I need to provide a train.py file when I already have the notebook.ipynb file?
train.py lets your peer reviewers cross-check that your training process works on someone else's system without having to step through your notebook cell by cell. The reviewers should be able to clone your repo, install dependencies (pipenv install / uv sync / pip install -r requirements.txt), and run python train.py to reproduce your model.
Make sure your project's environment file (Pipfile, pyproject.toml, or requirements.txt) lists every dependency train.py needs.
# Loading the Image with PILLOW library and converting to numpy array
To load an image using the PILLOW library and convert it to a NumPy array, you can follow these steps:
Install the Pillow library:
pip install pillowUse the following code to load an image and convert it:
from PIL import Image
from numpy import asarray

# Open the image file
img = Image.open('aeroplane.png')

# Convert the image to a NumPy array
numdata = asarray(img)
# Is a train.py file necessary when you have a train.ipynb file in your midterm project directory?
train.py has to be a Python file. This is because running a Python script for training a model is much simpler than running a notebook, and that's how training jobs usually look like in real life.
# Is there a way to serve up a form for users to enter data for the model to crunch on?
Yes, you can create a mobile app or interface that manages these forms and validations. However, it is important to also perform validations on the backend.
You can also check Streamlit: https://github.com/DataTalksClub/project-of-the-week/blob/main/2022-08-14-frontend.md
# [Errno 12] Cannot allocate memory in AWS Elastic Container Service
In the Elastic Container Service task log, error "[Errno 12] Cannot allocate memory" showed up.
To resolve this issue, increase the RAM and CPU in your task definition.
# Pickle error: can’t get attribute XXX on module __main__
When running a Docker container with Waitress serving the app.py for making predictions, you may encounter a pickle error: "can't get attribute <name_of_class> on module main".
This error does not occur when Flask is used directly, i.e., not through Waitress.
Cause
The issue arises because the model uses a custom column transformer class. When the model was saved, it was saved from the __main__ module (e.g., via python train.py). Pickle references the class in the global namespace (top-level code): __main__.<custom_class>.
When using Waitress, it loads the predict_app module, and this calls pickle.load, which tries to find __main__.<custom_class>, but it does not exist in that namespace.
Solution
- Move the custom class into a separate module.
- Import this module in both the script that saves the model (e.g.,
train.py) and the script that loads the model (e.g.,predict.py).
Note: If Flask is used (without Waitress) in predict.py, and predict.py defines the class, executing python predict.py will work because the class is in the same namespace as when the model was saved (__main__).
For more information, check out the detailed explanation on Stack Overflow.
# How to handle outliers in a dataset?
There are different techniques, but the most commonly used are the following:
- Dataset Transformation: Apply transformations such as log transformation to normalize data.
- Clipping High Values: Limit the range of data by capping extremes.
- Dropping Observations: Remove the outlier observations from the dataset.
# Reproducibility: Do we have to run everything?
You are encouraged to run them if you can, as this provides another opportunity to learn from others. Not everyone will be able to run all the files, particularly the neural networks.
Alternatively, ensure everything you need to reproduce is there: the dataset, the instructions, and check for any obvious errors.
# Model too big
If your model is too big for GitHub, one option is to compress the model using joblib. For example:
joblib.dump(model, model_filename, compress=('zlib', 6))
This will use zlib to compress the model. Note that this process may take a few moments as the model is being compressed.
# Permissions to push docker to Google Container Registry
When you try to push the Docker image to Google Container Registry and receive the message:
unauthorized: You don't have the needed permissions to perform this operation, and you may have invalid credentials.
Follow these steps:
Install the Google Cloud SDK from https://cloud.google.com/sdk/docs/install.
Run the following command in your console:
gcloud auth configure-docker
# Error when running ImageDataGenerator.flow_from_dataframe
Error: ImageDataGenerator name 'scipy' is not defined.
To resolve this issue:
Ensure that
scipyis installed in your environment:pip install scipyRestart the Jupyter kernel and try running the code again.
# Error: UnidentifiedImageError: cannot identify image file
In deploying the model, I encountered an error while testing my model locally on a test-image data.
The initial command was:
url = '[GitHub](https://github.com/bhasarma/kitchenware-classification-project/blob/main/test-image.jpg')

X = preprocessor.from_url(url)
The error received:
UnidentifiedImageError: cannot identify image file <_io.BytesIO object at 0x7f797010a590>
Solution:
Add
?raw=trueafter.jpgin the URL. For example:url = '[GitHub](https://github.com/bhasarma/kitchenware-classification-project/blob/main/test-image.jpg?raw=true)'
# [pipenv.exceptions.ResolutionFailure]: Warning: Your dependencies could not be resolved. You likely have a mismatch in your sub-dependencies
Problem: If you run pipenv install and get this message, it may indicate a mismatch in your sub-dependencies.
Solution:
You may need to manually update
PipfileandPipfile.lock.Run the following command to resolve the dependency issues:
pipenv lock
# Error decoding JSON response: Expecting value: line 1 column 1 (char 0)
This problem occurs when contacting the server to send your predict-test data in the correct shape. The issue is that the input format to the model wasn't in the right shape.
The server receives data in JSON format (dict), which is not suitable for the model. You should convert it to a format like numpy arrays.
# Free / cheap cloud alternatives for deploying my Docker image
If a small free-tier host like Render gives you SIGTERM errors, the container is most likely getting OOM-killed — 512 MB of RAM isn't enough for many ML images.
Cheaper / better-spec options:
- AWS — free-tier micro instances for the first 12 months, plus broader free quotas across services.
- GCP — similar free-tier micro instance, plus a one-time signup credit you can use for higher-spec instances.
- Fly.io / Railway / Hugging Face Spaces — small free tiers; Spaces is convenient if you only need to demo a model.
- Google Colab — runs the model in a notebook for free (not a deployment, but useful for sharing demos).
For Docker images, watch the memory footprint: shipping tensorflow-cpu instead of full tensorflow, or pruning unused dependencies from requirements.txt, often gets the image under the free-tier RAM limits.
# Chart for classes and predictions
How to visualize the predictions per classes after training a neural net:
classes, predictions = zip(*dict(zip(classes, predictions)).items())

plt.figure(figsize=(12, 3))

plt.bar(classes, predictions)
# Convert dictionary values to Dataframe table
You can convert the prediction output values to a DataFrame using the following code:
import pandas as pd

df = pd.DataFrame.from_dict(your_dict, orient='index', columns=['Prediction'])
# Kitchenware Classification Competition Dataset Generator
The image dataset for the competition was in a different layout from what we used in the dino vs dragon lesson. Since that’s what was covered, some folks were more comfortable with that setup, so a script was written to generate it for them.
It can be found here: kitchenware-dataset-generator | Kaggle
# I may end up submitting the assignment late. Would it be evaluated?
Depends on whether the form will still be open. If it's open, you can submit your homework and it will be evaluated. If closed, it's too late.
# Does the GitHub repository need to be public?
Yes. Whoever corrects the homework will only be able to access the link if the repository is public.
# Which IDE is recommended for machine learning?
VSCode and Jupyter.
# How to use wget with Google Colab?
To use wget in Google Colab, follow these steps:
Install wget: Ensure that
wgetis installed by running the following command:!which wgetDownload Data: Use
wgetto download files by specifying the URL and destination path:!wget -P /content/drive/My\ Drive/Downloads/ URL
# Features in scikit-learn?
Features (X) must always be formatted as a 2-D array to be accepted by scikit-learn. Use reshape to convert a 1D array to a 2D array.
# Example of reshaping a 1D array to a 2D array
import numpy as np

# 1D array
array_1d = np.array([1, 2, 3, 4, 5])

# Reshape to a 2D array
array_2d = array_1d.reshape(-1, 1)
print(array_2d)
Additionally, when filtering and selecting specific columns in a DataFrame, you can use:
# Filtering the DataFrame
df[df['ocean_proximity'].isin(['<1H OCEAN', 'INLAND'])]

# Select only the desired columns
selected_columns = [
    'latitude',
    'longitude',
    'housing_median_age',
    'total_rooms',
    'total_bedrooms',
    'population',
    'households',
    'median_income',
    'median_house_value'
]

filtered_df = filtered_df[selected_columns]

# Display the first few rows of the filtered DataFrame
print(filtered_df.head())
# Matplotlib: When I plotted using Matplotlib to check if the median has a tail, I got the error "FutureWarning: is_categorical_dtype is deprecated and will be removed in a future version. Use isinstance(dtype, CategoricalDtype) instead". How can I bypass this?
To resolve this issue, you can try the following methods:
Upgrade Pandas:
You can resolve this by installing the latest version of Pandas. Execute the following command in a Jupyter code cell:
!pip install --upgrade pandasSuppress Warnings:
If you prefer not to change your Pandas version, you can suppress the warnings in your code:
import warnings
import pandas as pd

# Suppress FutureWarning messages
warnings.simplefilter(action='ignore', category=FutureWarning)
# Reproducibility in different OS
When trying to rerun the Docker file in Windows, as opposed to developing in WSL/Linux, I encountered the following error:
Warning: Python 3.11 was not found on your system…

Neither ‘pipenv’ nor ‘asdf’ could be found to install Python.

You can specify specific versions of Python with:

$ pipenv –python path\to\python
The solution was to add the Python 3.11 installation folder to the PATH, restart the system, and run the Docker file again. This solved the error.
# Deploying to Digital Ocean
You may quickly deploy your project to DigitalOcean App Cloud. The process is relatively straightforward. The deployment costs about 5 USD/month. The container needs to be up until the end of the project evaluation.
Steps:
- Register in DigitalOcean.
- Go to Apps -> Create App.
- Choose GitHub as a service provider.
- Edit Source Directory (if your project is not in the repo root).
- IMPORTANT: Go to settings -> App Spec and edit the Dockerfile path so it looks like
./project/Dockerfilepath relative to your repo root. - Remember to add model files if they are not built automatically during the container build process.
# Is it best to train your model only on the most important features?
Not necessarily. While some features may show higher importance, it's essential to consider the predictive value of all features. Here are a few guidelines:
- Evaluate Predictive Value: Include features that offer additional predictive value. Test your model with and without certain features. If excluding a feature decreases performance, it should be retained.
- Correlation Consideration: Some important features might be highly correlated with others. It may be fine to drop some correlated features if they do not improve model performance.
- Feature Selection Algorithms: Consider using feature selection methods like L1 regularization (Lasso), which implicitly selects features by shrinking some weights to zero.
Refer to the lessons in week 3 of the churn prediction project for more insights, especially around feature importance for categorical values. Specifically, lesson 3.6 discusses mutual info scores, and lesson 3.10 demonstrates training a Logistic Regression model on all categorical variables.
# How can I work with very large datasets, e.g. the New York Yellow Taxi dataset, with over a million rows?
You can consider several different approaches:
Sampling: In the exploratory phase, you can use random samples of the data.
Chunking: When you do need all the data, you can read and process it in chunks that do fit in the memory.
Optimizing data types: Pandas’ automatic data type inference (when reading data in) might result in, e.g.,
float64precision being used to represent integers, which wastes space. You might achieve substantial memory reduction by optimizing the data types.Using Dask: An open-source Python project which parallelizes Numpy and Pandas.
See, e.g., this blog on Vantage AI
# Can I do the course in other languages, like R or Scala?
Technically, yes. Advisable? Not really. Here are the reasons:
- Some homework assignments require specific Python library versions.
- Answers may not align with multiple-choice questions if using languages other than Python 3.10 (the recommended version for the 2023 cohort).
- For midterms or capstones, your peer-reviewers may not know these other languages, which could lead to issues in scoring and feedback.
- While you can create a separate repository using the course lessons in other languages for personal learning, it is not recommended for official submissions.
# Is use of libraries like [fast.ai](http://fast.ai/) or Huggingface allowed in the capstone and competition, or are they considered to be "too much help"?
Yes, it’s allowed.
# Docker: Flask image was built and tested successfully, but tensorflow serving image was built and unable to test successfully. What could be the problem?
The TF and TF Serving versions have to match.
For Module 10.3, if you are on Apple Silicon and you encounter the following error when trying to run TF-Serving locally with Docker:
/usr/bin/tf_serving_entrypoint.sh: line 3: 7 Illegal instruction tensorflow_model_server --port=8500 --rest_api_port=8501 --model_name=${MODEL_NAME} --model_base_path=${MODEL_BASE_PATH}/${MODEL_NAME} "$@"
You may find a solution in this GitHub comment.
Docker release 4.35.0 for Mac introduces Docker VMM Beta, a replacement for the Apple Virtualisation Framework using Rosetta. You can now run the native TF Serving image.
# Any advice for adding the Machine Learning Zoomcamp experience to your LinkedIn profile?
I've seen LinkedIn users list DataTalksClub as Experience with titles such as:
- Machine Learning Fellow
- Machine Learning Student
- Machine Learning Participant
- Machine Learning Trainee
It is advised not to list this experience as an official job or internship since DataTalksClub did not hire or financially compensate you.
Consider incorporating the experience in the following sections:
- Organizations
- Projects
- Skills
- Featured
- Original posts
- Certifications
- Courses
Interesting suggestion: Add the link of your project to your CV as a showcase and make posts to show your progress.
# How do I install extra packages on Google Colab or Kaggle?
In a notebook cell, prefix pip install with !:
!pip install tensorflow[and-cuda]==2.14
For packages with extras you want installed silently, use -q:
!pip install -q xgboost==2.1.0
Restart the runtime if a package overrides one that's already imported (Runtime → Restart runtime).
# If you are working in the terminal on your computer in WSL and you want to go to the directory in Explorer to upload to GitHub, what command should you use?
Use the following command:
explorer.exe .
This command opens the current directory in Windows Explorer.
Alternatively, you can sync through VSCode to GitHub.
# Random seeds give different results between Jupyter local, Colab, and other machines — even with random_state=42
Numerical results can differ across:
- sklearn / numpy / pandas versions (algorithm internals or default parameters change between versions).
- Python versions (especially 3.8 vs 3.11).
- BLAS / linear-algebra backends (MKL vs OpenBLAS) on different OSes/CPUs.
Pin package versions (requirements.txt / Pipfile.lock / uv.lock) for reproducibility, and accept that the homework lets you "select the closest option" precisely because of this. Setting random_state doesn't eliminate cross-environment differences.
# How do I convert a Jupyter notebook to a .py script?
From the command line:
jupyter nbconvert --to script notebook.ipynb
# or
uv run jupyter nbconvert --to script notebook.ipynb
In JupyterLab: File → Save and Export Notebook As → Executable Script.
# GitHub 429: Too Many Requests when downloading a CSV via wget / pd.read_csv(url)
GitHub rate-limits unauthenticated requests by IP. Workarounds:
- Wait a few minutes and retry.
- Click the "Raw" button in the browser, save the file manually, then load it from disk.
- Add a User-Agent header:
wget --user-agent="Mozilla/5.0" <url>. - Switch network or use a VPN.
For repeatable use, download once and commit the data file (or read from a cached local copy).
# Pandas ParserError: Expected 1 fields in line N, saw M when reading a CSV downloaded with wget
wget saved an HTML page (the GitHub web view), not the actual CSV. Use the raw GitHub URL:
https://raw.githubusercontent.com/<user>/<repo>/<branch>/<path>.csv
NOT https://github.com/<user>/<repo>/blob/... — that serves an HTML page. Verify with head data.csv — if you see HTML tags, you have the wrong URL.
# Python 3.13 / 3.14 breaks my code (sklearn / numpy / etc.)
Pin to Python ≤ 3.12 for now. Python 3.13 introduced free-threaded (no-GIL) builds and 3.14 made significant changes that some ML libraries haven't caught up with.
The course officially recommends Python 3.11. If you've already upgraded, the easiest fix is uv python install 3.11 (or pyenv install 3.11) and pin the project to that version.
# My homework answer doesn't match any of the options
Common causes, in order of frequency:
- Wrong column slice or filter — apply filters BEFORE selecting columns /
.head(n)/.values. - Log transform applied where it shouldn't be (or not applied where it should).
- Rounding too early — only round the final answer, not intermediate values, unless explicitly told to.
- Different sklearn / numpy / Python versions — pin them via
requirements.txt,Pipfile.lock, oruv.lock. - Different train/val/test split logic —
train_test_splitshuffles by default; manualnp.random.shuffleproduces a different ordering than sklearn's.
If after these checks your answer still doesn't match, pick the closest option — the homework explicitly allows it.